Moisture testing is non-negotiable before applying a polyurea concrete floor coating. Skipping it can lead to peeling, delamination, and costly failures – issues that cost U.S. businesses nearly $1 billion annually. Even if the concrete seems dry, hidden moisture can compromise adhesion, degrade coatings, and encourage mold growth.
Here’s a quick guide to ensure accurate moisture testing:
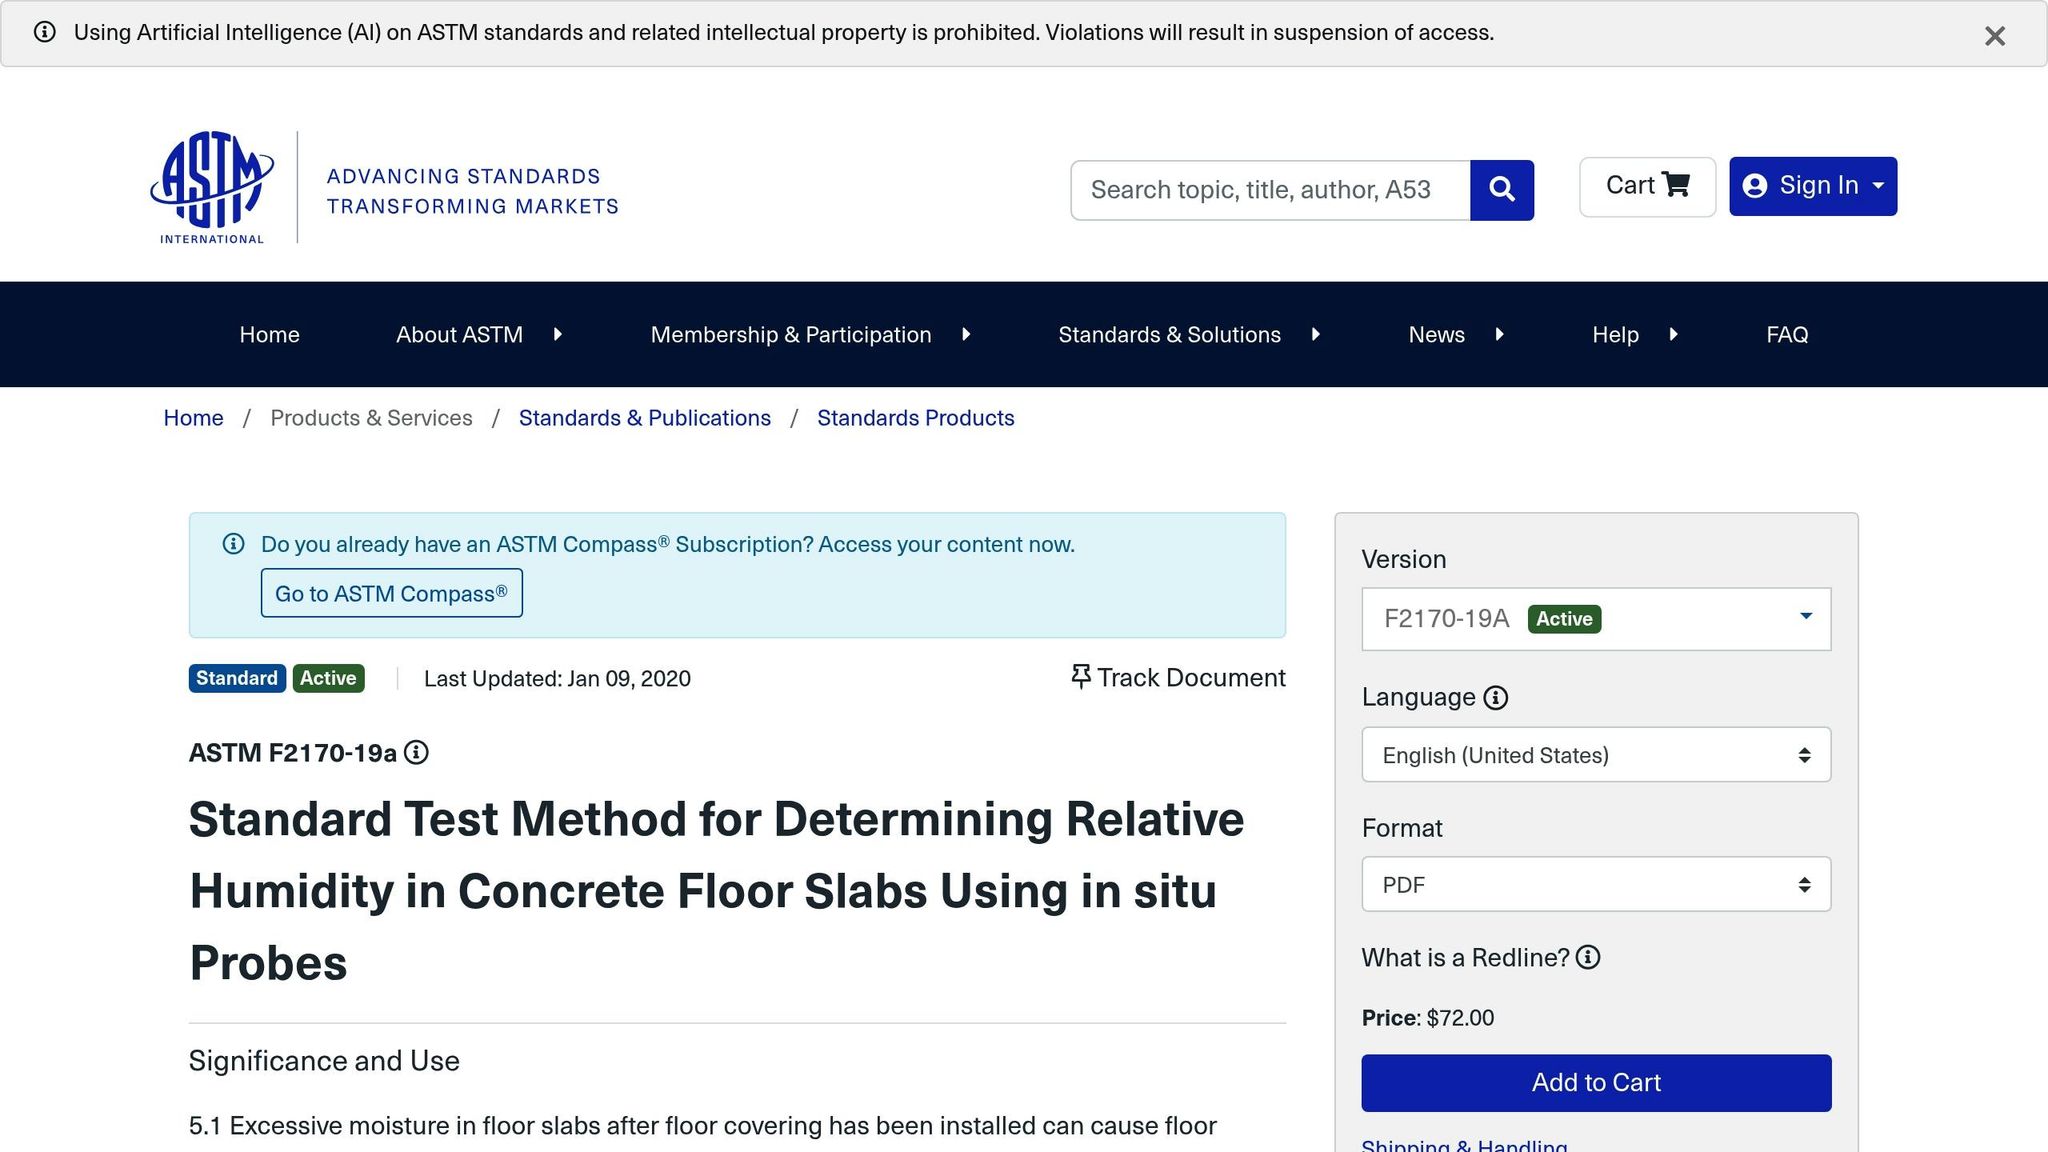
- Use the Right Tools: RH probes (ASTM F2170), electronic meters (ASTM F2659), and calcium chloride kits (ASTM F1869) are essential. Ensure tools are calibrated and maintained properly.
- Prepare Thoroughly: Stabilize the environment for 48 hours, identify test locations, and calculate hole depths (40% for one-sided drying, 20% for two-sided).
- Follow ASTM Standards: Drill dry, clean holes thoroughly, and allow sensors to equilibrate for at least 24 hours.
- Document Everything: Record RH readings, slab conditions, and sensor details to comply with ASTM F2170 and avoid liability risks.
If moisture levels exceed acceptable limits (usually 75% RH), options include allowing more drying time, applying a moisture mitigation system, or using moisture-tolerant primers. Proper preparation and testing are critical to ensuring a durable, long-lasting floor coating.
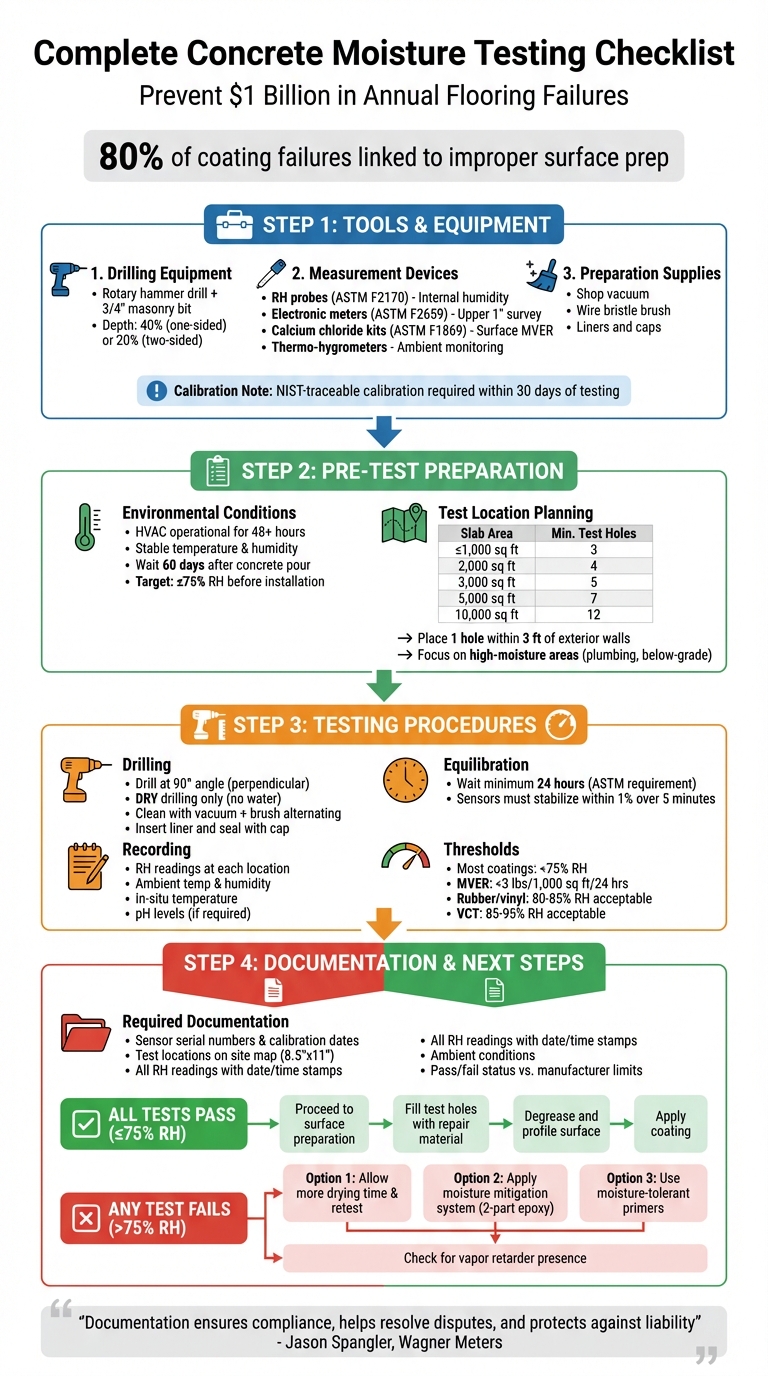
Complete Concrete Moisture Testing Checklist: 4-Step ASTM F2170 Process
10 Steps for Mastering ASTM F2170
sbb-itb-4b4bb37
Tools and Equipment Needed for Moisture Testing
Accurate moisture testing relies on following ASTM F2170 methods and using the right tools. According to Jason Spangler, Sales Manager at Wagner Meters, ASTM F2170 RH testing is the preferred method for monitoring moisture levels in concrete slabs. To get reliable results, you’ll need drilling tools, measurement devices, and preparation supplies. Here’s a breakdown of the essential tools and how to ensure they’re properly calibrated.
Required Tools and Their Functions
To stay organized, group your tools into three main categories: drilling equipment, measurement devices, and preparation tools.
- Drilling Equipment: A rotary hammer drill with a 3/4-inch masonry bit is essential for creating test holes. The depth of these holes depends on the slab’s thickness: 40% for one-sided drying and 20% for two-sided drying. For example, if you’re working with a 5-inch slab that dries from one side, you’ll need to drill to a depth of 2 inches.
- Measurement Devices: In situ RH probes are the go-to for measuring internal relative humidity within the slab. These probes, used with liners and caps, provide accurate moisture readings while isolating the sensors from outside conditions during the 24-hour equilibration period. Thermo-hygrometers are also critical, as they monitor ambient temperature and humidity to confirm the environment has stabilized for at least 48 hours before testing starts.
- Preliminary Testing Tools: Non-destructive electronic moisture meters (ASTM F2659) are useful for surveying the slab’s upper 1.0 inch. These handheld devices help identify "hot spots" but can sometimes give false readings if metal rebar interferes. Additionally, calcium chloride test kits (ASTM F1869) measure surface moisture vapor emission rates. However, they aren’t suitable for lightweight concrete and only capture shallow moisture levels.
- Preparation Supplies: A shop vacuum and wire bristle brush are critical for clearing dust and debris from drilled holes. This step ensures proper sensor contact and improves the accuracy of your readings.
Each tool plays a specific role in meeting ASTM standards for reliable moisture testing.
| Tool Type | ASTM Standard | Depth of Measurement | Primary Function |
|---|---|---|---|
| RH Probes (In situ) | F2170 | 20% or 40% of slab depth | Quantitative internal humidity measurement; predicts dryness |
| Electronic Meters | F2659 | Upper 1.0 inch | Preliminary survey; identifies moisture "hot spots" |
| Calcium Chloride | F1869 | Surface/Shallow | Measures moisture vapor emission rate (MVER); not for lightweight concrete |
Calibrating and Maintaining Your Tools
Proper calibration is key to ensuring your tools provide accurate results. Sensors should have NIST-traceable calibration, performed annually by the manufacturer or more frequently if conditions demand it. Additionally, sensors must be recalibrated within 30 days of testing.
"The manufacturer should calibrate reusable sensors at least once per year or more often if exposed to conditions that may impact their accuracy. All sensors must be calibrated no less than 30 days before use".
To verify sensor accuracy, check that RH readings do not drift by more than 1% over five minutes. If they do, the sensor may not be equilibrated or could be faulty. Modern wireless systems, like the Wagner Meters DataMaster L6 app, simplify the process by syncing RH data via Bluetooth, reducing manual errors and ensuring ASTM-compliant reporting.
When preparing test holes, alternate between vacuuming and brushing to remove all debris. Then, seal each hole with a liner that isolates the sensor from ambient conditions during the equilibration period. Always follow the manufacturer’s instructions for this step to maintain accuracy.
Pre-Test Preparation Steps
Before drilling, ensure that both the surrounding environment and slab conditions meet the necessary specifications. Skipping these steps can lead to unreliable results and potential delays.
Check Environmental Conditions
The building’s HVAC system should be fully operational, maintaining normal temperature and humidity levels. Both the air and the concrete slab must remain stable under these conditions for at least 48 hours prior to testing.
To prevent fluctuating relative humidity (RH) readings, the ambient temperature must stay consistent during this 48-hour period. Use tools like a thermo-hygrometer or data logger to monitor and confirm stability.
"Section 9 of the standard requires that the slab and the ambient air above it must be at service conditions for a minimum of 48 hours before testing." – Jason Spangler, Rapid RH Product Sales Manager, Wagner Meters
The MFMA advises waiting at least 60 days after the concrete is poured before testing moisture content. Testing too soon often results in high moisture readings, which can delay installation work. Additionally, the MFMA recommends that RH levels remain at or below 75% before installing synthetic flooring.
Select Test Locations and Calculate Test Quantity
ASTM F2170 specifies that three test holes are required for the first 1,000 square feet, with one additional test for every extra 1,000 square feet. For example, a 3,000-square-foot project requires five test holes, while a 10,000-square-foot area needs at least 12.
Choose test locations that provide a thorough assessment of moisture levels across the slab. Pay close attention to areas likely to retain more moisture, such as near plumbing, below-grade sections, or thicker parts of the slab. ASTM F2170 also mandates placing at least one test hole within 3 feet of each exterior wall.
| Slab Area (sq. ft.) | Minimum Number of RH Test Holes Required |
|---|---|
| 1,000 or less | 3 |
| 2,000 | 4 |
| 3,000 | 5 |
| 5,000 | 7 |
| 10,000 | 12 |
Document the number and placement of sensors on a floor plan for your final report. Tools like the DataMaster L6 app can assist by automatically calculating sensor requirements based on your square footage.
Once you’ve mapped the locations and determined the number of holes, the next step is calculating the correct drilling depth for each test.
Determine Test Hole Depth
After confirming environmental conditions and planning test locations, adjust the drilling depth based on the slab’s drying conditions. The depth is calculated as a percentage of the slab’s total thickness, depending on whether it is drying from one or two sides. For one-sided drying, drill to 40% of the slab’s thickness; for two-sided drying, drill to 20%.
"The test hole depth is not a fixed depth, but it must be calculated based on slab thickness and the number of drying sides: drilling a hole 40% of the slab thickness if it is drying from one side only, or 20% of the slab thickness if it is drying from two sides." – Jason Spangler, Rapid RH Product Sales Manager, Wagner Meters
Measure the slab thickness carefully, including any flooring residue, to ensure accurate depth calculations.
Testing Procedures
Once you’ve determined the hole depths and pinpointed test locations, it’s time to move on to the actual testing process. Adhering to ASTM F2170 specifications during drilling, preparation, and measurement is crucial for obtaining reliable results.
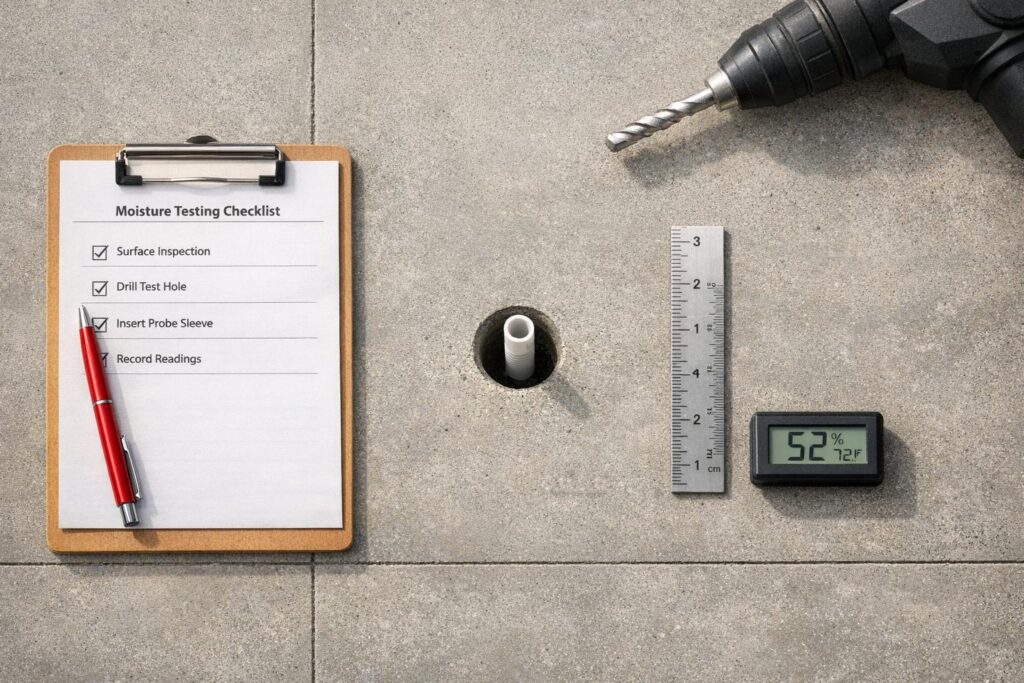
Drill and Prepare Test Holes
Using a rotary hammer drill equipped with a 3/4-inch masonry bit, drill each test hole at a perfect 90° angle. Dry drilling is mandatory – avoid using water for cooling, as it can interfere with the test results.
"Holes must be drilled dry and perpendicular (90°). Do not use water for cooling or lubrication, as this can affect the test results." – David Gross, Executive Director, INSTALL
After reaching the required depth, clean the hole by alternating between vacuuming and brushing to remove all dust and debris. Then, insert the ASTM-specified liner, ensuring the RH sensor is positioned at the bottom. Seal the hole with a cap, and label your floor plan with the sensor’s serial number decal to match the test location. This step ensures precise tracking. Once sealed, the test holes are ready for the equilibration phase.
Wait for Equilibration
Allow the sensors to remain sealed for at least 24 hours before taking any readings. This equilibration period was reduced from the previous 72-hour requirement in earlier versions of ASTM F2170. While some sensors can provide preliminary readings within an hour for scheduling purposes, these are not ASTM-compliant. The full 24-hour waiting period is mandatory for accurate results.
Record RH and MVER Readings
After the equilibration period, take your RH readings and ensure they stabilize within 1% over a five-minute span. For calcium chloride tests (MVER), measure the moisture emitted from the slab over a 24-hour period.
Keep in mind the following thresholds:
- RH levels should stay below 75% for most coatings.
- MVER results should not exceed 3 lbs per 1,000 sq. ft. per 24 hours.
Different flooring materials have varying moisture tolerances. Rubber and vinyl flooring can usually handle 80–85% RH, while VCT may allow for 85–95% RH. Proper documentation of these readings is essential for compliance and decision-making.
Recording and Reporting Test Results
Keeping detailed records of test results is a critical step to ensure ASTM F2170 compliance and minimize liability risks. Jason Spangler, Rapid RH Product Sales Manager at Wagner Meters, emphasizes this point:
"Documentation ensures compliance, helps resolve disputes, and protects against liability".
Accurate documentation safeguards the integrity of the moisture testing process and provides a clear trail of accountability.
Data to Record
After completing the testing procedures, it’s important to document all relevant data to support your compliance report. Here’s what you should include:
- General Information: Total slab area, number of test holes, slab thickness, and the pre-determined hole depth (40% depth for one-sided drying, 20% for two-sided drying).
- Environmental Conditions: Ambient temperature and relative humidity of the testing area.
- Sensor Details: Serial numbers, locations, and calibration dates for each sensor used.
- Test Readings: Date and time of each reading, in-situ relative humidity (RH) percentage, and in-situ temperature at the sensor depth.
- Equilibration Check: Confirm that the RH reading stabilizes within 1% over five minutes to verify proper equilibration.
- Surface pH Levels: If required by the coating manufacturer, record the surface pH level near each test site.
Report Format Example
To present the data clearly, use a table format that includes a pass/fail indicator based on the coating manufacturer’s moisture tolerance. Here’s an example:
| Test ID | Location | Date/Time | Slab Thickness | Hole Depth | Ambient Temp/RH | In-Situ RH (%) | In-Situ Temp | pH Level | Manufacturer Limit | Pass/Fail |
|---|---|---|---|---|---|---|---|---|---|---|
| 001 | NW Corner | 02/12/26 9:00 AM | 5.0" | 2.0" | 72°F / 45% | 68% | 71°F | 8.5 | 75% | Pass |
| 002 | Center | 02/12/26 9:15 AM | 5.0" | 2.0" | 72°F / 45% | 73% | 72°F | 8.2 | 75% | Pass |
| 003 | Near Ext. Wall | 02/12/26 9:30 AM | 5.0" | 2.0" | 72°F / 45% | 78% | 70°F | 8.7 | 75% | Fail |
Additionally, include an 8.5" x 11" site map that shows where each test hole is located.
Using Bluetooth-enabled sensors paired with mobile apps like DataMaster L6 can simplify the process by automatically syncing readings. This reduces the chance of manual entry errors and helps maintain data accuracy. If any test fails, the entire floor area is deemed noncompliant. These comprehensive records are essential for making quick and informed decisions about the next steps.
Next Steps After Testing
Once you’ve documented your moisture test results, it’s time to decide your next move. If all tests pass, you can proceed directly to coating installation. However, if any test fails, take a moment to address the issue before moving on to surface preparation.
Handling Failed Tests
What happens if your moisture readings exceed the acceptable 75% RH? You’ve got a few options:
- If the readings are only slightly above the limit, allow more drying time and retest the area.
- Check whether a vapor retarder was installed when the slab was poured.
Jason Spangler, Rapid RH Product Sales Manager at Wagner Meters, offers this advice:
"If the slab was poured without a vapor retarder, the best way to move forward is to seal the concrete to keep the moisture from interacting with the flooring".
If no vapor retarder exists, sealing the concrete becomes essential. Use a two-part epoxy moisture mitigation coating to create a barrier and prevent moisture from affecting the final floor finish. For contractors juggling multiple projects, tools like Floorcloud enable remote monitoring of slab drying progress, saving time and unnecessary site visits.
Preparing for Floor Coating Installation
Once you’ve resolved any failed tests or confirmed all tests passed, shift your attention to surface preparation. Proper surface prep is critical for a successful coating application. In fact, nearly 80% of floor coating failures are linked to improper surface preparation.
Start by filling all test holes with low-shrinkage concrete repair material to avoid future bonding issues. Next, eliminate any oil or grease contamination using degreasers and stiff bristle brushes. To ensure the surface is clean, perform a water bead test: if water beads up instead of soaking in, additional degreasing is necessary.
Then, check the surface texture. If it feels smooth, like polished stone, you’ll need to create a mechanical profile for proper adhesion. This can be done through methods like acid etching with muriatic acid, pressure washing, or blast cleaning.
Atlas Concrete Coatings follows a thorough surface preparation process, including filling test holes, degreasing, and profiling, to deliver durable and reliable results across residential, commercial, and industrial projects.
Conclusion
Moisture testing is the bedrock of ensuring your concrete floor coating stands the test of time. With moisture-related flooring failures racking up nearly $1 billion annually in the United States, sticking to a thorough testing checklist is key to avoiding costly mistakes.
Getting accurate results means testing at the right depth, allowing the slab to equilibrate, and keeping detailed records of every reading. As Jason Spangler from Wagner Meters explains:
"Testing moisture in concrete slabs isn’t just a box to check – it’s crucial for preventing costly flooring failures".
If moisture levels are too high, you’re not out of options. You can extend drying time, use moisture mitigation systems, or choose primers designed to handle high-moisture environments. The critical step is understanding the moisture levels before committing to a coating.
Atlas Concrete Coatings takes this process seriously by using ASTM F2170 moisture testing to ensure their polyurea-based floor coatings perform as intended. By confirming moisture levels, prepping surfaces correctly, and selecting materials suited to the environment, they consistently deliver durable solutions for residential, commercial, and industrial spaces.
FAQs
What is the best moisture test for my slab?
The in situ relative humidity (RH) test is considered the most dependable method for checking moisture levels in your slab. Supported by ASTM F2170 standards, this approach is known for its precise and consistent results when measuring concrete moisture.
How do I know my RH readings are reliable?
To get accurate RH readings, it’s crucial to test under the right conditions and use the appropriate techniques. Start by clearing away any dust or debris from drilled areas to avoid interference. When collecting readings, handle them with care to ensure precision. Following proper preparation and sticking to established testing protocols will help you achieve reliable results consistently.
What should I do if the slab is above 75% RH?
If the slab’s moisture level goes above 75% RH, action is necessary to bring it down before flooring installation. Excess moisture can cause flooring issues, including damage over time. This might involve extra drying processes or using moisture control techniques to ensure the flooring is installed correctly and lasts as intended.