Proper surface preparation is the foundation for successful polyurea coatings. Without it, even the best coatings can fail, leading to peeling, blistering, or delamination. Here’s what you need to know:
- Why it matters: Surface prep ensures strong adhesion, durability, and a smooth finish, helping polyurea coatings last 15–20 years, even in high-traffic areas.
- Key steps:
- Inspect the surface: Look for cracks, spalling, oil stains, and moisture issues.
- Test for moisture and porosity: Use ASTM-standard tests to identify vapor risks and confirm the surface is ready for coating.
- Clean thoroughly: Remove debris, grease, and old coatings with industrial tools like grinders and pressure washers.
- Repair and profile: Fix cracks and spalled areas, then mechanically profile the surface to create the right texture (ICRI CSP 2–3).
- Final checks: Ensure the surface is clean, dry, and meets all environmental conditions before applying the coating.
Skipping these steps can lead to costly failures, but proper preparation ensures a durable, low-maintenance surface that performs for years.

5-Step Surface Preparation Process for Polyurea Coatings
HOW TO APPLY POLYUREA IN 5 STAGE ? #polyurea #ındustry #chemical
Assessing and Testing the Concrete Surface
Properly evaluating the concrete surface is a crucial first step in ensuring the success of polyurea coatings. A thorough assessment helps identify potential issues like moisture, contaminants, or weak spots in the concrete that could compromise adhesion and long-term performance.
Visual Inspection and Identifying Surface Defects
Start with a comprehensive visual inspection. Confirm that the concrete slab has cured for at least 28 days at 70°F (21°C). Slabs that haven’t fully cured may still release moisture, which can cause blistering under the coating.
Carefully examine the surface for defects such as hairline cracks, larger structural cracks, spalling, pitting, bug holes, and joint damage. In residential garages, you’re likely to encounter tire marks and oil stains from vehicles. Mark these problem areas for repair: fill cracks, grind and patch spalled sections, and degrease any oil-stained spots.
Also, check for any existing coatings or sealers. Run your hand across the surface – if it feels slick or shiny, or if water beads on it, there may be an old epoxy or sealer present. These must be completely removed to avoid delamination issues.
Once the visual inspection is complete, move on to moisture testing to address potential vapor-related problems.
Moisture Testing and Vapor Emission Checks
Moisture is a critical factor in the success of polyurea coatings. Even fast-curing systems can fail if vapor pressure builds beneath the surface. Start with basic qualitative tests and follow up with precise quantitative methods.
The plastic sheet test (ASTM D4263) offers a simple way to check for moisture. Tape a 2-foot square of clear plastic to the concrete and leave it for 24 hours. If condensation or dark spots appear, moisture is present. This method is especially helpful in regions with high humidity, like Florida, or in moisture-prone areas such as basements.
For more detailed measurements, use the calcium chloride test (ASTM F1869), which determines the moisture vapor emission rate. Aim for readings under 3–5 lbs per 1,000 square feet over 24 hours. For newer slabs or greater accuracy, use in-slab relative humidity probes (ASTM F2170). Insert the probes at about 40% of the slab depth; the relative humidity should stay below 75–80%. If moisture levels exceed 8%, apply a moisture-barrier primer before proceeding.
Porosity and Contamination Checks
Once moisture levels are addressed, test the surface porosity to ensure proper adhesion. Use the water drop test: place 4–5 drops of water on different spots and wait for 60 seconds. If the water beads, the surface may be sealed. You can confirm this by lightly misting the area with a spray bottle – if the water sheets off, the surface will need mechanical profiling.
To check for oil contamination, perform a solvent rub test. Wipe suspected areas with a solvent-soaked rag. If black residue appears, grease or oil is present and must be removed. In high-traffic areas like warehouses, burnished surfaces from heavy equipment often fail these tests and may require shot blasting to restore the correct texture.
Atlas Concrete Coatings follows a meticulous testing process for every project. They use tools like moisture meters, relative humidity probes, and field tests to ensure the surface is fully prepared before applying their polyurea coatings. This attention to detail is essential for delivering durable results that meet the demands of residential, commercial, and industrial clients.
Cleaning and Decontaminating the Surface
After testing is complete and any potential issues are identified, the next step is thorough cleaning. This step is critical because even small amounts of grease, oil, or debris can interfere with adhesion, causing polyurea coatings to peel or delaminate. Proper cleaning ensures a strong bond, which is essential for the coating’s durability.
Removing Debris and Laitance
Start by sweeping the surface to remove loose dirt and debris. Follow this with a HEPA vacuum to pick up fine dust that sweeping alone can’t eliminate.
Next, tackle laitance, which is a weak, chalky layer of cement paste that often forms on concrete surfaces. This layer can prevent proper mechanical bonding. Use a scraper to remove any visible laitance, working methodically across the entire area. If the laitance is widespread, mechanical profiling methods like grinding or shot blasting are necessary to expose fresh, porous concrete that will bond better with the coating.
Once debris and laitance are cleared, the focus shifts to addressing grease and other stains.
Degreasing and Stain Removal
Oil, grease, and tire marks are common in garages and industrial spaces, and they can prevent polyurea from adhering properly. To remove these contaminants, apply an alkaline degreaser such as TSP (trisodium phosphate) or commercial products like Krud Kutter to the affected areas. Scrub the areas vigorously with a stiff brush, then rinse with a pressure washer set to 3,000–4,000 PSI. This process helps to emulsify and flush out oils.
After pressure washing, perform a water break test to check for residual contaminants. Water should spread evenly across the surface; if it beads up, further degreasing is needed. For stubborn stains that resist chemical cleaning, mechanical grinding or a poultice method using absorbent materials can help draw out deeply embedded contaminants.
Once the surface is free of stains and grease, the next step is to remove any old coatings or curing compounds.
Old Coating and Curing Compound Removal
Existing coatings, sealers, or curing compounds act as barriers to adhesion and must be stripped away. For thin sealers, diamond grinding is typically sufficient to create the required surface profile (ICRI CSP 2-3). For thicker coatings, more aggressive methods like shot blasting or scarifying are needed. These methods can achieve CSP 3-5 profiles while simultaneously removing contaminants.
Shot blasting is especially effective for large commercial or industrial spaces, as it removes old materials and profiles the surface in one step. Be sure to use overlapping passes to ensure even removal. Afterward, vacuum the area with an industrial HEPA vacuum to remove any remaining dust or particles. To confirm the surface is clean, perform a tape test by pressing duct tape firmly onto the surface and pulling it off. If no dust or concrete particles stick to the tape, your surface is ready.
Atlas Concrete Coatings emphasizes the importance of professional cleaning and decontamination for every polyurea installation. Their team uses industrial-grade equipment and strict protocols to ensure surfaces are entirely free of contaminants before applying their durable polyurea coatings.
With the surface now thoroughly cleaned and decontaminated, the next step is to move on to repairs and profiling to further prepare for the coating application.
sbb-itb-4b4bb37
Repairing and Profiling the Concrete
Once the surface is cleaned and decontaminated, the next step is addressing structural issues and preparing the surface texture to ensure the polyurea coating adheres properly. Even small imperfections can weaken the coating’s performance, so this phase demands precision and thoroughness.
Repairing Cracks, Joints, and Spalled Areas
Start by identifying structural cracks and loose edges that need fixing, while leaving control joints untouched. Control joints are deliberate, straight cuts in the concrete designed to manage movement and are typically left open or re-cut after the coating process. Irregular cracks or areas with loose edges, however, must be repaired.
For cracks wider than 1/8 inch, use a crack chaser or diamond blade to create a V- or U-shaped groove about 1/4 to 1/2 inch wide and deep. This exposes solid concrete and provides a mechanical key for the repair material. Once grooved, vacuum the area and clear out dust with oil-free compressed air. If the crack is particularly wide, insert a foam backer rod to control the depth of the filler.
Fill the prepared crack with a polyurea or epoxy crack filler compatible with your coating system. Polyurea is often preferred because it chemically bonds with the concrete and offers flexibility to handle thermal expansion, reducing the risk of future cracks. Slightly overfill the crack, allow the filler to cure (fast-setting polyureas often cure in 15–45 minutes at 70°F), and grind the repair flush with the surrounding surface.
For spalled areas, where the concrete has chipped or flaked, cut back to solid material and patch the area using epoxy mortar or polymer-modified cement. Let these repairs cure completely before moving forward.
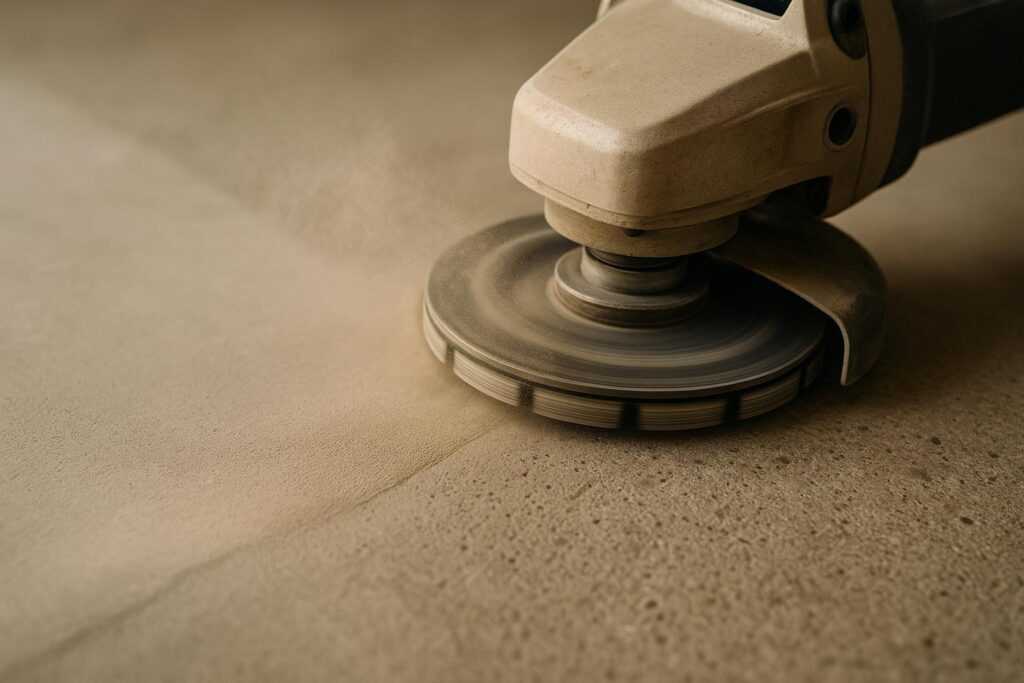
Mechanical Surface Profiling
Surface profiling is crucial for creating the rough texture that allows the polyurea to grip the concrete. Diamond grinding and shot blasting are the go-to methods, as they provide consistent results compared to acid etching, which can trap salts and compromise adhesion.
Diamond grinding uses rotating diamond segments to create a smooth, level profile, making it an ideal choice for residential floors. Shot blasting, in contrast, uses steel shot to aggressively clean and texture the surface, which is great for removing weak layers and achieving a deeper profile for industrial applications.
Most polyurea systems call for an ICRI CSP 2–3 profile, which is similar to the texture of 60-grit sandpaper. Diamond grinding with 16–40 grit metal-bond diamonds typically achieves a CSP 1–3 profile, while shot blasting can create a CSP 3–6 depending on the equipment settings and shot size. Always check the technical data sheet for your product to confirm the required profile.
In enclosed areas, ensure safety by using OSHA-compliant dust collectors with HEPA filters and wearing NIOSH-approved personal protective equipment (PPE), such as respirators, safety glasses, and hearing protection. Companies like Atlas Concrete Coatings use integrated vacuum systems and full PPE to meet U.S. safety standards while keeping job sites clean.
Dust Removal After Profiling
After profiling, it’s critical to remove all dust from the surface. Even a fine layer of dust can act as a barrier, causing blistering, pinholes, or delamination in the primer or topcoat.
Use a HEPA-filter industrial vacuum to thoroughly clean the surface, making multiple passes to ensure all embedded dust is removed. Pay close attention to edges, joints, and repaired cracks, using crevice tools to clean out trapped debris. After vacuuming, follow up with a dry microfiber mop to eliminate any remaining dust film.
To confirm the surface is clean, wipe it with a white cloth or glove. If no dust is visible, the surface is ready for primer and polyurea application. With repairs complete and dust eliminated, the floor is now prepped for final inspection and the next steps in the coating process.
Pre-Coating Inspection and Quality Assurance
Before applying polyurea, it’s crucial to perform a thorough pre-coating inspection to ensure the surface and environmental conditions meet all application requirements. Since polyurea cures quickly, there’s little room for error once the process begins. Skipping this step can lead to defects, and many warranty claims or callbacks are traced back to missed steps, such as neglecting to check moisture levels or dew-point conditions.
Environmental and Substrate Condition Checks
Start by measuring ambient temperature and relative humidity with a digital hygrometer. Use an infrared or contact thermometer to check the concrete temperature at various spots, especially near doors, walls, and cold joints. Ensure the substrate temperature is at least 5°F (3°C) above the dew point. Most polyurea systems perform best within an ambient and concrete temperature range of 50–90°F (10–32°C), with an ideal range around 60–80°F (15–27°C), and relative humidity below 80–85%. Always refer to the manufacturer’s technical data sheet for specific guidelines and postpone work if conditions fall outside these parameters. Document these measurements with time stamps in a pre-application checklist to confirm compliance before spraying.
Verify that all crack fillers, patch mortars, and primers are fully cured, free from tackiness, and still within their recoat window as specified by the manufacturer. Some companies, like Atlas Concrete Coatings, maintain detailed project sheets that log slab age, moisture test results, and repair products used prior to polyurea application.
Once environmental and substrate conditions are confirmed, move on to checking the surface for cleanliness and proper texture.
Surface Cleanliness and Profile Verification
Inspect the surface by wiping random spots with a clean white cloth. Any gray residue or damp areas indicate the need for additional cleaning.
To confirm the surface texture, compare it to ICRI concrete surface profile (CSP) chips or replica cards. Thin-mil polyurea systems typically require a CSP of 2–3. Run a gloved hand over the surface to detect any smooth or glossy patches that may need further grinding. Professional installers often take photos of the CSP alongside ICRI reference chips to document the surface preparation, especially for commercial or industrial projects.
After confirming cleanliness and texture, perform adhesion tests to finalize the pre-coating inspection.
Adhesion and Compatibility Tests
Conduct a cross-hatch tape test on a primed area. Once the test coat has cured, cut a 6×6 grid down to the substrate, apply adhesion tape, and pull it off at a 180° angle. Minimal to no coating removal within the grid is considered acceptable. If significant flaking or bare concrete is exposed, it may indicate inadequate surface preparation, moisture issues, or improper primer selection.
For unusual substrates, new products, or borderline conditions, apply trial patches to test system performance. These mock-ups should include the full system – primer, basecoat, chips (if applicable), and topcoat – over an area of at least 10–25 square feet. Evaluate adhesion using tape pulls or small pull-off tests, and inspect for uniformity, color consistency, and any signs of defects like blistering, pinholes, outgassing, or amine blush after curing. Companies like Atlas Concrete Coatings often use mock-ups to gain owner approval for aesthetics and confirm compatibility before large-scale installations in garages or commercial spaces.
With the environmental conditions verified, the surface cleaned and textured, and adhesion tests completed, the floor is ready for the polyurea application process.
Conclusion
The quality of a coating depends entirely on the surface it’s applied to – this idea shapes every step of the process. With polyurea’s rapid cure time, careful preparation is non-negotiable. Skipping steps like inspection, moisture testing, cleaning, repairs, or surface profiling can lead to peeling, blistering, or delamination in mere months, rather than delivering decades of reliable performance.
Each stage of preparation plays a critical role in ensuring a strong bond. Moisture testing helps identify vapor issues, cleaning removes contaminants, profiling enhances mechanical adhesion, and environmental checks – like confirming the temperature is at least 5°F above the dew point and keeping relative humidity below 80–85% – ensure the coating cures properly and performs as intended.
Experienced professionals, such as Atlas Concrete Coatings, adhere to proven preparation standards to meet the demands of every project, whether it’s a garage, pool deck, or industrial floor. By documenting details like slab age, moisture levels, and repairs, they deliver consistent results backed by warranties.
While proper preparation may add an extra day to the process, it prevents costly rework – often running between $2,000 and $6,000 or more – caused by premature coating failure. A well-prepared polyurea floor offers long-lasting benefits: it requires minimal maintenance, resists chemicals and abrasion, and retains its appearance for years. Investing time in thorough preparation ensures a durable, cost-effective upgrade that stands the test of time.
FAQs
What happens if you skip surface preparation before applying polyurea coatings?
Proper surface preparation is a crucial step when applying polyurea coatings. Skipping this process can result in poor adhesion, leading to issues like peeling, chipping, or flaking. These problems don’t just ruin the look of the coating – they also compromise its durability and protective features.
By thoroughly cleaning, repairing, and inspecting the surface beforehand, you can ensure a strong bond and extend the coating’s lifespan. This extra effort saves you from expensive repairs or the hassle of reapplying the coating down the line.
How do I check for moisture and porosity before applying polyurea coatings?
To evaluate moisture levels, you can rely on tools like a calcium chloride test or a relative humidity probe. These methods help identify if the concrete surface contains too much moisture, which could interfere with the coating’s ability to adhere properly.
For porosity, a quick water absorption test is often enough. Simply pour a small amount of water onto the concrete. If it absorbs within a few minutes, the surface is porous and suitable for coating. If you need more detailed insights, a core sample analysis can provide a thorough assessment of the surface condition.
Conducting these tests ensures the concrete is properly prepared, setting the stage for a durable and long-lasting polyurea coating.
Why is mechanical surface profiling important for polyurea coating preparation?
Mechanical surface profiling plays a key role in getting concrete surfaces ready for polyurea coatings. This process creates a textured and clean surface, which is crucial for ensuring the coating adheres properly to the concrete. Without it, issues like peeling, bubbling, or delamination can occur over time.
A well-prepared surface not only strengthens the bond but also boosts the durability and performance of the coating. This makes mechanical profiling an essential step for achieving reliable and long-lasting results.