Preventing slip-and-fall accidents is critical for safety and cost control. Polyurea chip floor systems are durable but can become slippery, especially in wet or high-traffic areas. Adding slip resistance ensures safety without compromising the floor’s strength or appearance. Here’s how:
- Surface Preparation: Clean, repair, and profile the concrete surface for proper coating adhesion.
- Choose Slip-Resistant Chips: Select vinyl flakes or tougher materials like quartz sand for texture and traction.
- Broadcasting Techniques: Use full or partial chip broadcasts for desired grip levels.
- Anti-Slip Additives: Incorporate lightweight or heavy-duty additives like aluminum oxide or quartz sand into coatings.
- Protect with Topcoats: Apply strong polyurea or polyaspartic topcoats to seal and protect the surface.
- Test Slip Resistance: Verify the floor meets safety standards, such as a wet DCOF of 0.42 or higher.
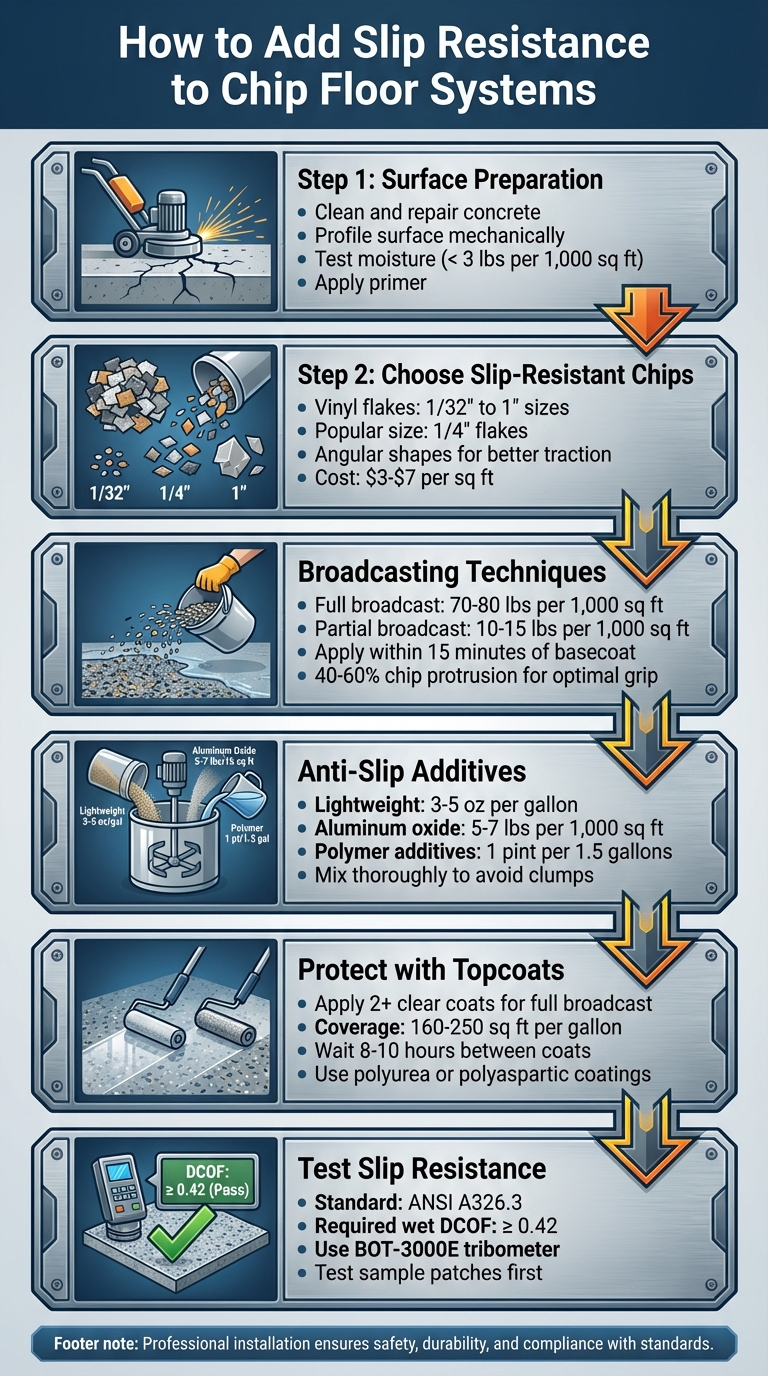
6-Step Process to Add Slip Resistance to Chip Floor Systems
How to Epoxy Concrete Floors with Flakes | Full DIY Tutorial
Preparing the Surface for Slip-Resistant Chip Floors
Getting your concrete surface ready is the key to a long-lasting, slip-resistant chip floor. Skipping proper prep work can lead to issues like peeling, blistering, or delamination, no matter how good the coating is.
Start by giving the area a deep clean. Sweep away dust and debris, mop with a mild detergent solution, rinse thoroughly, and let it dry completely. For stubborn oily or stained spots, a degreaser will do the trick. Check the surface for cracks or uneven areas, and fix them with a patching compound, a polyurea-and-sand mix, or self-leveling concrete for deeper problem spots.
To ensure the coating sticks properly, the surface needs to be mechanically profiled. Tools like diamond grinders or shot blasters work well for this. Use a coarse grit to roughen the surface, then vacuum up all the dust and loose material.
Moisture testing is another crucial step to avoid coating failure. A Calcium Chloride test (ASTM F1249-13) is a reliable method – make sure the results show less than 3 pounds of moisture per 1,000 square feet over 24 hours. Alternatively, you can spray water on the surface; if it absorbs fully within a minute, you’re good to go. Beading or pooling, however, means the surface needs more attention. As highlighted by All Weather Floors Polyurea Garage Floor Coating Instructions, picking the right testing method is critical.
Once the surface is clean, repaired, profiled, and moisture-free, apply a primer to seal it and boost adhesion. If moisture is a concern, use a moisture vapor transmission (MVT) primer. For proper curing, keep the room temperature at 75°F and ensure the slab is at least 50°F.
Following these steps lays the groundwork for a durable, slip-resistant chip floor. Companies like Atlas Concrete Coatings rely on these methods to ensure top-notch results.
Choosing and Applying Slip-Resistant Chips
Selecting the Right Chips for Texture
Once your substrate is properly prepared, the next step is picking vinyl flakes that strike the right balance between style and slip resistance. These composite vinyl flakes not only enhance the look of your floor but also add essential texture.
The size of the chips plays a big role. Flakes come in sizes ranging from 1/32" to 1", with 1/4" being a popular choice for general use. Larger flakes create a rougher texture, while smaller ones produce a more uniform appearance. For better traction, go for angular-shaped flakes.
Vinyl flakes are ideal for lighter residential settings like garage floors. However, for high-traffic commercial or industrial areas, tougher materials like quartz sand or aluminum oxide are better suited to handle heavy wear. For reference, a decorative random broadcast flake system typically costs around $3–$5 per square foot, while a full broadcast system ranges from $4–$7 per square foot.
Choosing the right chips sets the stage for improved grip, which can be further enhanced by adding anti-slip additives in the next step.
Broadcasting Techniques for Even Coverage
When applying the chips, you’ll decide between two main methods: full broadcast or partial broadcast.
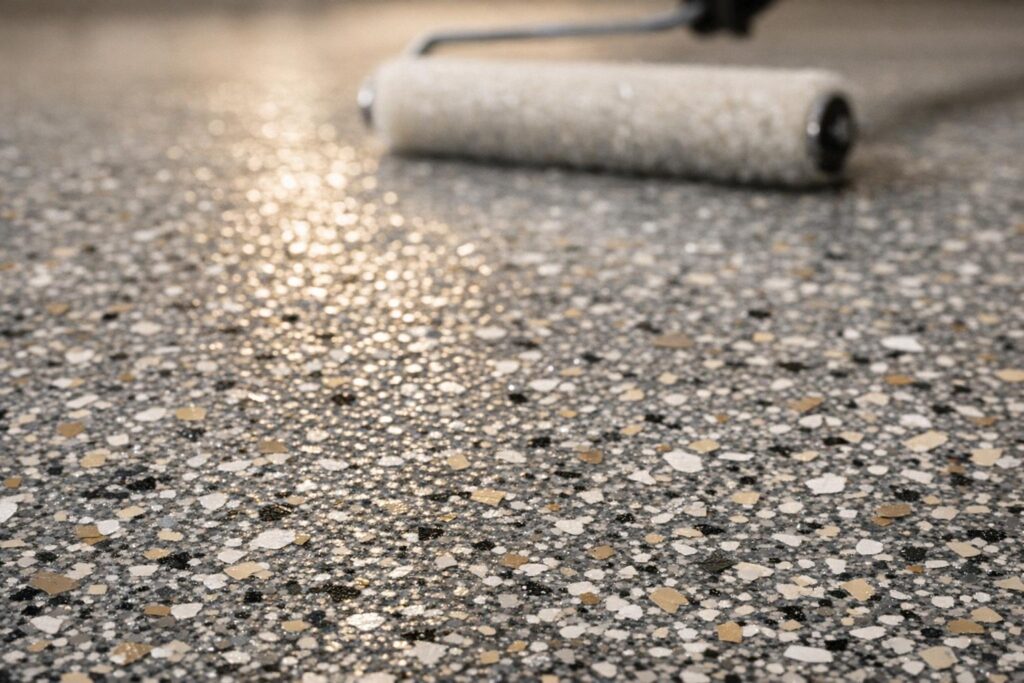
- Full broadcast involves spreading chips until the basecoat is completely covered and no more chips will stick. This method requires approximately 70–80 pounds of chips per 1,000 square feet, resulting in a rougher surface with excellent slip resistance. As The Garage Floor Company explains:
"This method provides strong traction and a rougher surface, making it ideal for residential garage flooring and outdoor areas where extra grip is needed".
- Partial broadcast uses much fewer chips – about 10–15 pounds per 1,000 square feet. This leaves parts of the basecoat visible, creating a smoother finish with moderate slip resistance.
For either method, apply the chips in small sections (about 3’x6′ to 5’x10′) within 15 minutes of applying the basecoat to ensure they adhere properly. Distribute the chips by hand, ensuring even coverage without clumps or high spots. To achieve effective slip resistance, aim for 40–60% of each flake to protrude above the coating, while the rest remains embedded to prevent dislodgment under foot traffic.
Once the floor cures overnight, sweep away any excess chips with a stiff-bristled broom. Lightly sand the surface before applying a clear topcoat.
Adding Anti-Slip Additives to Coatings
Common Anti-Slip Additives and Their Benefits
Incorporating anti-slip additives into your polyurea coating can significantly improve traction. These additives come in a few main types, each suited for specific applications:
- Soft, lightweight additives: Ideal for light residential use, materials like polypropylene (e.g., H&C Shark Grip) or acrylic (e.g., Res-N-Sand) are designed to stay evenly suspended in the coating. Typically, 3–5 ounces per gallon is enough to enhance grip without making the surface too rough.
- Hard, abrasion-resistant particles: For areas with heavy foot traffic, options like aluminum oxide, quartz sand, glass beads, or walnut shells are better suited. Since these heavier particles can’t remain suspended in liquid, they should be broadcast onto the wet coating instead. For aluminum oxide, apply at a rate of 5–7 pounds per 1,000 square feet. Angular particles generally offer better traction compared to rounded ones.
- Micronized polymer additives: These provide a balance between improved traction and ease of application. Mix these additives into the coating at a rate of 1 pint (16 oz.) per 1.5 gallons or 1 quart (32 oz.) per 3 gallons. Fine, white powdery options are particularly suitable for clear topcoats and are typically added at a ratio of 1/2 to 1 pound per gallon.
Once you’ve chosen the appropriate additive and determined the correct application rate, thoroughly mix it into your polyurea coating to ensure even distribution.
Proper Mixing and Application Techniques
Achieving a smooth and consistent finish starts with proper mixing. Gradually add the additive to the coating while stirring continuously to avoid clumps. Use a low-speed drill mixer or mix by hand to prevent introducing air bubbles, which can affect the final appearance. Allow the mixture to rest briefly so any air bubbles can settle before you begin applying the coating.
Be cautious not to over-mix, as excessive agitation can cause heat buildup, speeding up curing and potentially altering the coating’s appearance. For tinted polyurea, combine the polyurea, tint, and fine additives in one container before mixing to ensure uniform color throughout the application.
Balancing safety and aesthetics is key. Discuss the expected conditions – whether the surface will be wet or dry, flat or sloped – with your customer, and get written approval on the desired texture level before proceeding.
For professional installation that ensures both safety and durability, reach out to Atlas Concrete Coatings.
sbb-itb-4b4bb37
Sealing and Protecting the Slip-Resistant Surface
Why a Durable Topcoat Matters
After applying chips and additives, the final step is adding a strong topcoat to lock everything in place. This layer is essential for durability, especially in high-traffic or tough environments. Polyurea and polyaspartic topcoats are popular choices because they’re incredibly tough and flexible. They can handle extreme temperatures, heavy impacts, and abrasions without breaking down. On top of that, they provide excellent protection against chemicals like oil spills and cleaning agents, while also offering UV stability to prevent yellowing or fading caused by sunlight exposure.
For full broadcast chip systems, it’s recommended to apply at least two clear coats to ensure a proper seal. Even if you’re using minimal chips, applying at least one clear coat is a must to protect the surface.
Steps to Apply and Seal the Topcoat
Before starting, make sure the surface is clean and free of any loose material. Using a shop vacuum with duct tape on the edges of the attachment or carefully scraping the surface works well for this prep step. For full broadcast systems, smooth the surface with a floor buffer fitted with a 60–80 grit abrasive screen. Once done, sweep and vacuum up any remaining debris.
Next, mix the topcoat components. Start by separately stirring Part A and Part B. Then, combine them in a 1:1 ratio by volume and mix for about 2–3 minutes using a low-speed drill. Only mix as much as you can apply within 15–20 minutes. If you’re adding anti-skid additives, introduce them gradually while mixing to avoid clumping.
Pour the mixed topcoat onto the floor in sections you can manage and spread it evenly with a trowel or squeegee, covering about 160–250 square feet per gallon. Use a short or medium-nap roller to backroll and smooth out any ridges. For clear coats, use one roller to apply and a separate dry roller to finish. Work in sections measuring roughly 3′×6′ to 5′×10′, applying a thin, even layer to prevent solvent bubbling.
If applying multiple coats, allow 8–10 hours between each layer (or 14–16 hours in colder or more humid conditions). Avoid waiting longer than 20 hours between coats unless you’re prepared to re-prepare the surface. For spaces like commercial or industrial areas, applying two color coats followed by two clear coats is highly recommended for maximum durability.
Once the topcoat is sealed and fully cured, test the surface for slip resistance to ensure it meets safety standards.
Testing and Verifying Slip Resistance
Slip Resistance Testing Standards
Once the topcoat has fully cured, it’s time to ensure the floor meets safety requirements. This verification step is crucial to confirm that the slip-resistant features are performing as intended.
The American National Standard A326.3 serves as the go-to guideline for measuring the Dynamic Coefficient of Friction (DCOF) on hard surface flooring, including chip floor systems. Widely recognized by industry professionals, it is considered a leading standard for DCOF testing.
So, what exactly does the DCOF test measure? It calculates the force needed to maintain motion relative to the weight of the object. For floors in interior spaces where wet conditions are possible, the standard requires a wet DCOF of 0.42 or higher to ensure adequate slip resistance for everyday use. This benchmark helps maintain safety in environments prone to moisture.
The testing process accommodates both dry and wet conditions. For wet testing, materials like SBR sensors and SLS solutions are typically used to simulate moist environments.
Armed with these guidelines, you’re ready to take precise measurements using approved tools.
Using Tools for Accurate Measurement
When it comes to tools, the BOT-3000E tribometer is the only device explicitly recommended by ANSI/TCNA for compliance with the A326.3 standard. This digital device is designed to deliver accurate, on-site measurements, ensuring your floor meets safety requirements.
It’s wise to start small before committing to a full-scale installation. As Sherwin-Williams High Performance Flooring advises, "A sample should always be obtained and tested prior to the installation of any slip resistant flooring system". Begin by consulting the ANSI A326.3-2021 specifications, and then apply test patches of your flooring system. Measure the slip resistance of these patches to determine if adjustments to the chip density or additive mix are needed. This step ensures the final installation will deliver the desired level of safety.
Conclusion
Achieving slip resistance in polyurea chip floor systems demands careful attention to each step of the process. It starts with thorough surface preparation to ensure the basecoat adheres properly. Once the polyurea basecoat is applied, broadcasting vinyl chips or flakes creates a textured surface that enhances traction. For areas prone to moisture or heavy foot traffic, incorporating anti-slip additives like aluminum oxide or quartz sand into the final clear topcoat can further improve grip.
After applying the chips, sealing the floor is essential to ensure durability and maintain slip resistance. Adding a strong polyaspartic topcoat not only protects the surface but also helps the floor meet safety standards. To verify compliance, use slip resistance testing tools to confirm the floor achieves the required 0.42 coefficient of friction for wet conditions.
When installed correctly, these floors offer a winning combination of safety and durability. Atlas Concrete Coatings specializes in polyurea chip systems that deliver long-lasting performance while offering a polished look. With a variety of customizable colors, textures, and finishes, plus a lifetime warranty on chip systems, their floors are built to withstand heavy use, chemical spills, and UV exposure.
Whether you’re upgrading a garage or outfitting a commercial space, professional installation ensures the perfect mix of safety, style, and resilience. Atlas Concrete Coatings provides free consultations to help you create a floor system tailored to your needs, ensuring both functionality and aesthetic appeal.
FAQs
How can I make sure the slip-resistant coating sticks properly to my concrete floor?
To get your slip-resistant polyurea chip coating to stick properly, you need to start with solid surface prep. Begin by thoroughly cleaning the concrete floor – get rid of any dust, grease, or old coatings. If you spot cracks or flaws, patch them up using a concrete repair product that’s designed for the job. Depending on the condition of the surface, you might also need to apply a primer to help the coating bond better.
Make sure the floor is completely dry before moving forward. Check the temperature too – ideally, the room should be around 75°F, and the concrete surface itself should be at least 50°F. Once everything is ready, apply the polyurea chip coating and finish it off with the recommended topcoat for a tough, slip-resistant surface.
If you want a polished, professional result that lasts, consider contacting Atlas Concrete Coatings. They specialize in concrete floor systems for both residential and commercial spaces.
What should I consider when deciding between full and partial chip broadcasts for my floor coating?
When choosing between full and partial chip broadcasts, it’s important to weigh factors like slip resistance and visual texture. Full broadcasts create a thicker, more textured surface that boosts traction and durability, making them ideal for high-traffic areas. On the other hand, partial broadcasts offer a subtler texture and use fewer materials, which can be a more economical choice.
You’ll also want to consider the condition of your substrate and how much preparation it needs, as well as your overall budget and timeline. Full broadcasts typically demand more materials and time but deliver a uniform, polished look. Partial broadcasts, while quicker and less expensive, may not provide the same level of durability. Ultimately, the decision should align with your priorities for aesthetics, safety, and functionality.
What are the best anti-slip additives for commercial chip floor systems?
For commercial chip floor systems that handle heavy traffic, the most effective anti-slip additives are those that balance toughness, simple application, and compatibility with coatings like polyurea or epoxy. Some of the top options include finely ground polymers, aluminum oxide, and pumice-based additives. These materials integrate smoothly into topcoats without affecting the finish.
Here’s a closer look at popular choices:
- Aluminum oxide additives: Known for their superfine texture, these are perfect for high-traffic areas like warehouses and entryways. They deliver strong traction and excellent resistance to wear.
- Polymer-based additives: Lightweight and easy to mix, these create a sturdy, slip-resistant surface that’s well-suited for spaces with heavy foot traffic.
- Pumice-based additives: These enhance grip without changing the coating’s color or drying time, making them a great fit for garages, patios, and ramps.
Adding one of these options to your chip floor system boosts safety and durability, ensuring the surface can handle demanding environments with ease.