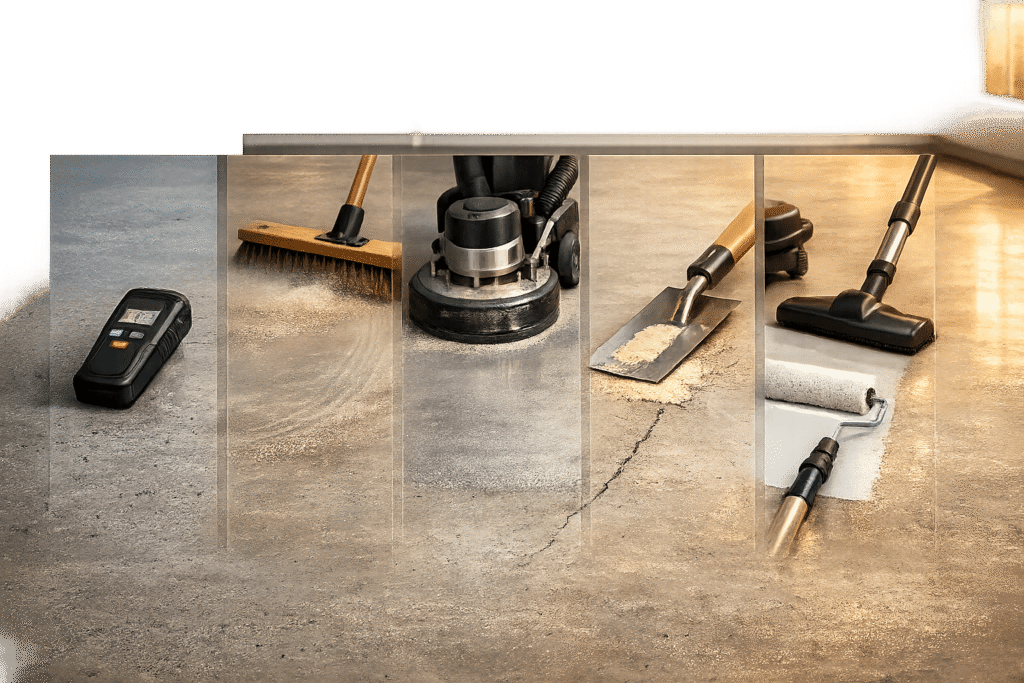
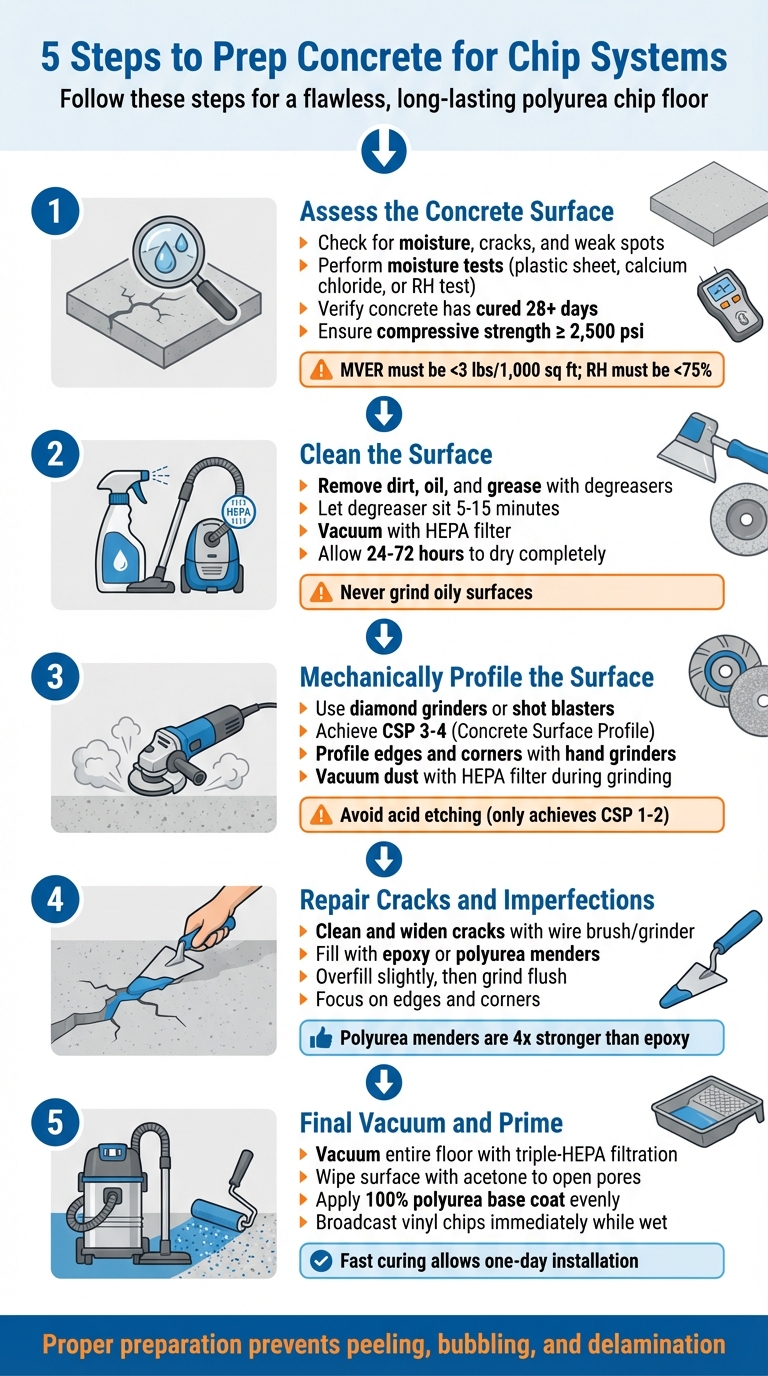
Want a long-lasting, durable polyurea chip floor? It all starts with proper concrete preparation. Skipping key steps can lead to peeling, bubbling, or delamination. Here’s a quick breakdown of the five steps you need to follow for a flawless finish:
- Assess the Concrete Surface: Check for moisture, cracks, and weak spots. Use tests like the plastic sheet test or calcium chloride test to identify hidden moisture issues.
- Clean the Surface: Remove dirt, oil, and grease with degreasers. Vacuum thoroughly to eliminate dust and debris.
- Mechanically Profile the Surface: Use diamond grinders or shot blasters to roughen the concrete and create the ideal texture for bonding.
- Repair Cracks and Imperfections: Fill cracks and pits with epoxy or polyurea menders. Grind repairs flush with the surrounding surface.
- Final Vacuum and Prime: Vacuum the floor with a HEPA-filtered vacuum, wipe with acetone, and apply the polyurea base coat for a strong, lasting bond.
Each step ensures your polyurea chip system adheres properly and lasts for years. Follow these steps, and you’ll avoid common pitfalls like delamination or hot-tire pickup. For professional results, consider working with experts like Atlas Concrete Coatings, who guarantee quality preparation and installation.
5-Step Concrete Preparation Process for Polyurea Chip Floor Systems
How To Prep for Floor Coatings | Cracks and Saw Cuts
sbb-itb-4b4bb37
Step 1: Assess the Concrete Surface
Before diving into your project, take the time to evaluate the state of your concrete slab. This step is critical because underlying issues like moisture, structural damage, or weak concrete can cause your chip system to fail prematurely.
Check for Moisture and Humidity
Moisture is a sneaky culprit that can ruin the adhesion of your coating – even if the surface feels dry. Water vapor from within the slab can slowly push the coating off over time. As Roy Magnuson, Owner of Allsource Supply Inc., puts it, "Moisture isn’t always visible – but it’s always a risk".
To detect moisture, professionals rely on three key tests:
- Plastic Sheet Test (ASTM D4263): Tape an 18×18-inch clear plastic sheet to the bare slab for 24 hours. If condensation forms or the concrete darkens underneath, moisture is present.
- Calcium Chloride Test (ASTM F1869): Place a pre-weighed dish under a sealed dome for 72 hours to measure the Moisture Vapor Emission Rate (MVER). Most coatings fail if the MVER exceeds 3 lbs per 1,000 sq. ft..
- In-Situ Relative Humidity Test (ASTM F2170): Drill holes into the slab and measure internal moisture over 24–72 hours. If the Relative Humidity (RH) exceeds 75%, you’ll need to address the moisture before proceeding.
Test multiple spots, especially areas with oil stains or tire marks. If moisture levels are high, consider using a moisture-tolerant base coat or a vapor reducer like Vexcon Vapor Reducer to prevent issues like delamination.
Once moisture levels are under control, shift your focus to the slab’s physical condition.
Inspect for Surface Issues
Look closely for physical damage such as cracks, chips, pits, or spalling (surface flaking). Also, check for any remnants of previous coatings or sealers, as these can interfere with the new coating’s adhesion. Noah Nash from GatorGuard explains, "Concrete may look solid, but it’s full of pores, residue, and sometimes even hidden moisture".
To check porosity, spray water on the dry surface. If the water beads or forms puddles instead of soaking in within a minute, the surface needs mechanical profiling to ensure proper adhesion. Don’t forget to inspect edges and corners just as thoroughly as the main area.
With these checks complete, it’s time to verify the concrete’s curing and strength.
Verify Concrete Cure and Strength
Make sure that any new concrete has cured for at least 28 days and has reached a compressive strength of at least 2,500 psi before applying the coating. Skipping this step can lead to bubbling, blistering, or delamination. Weak concrete can also cause the coating to peel.
Ensure the slab is "sound", meaning it’s free from loose or crumbling sections, before moving forward. A solid, well-cured surface is crucial for the bond that polyurea systems require. This strong foundation allows for mechanical profiling methods like diamond grinding, which creates the open, stable surface needed for a lasting polyurea chip system installation.
Step 2: Clean the Surface
Before moving forward, ensure the concrete slab is dry and free of contaminants. Even a porous concrete surface can trap oils, grease, and fine dust that interfere with the adhesion of polyurea chips.
Remove Dirt, Oil, and Grease
Start by sweeping or vacuuming the entire area, paying extra attention to edges and corners. If there are fresh oil spills, absorb them with materials like clay, cat litter, or sawdust before cleaning.
Next, use a pH-neutral or alkaline degreaser specifically designed for concrete. Let the degreaser sit on the surface for 5–15 minutes, but don’t let it dry out. For larger areas, a rotary scrubber can help, while tougher spots may require acetone or a solvent-based cleaner.
Important: Avoid using a grinder on oily surfaces. Doing so can smear the oil into the slab, creating dark patches and uneven areas. This could lead to bond failure if the surface is later sealed, stained, or polished. Make sure all oils are completely removed before moving on to mechanical profiling.
After cleaning, use a wet vacuum or shop vac to remove the rinse water and any emulsified oils. Allow the floor to dry thoroughly before proceeding.
Clear Away Dust and Debris
Use an industrial vacuum with a HEPA filter to remove fine dust across the entire floor. For cracks or textured areas, use compressed air to loosen dust, then vacuum immediately. You can also lightly mist the floor or use a damp mop to collect any remaining particles. Ensure the floor is completely dry – this usually takes 24–72 hours. In humid conditions, air movers or dehumidifiers can help speed up the drying process.
To confirm the surface is clean, perform a tape test: press a piece of clear tape onto the floor and remove it. If dust sticks to the tape, repeat the cleaning process.
Once the surface is spotless and fully dry, you’re ready to proceed with mechanically profiling the concrete.
Step 3: Mechanically Profile the Surface
Once the concrete is clean and dry, the next step is to roughen it up to ensure the polyurea base coat bonds effectively. This process, called mechanical profiling, opens up the concrete’s pores and creates a textured surface that the coating can grip onto. Without this step, the bond won’t be strong enough to support the durability expected from polyurea chip systems.
Choose the Right Profiling Method
For polyurea chip systems, the goal is to achieve a Concrete Surface Profile (CSP) of 3 to 4, as defined by ICRI standards. Picture CSP as a scale of roughness, where 1 is nearly smooth and 10 is extremely coarse.
Diamond grinding is the go-to method for most residential and commercial floors. It reliably produces the CSP of 3 to 4 needed for polyurea applications. For larger projects, propane-powered grinders are often favored over electric models. These machines deliver more power, better downward pressure, and faster results – plus, they aren’t limited by the reach of extension cords. This makes them ideal for handling expansive areas.
Shot blasting is another effective method, particularly for industrial floors or when a CSP of 3 or higher is required. This technique uses steel shot to simultaneously clean and profile the surface. Some contractors even combine diamond grinding with shot blasting to remove any lingering dust in the pores, ensuring the surface is completely ready for coating.
Don’t forget about hand grinders for edges, joints, and corners where larger equipment can’t reach. These areas still need the same level of profiling as the rest of the floor.
Important Note: Steer clear of acid etching for polyurea systems. While it’s a common DIY approach, acid etching typically only achieves a CSP of 1 to 2. This insufficient profile can result in peeling, especially in high-traffic areas. As Robert Hanson, President of GarageFloorCoating.com, emphasizes:
"Properly prepare the concrete substrate to create a proper profile (CSP) – grind it!"
Once the surface is uniformly textured, move on to verifying consistency.
Check for Consistency
Take a close look at the floor to ensure the texture is even across the entire surface. Uneven profiling can cause issues like fisheyes, peeling, or premature delamination of the coating.
You can also test whether the pores are open by checking water absorption. Dennis Von Ruden, President of General Equipment Co., explains:
"If I see the water is permeating the concrete and starting to dry, I’ll have a good bond. Everything is clean and the pores are open. If the water beads up, that’s a sign that something isn’t right."
During and after grinding, use a vacuum with a HEPA filter to remove fine dust that can interfere with adhesion. Triple HEPA-filtered vacuum systems connected to grinding equipment are particularly effective, capturing up to 90% of airborne dust.
Step 4: Repair Cracks and Imperfections
Once the surface is cleaned and prepped, it’s time to tackle cracks, pits, and other flaws. These imperfections can weaken the bond of your polyurea chip system, so repairing them is a crucial step.
Fill Cracks and Holes
Start by cleaning and slightly widening each crack with a wire brush or an angle grinder. This exposes more surface area for bonding. Use a shop vacuum with HEPA filtration to remove any dust or debris left behind, as even small particles can interfere with adhesion.
For minor cracks and chips, standard concrete patching compounds do the job. However, for larger cracks or deep pits, opt for epoxy fillers, which are stronger and less prone to shrinking over time. If you’re working with a polyurea chip system, consider polyurea menders – they’re up to four times stronger than traditional epoxy and cure much faster. Overfill the cracks slightly, then grind them flush after curing to ensure a smooth surface for the coating.
Use a trowel or putty knife to press the repair material firmly into the cracks. This creates a consistent surface for the polyurea base coat to adhere to.
Focus on Hard-to-Reach Areas
Edges, corners, and other tight spots can be tricky to repair with larger tools. Use smaller tools to handle these areas by hand. For deep or irregular damage, mix a thin "scratch coat" by diluting the repair product with water. Apply this thin layer first to fill tight spaces, then follow up with the full-strength patch.
Once the repairs have cured, grind them flush with the surrounding surface. To ensure the surface is ready, spray water on the repaired areas. If the water doesn’t absorb within a minute and instead beads up, you’ll need to re-profile those spots.
Taking the time to repair these imperfections properly will ensure a strong, even foundation for your coating system.
Step 5: Final Vacuum and Prime
Once the cleaning and repairs are complete, the final steps ensure the surface is ready for a long-lasting coating. After the repairs have fully cured and the surface has been ground smooth, precise cleaning and the application of a polyurea base coat set the stage for your chip system.
Vacuum Thoroughly
A standard shop vacuum just won’t cut it. These vacuums can release up to 90% of fine silica dust back into the air, where it can settle on your freshly prepared floor, nearby walls, or even worse – into your lungs. Instead, opt for an industrial-grade vacuum with triple-HEPA filtration.
Make sure to vacuum the entire floor, paying close attention to edges, corners, and any adjacent vertical surfaces. Removing every speck of dust is essential because even the smallest particles can ruin the finish or weaken the bond if they land in the wet base coat.
After vacuuming, wipe the surface with acetone or denatured alcohol. This step removes any lingering dust and opens up the concrete pores for better adhesion. As Floortek Coatings explains:
"We wipe down the entire floor with a fast-evaporating solvent. This ‘pops’ the pores of the concrete, making them extra receptive. It also removes any remaining dust."
With the surface completely clean and dust-free, you’re ready to move on to priming.
Apply the Polyurea Base Coat
The next step is applying the 100% polyurea base coat, which acts as the primer. This self-priming material penetrates the profiled concrete surface, creating a strong, permanent bond. Follow the manufacturer’s instructions for mixing, and then evenly roll the base coat onto the floor.
Speed and precision are key here. Polyurea cures quickly, so you need to broadcast the vinyl chips onto the wet base coat immediately. The fast curing process allows for one-day installations, leaving little room for error or delays once you begin.
Conclusion
By carefully following the five essential steps – assessment, cleaning, mechanical profiling, repairs, and priming – you set the foundation for a chip system that lasts. Each step is crucial: assessing the surface identifies moisture or structural issues, cleaning removes contaminants that hinder adhesion, mechanical profiling creates the ideal texture for polyurea to bond, repairs address weak spots, and priming ensures a seamless finish. Together, these steps guarantee a durable and reliable result.
As Noah Nash from GatorGuard explains:
"Concrete coatings don’t just stick to any surface – they bond. For that bond to be strong, the concrete needs to be properly prepared."
A well-prepared chip system not only enhances durability but also provides a slip-resistant, long-lasting finish.
For homeowners and businesses in Pennsylvania and New Jersey, Atlas Concrete Coatings delivers expert preparation and installation using these proven methods. Their chip systems are supported by a lifetime warranty and a 15-year product warranty for residential applications, giving you peace of mind. From moisture testing to diamond grinding, their team ensures your floor is built to withstand the test of time.
Looking to upgrade your concrete? Reach out to Atlas Concrete Coatings for a free consultation and see how proper preparation can transform your space.
FAQs
Can I coat concrete that has moisture issues?
Applying a coating to concrete that has moisture problems is a bad idea. Moisture can compromise the bond, lead to blistering, and even cause the coating to peel off. To avoid these issues, start with proper preparation – this includes testing the moisture levels. Ideally, the moisture content should be no more than 5%. If you find excess moisture, deal with it first to ensure the coating sticks well and stays intact over time.
Is diamond grinding required before a polyurea chip system?
Diamond grinding plays a key role in preparing surfaces for a polyurea chip system. This process helps create the right surface texture, improving adhesion and ensuring the coating bonds securely to the concrete. By mechanically profiling the surface with diamond tools, the pores are opened, allowing for better bonding. For effective surface preparation, diamond grinding is often a necessary step.
How long does concrete prep take before coating?
Concrete preparation usually takes 2 to 4 hours and involves several steps: cleaning, repairing, profiling, and testing. That said, extra time might be necessary if repairs or moisture testing reveal issues that require drying or curing. To achieve the best outcome, make sure every step is completed carefully before applying the coating.