

A power trowel is a machine used to smooth and level concrete surfaces efficiently. It’s ideal for large projects like warehouses and commercial floors, saving time and improving surface quality. For smaller areas like residential garages or driveways, walk-behind models are effective. However, power trowels aren’t suitable for tight spaces, small repairs, or uneven surfaces. Timing is critical – use the trowel when the concrete is firm but workable, typically 2-4 hours after pouring. Proper technique and equipment choice ensure durable, coating-ready results.
Key Points:
- Best for Large Areas: Warehouses, garages, and commercial spaces.
- Efficiency: Cuts project time drastically (e.g., 15 days reduced to 6).
- Surface Benefits: Increases hardness by 30%-50%, improves abrasion resistance by 30%, and reduces moisture penetration.
- Limitations: Not ideal for tight spaces, small repairs, or sloped surfaces.
- Timing: Use when a 1/8 to 1/4 inch imprint is left on the concrete.
Concrete Finishing Tips For Beginners | Power Troweling Floors
sbb-itb-4b4bb37
When to Use Power Trowels
Power trowels are a go-to tool when speed, consistency, and surface quality are top priorities. Knowing the right time to use these machines can save effort and ensure professional results. Below are key scenarios where power trowels shine.
Large Surface Areas Like Warehouses and Commercial Floors
For expansive projects – think warehouses, car parks, or commercial spaces over 5,000 square feet – power trowels are indispensable.
"An eight foot rider can generally do the work of three men with four‑foot walks in the same amount of time." – Brian Fortner, Bartell Global
These machines can boost productivity by up to 75% compared to manual methods. For example, two ride-on trowels can finish approximately 100,000 square feet in just seven days. Beyond speed, they ensure a uniform surface, reducing risks like water pooling or structural issues caused by uneven concrete.
Medium-Scale Projects Like Driveways and Residential Garages
For residential jobs over 200 square feet – such as garages, driveways, or basement floors – walk-behind power trowels are a practical choice. Models with diameters between 24 and 36 inches are especially effective for medium-sized areas, offering both efficiency and maneuverability around obstacles.
"For most residential jobs over 200 square feet, a walk‑behind power trowel is the standard choice. It covers more ground faster and produces a more consistent result across larger areas than hand troweling alone." – Mike Carmody, MudMixer
A trowel-finished garage floor creates a durable, dense surface that resists oil and chemical stains while remaining easy to clean. However, for driveways, keep in mind that a smooth finish can become slippery when wet. To counter this, consider applying a non-slip sealer or opting for a broom finish.
Power trowels also play a critical role in preparing surfaces for specialized coatings.
Polishing and Smoothing for Coating Applications
When prepping floors for coatings like epoxy, concrete stains, or polyurea systems, power trowels deliver a dense, polished finish by closing air voids and removing excess water. This not only speeds up the finishing process but also ensures a surface ready for advanced applications.
Modern power trowels equipped with diamond tooling can achieve high-gloss finishes much faster than traditional grinders. While this wet polishing method does require managing slurry cleanup, it provides consistent results over large areas.
While power trowels are incredibly effective in these scenarios, they aren’t the right tool for every situation – something explored in the next section.
When Not to Use Power Trowels
While power trowels shine in large, open projects, they can fall short in tighter or uneven spaces. Understanding when to skip these machines can save you time, protect surfaces, and avoid potential hazards.
Small Repairs or Tight Spaces
Power trowels struggle with corners, edges, and tight spots around walls or columns. For smaller slabs – like utility rooms, narrow walkways, or patch repairs under 200 square feet – using a power trowel often isn’t worth the effort.
"Power trowels can’t reach corners, edges, or tight areas around columns or walls. Plan to finish those spots by hand regardless of what machine you’re using." – Mike Carmody
In confined areas, even walk-behind models can be tricky to control and might damage nearby structures. For these situations, hand tools like steel trowels and hand floats are much more practical. They’re perfect for patching, creating non-slip textures, or finishing edges and corners.
Now, let’s look at the challenges of uneven surfaces.
Uneven or Sloped Concrete Surfaces
Power trowels are built for flat, level surfaces – not for fixing uneven areas or deep cracks. These machines polish surfaces but don’t remove material, so a concrete grinder is a better choice for leveling.
Sloped surfaces pose another issue. Power trowels create a smooth, sealed finish that can become dangerously slippery when wet. This is especially problematic on driveways, ramps, and sidewalks, where traction is essential. For outdoor or sloped areas, a broom finish or exposed aggregate finish is a safer bet, offering better grip and drainage.
| Feature | Trowel Finish | Broom/Exposed Aggregate Finish |
|---|---|---|
| Texture | Smooth, dense, and closed | Slightly rough and textured |
| Slip Resistance | Low; can be slippery when wet | Higher; provides better traction |
| Best Use | Interior slabs (garages, basements) | Exterior flatwork (driveways, patios) |
| Sloped Surfaces | Not recommended due to slip risk | Recommended for safety and drainage |
What to Consider Before Using Power Trowels
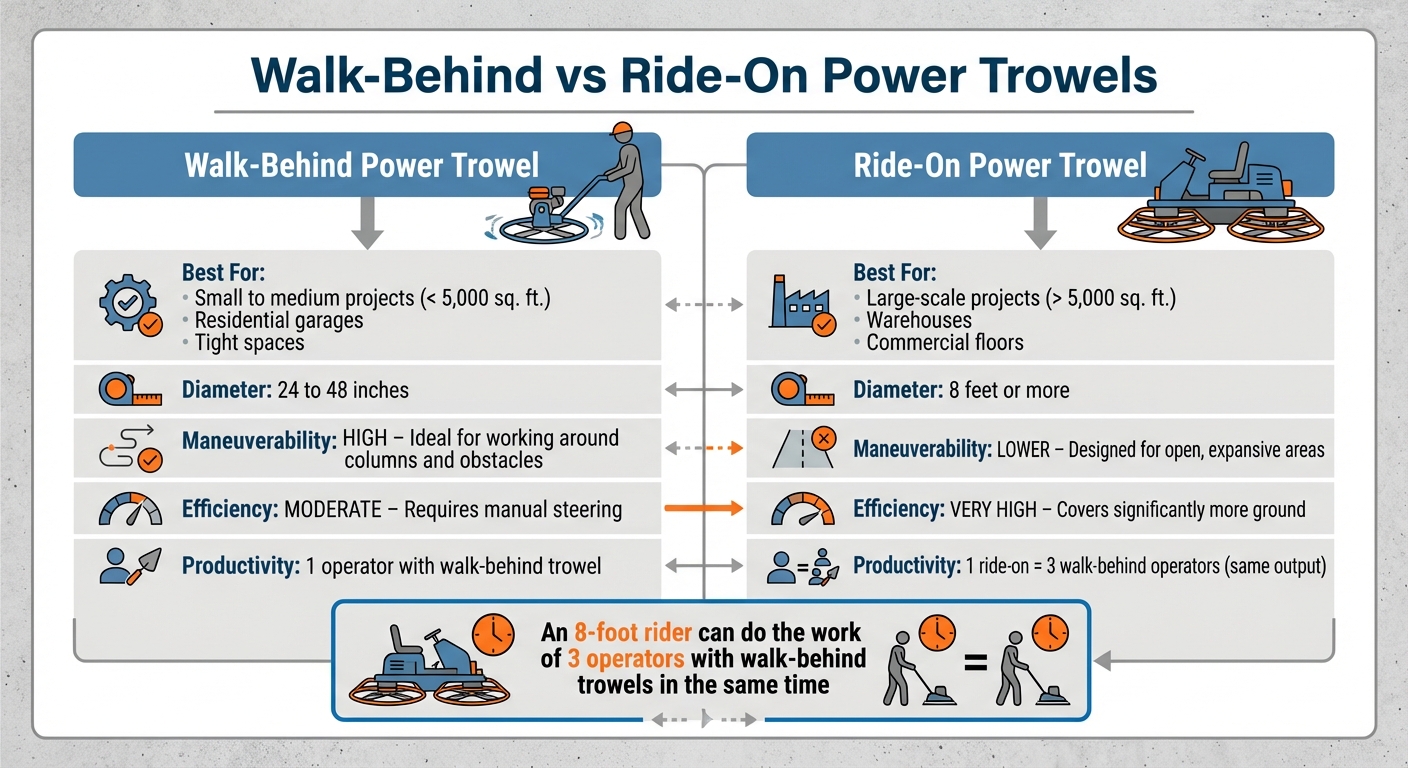
Walk-Behind vs Ride-On Power Trowels Comparison Chart
Getting a professional finish with a power trowel depends on two key factors: timing and choosing the right equipment. Before you start, you need to confirm the concrete is ready and pick the right machine for the job.
Concrete Mix Consistency and Curing Stage
The best time to use a power trowel is during a specific window – called the workable stage – when the concrete is firm enough to handle the machine’s weight but still soft enough to be finished properly. Typically, this stage happens 2 to 4 hours after the concrete is placed. However, factors like weather and the mix design can shift this timeline.
To check if the concrete is ready, look for a 1/8 to 1/4 inch imprint from a boot or thumb without the material crumbling.
Starting too early can trap bleed water, leading to weak and dusty surfaces. On the other hand, waiting too long makes the concrete too hard to work with. Always wait until the surface’s glossy sheen from bleed water disappears completely. This drying process can take anywhere from 20 minutes to 4 hours, depending on conditions.
"Timing is everything. Troweling too early traps bleed water. Too late and the concrete has hardened past the point of working." – Mike Carmody, MudMixer
Temperature also plays a big role. The ideal range for power troweling is between 50°F and 80°F.
Once the concrete is ready, the next step is picking the right trowel for your project.
Choosing the Right Trowel Type for the Job
After confirming the concrete is at the right stage, the type of trowel you choose should align with the size and scope of your project. For smaller or medium-sized projects, walk-behind trowels with diameters ranging from 24 to 48 inches are a great fit. However, for larger jobs, like warehouses or commercial spaces, ride-on trowels are far more efficient. For example, an 8-foot ride-on trowel can match the output of three operators using smaller walk-behind trowels, making it perfect for covering expansive areas.
| Feature | Walk-Behind Power Trowel | Ride-On Power Trowel |
|---|---|---|
| Best For | Small to medium projects (< 5,000 sq. ft.), residential garages, tight spaces [2,3] | Large-scale projects (> 5,000 sq. ft.), warehouses, commercial floors [2,3] |
| Diameter | Typically 24 to 48 inches [2,3] | Larger spans, often 8 feet or more |
| Maneuverability | High; ideal for working around columns and obstacles | Lower; designed for open, expansive areas |
| Efficiency | Moderate; requires manual steering | Very high; covers significantly more ground |
Blade selection is just as important as choosing the right machine. Start with float blades to distribute the machine’s weight evenly and smooth out high spots. For later passes, switch to finish blades, which are used at a higher pitch to create a hard, smooth, and dense surface. Begin with the blades flat or at a slight pitch, and gradually increase the angle – up to 1 inch – as the concrete hardens.
How to Use Power Trowels Effectively
Preparation and Safety Measures
Before you start, test the surface by stepping on it. If your boot leaves an imprint between 1/8 and 1/4 inch, the slab is ready for troweling. Clear the area of any tools, loose gravel, or debris that could interfere with the blades or become dangerous projectiles.
Next, inspect the power trowel. Check fuel or battery levels, ensure the blades are in good condition, and confirm that safety guards are secure. For electric models, verify proper grounding and look for any damage to the power cord. Personal safety gear is essential – wear safety goggles, ear protection, heavy-duty gloves, and steel-toed, non-slip boots. When moving the trowel, always use at least two people to lift and gently place it flat on the slab to avoid damaging the surface. Keep a small bucket of water nearby to sprinkle on "hot spots" that may dry too quickly during the initial passes.
Once the machine is inspected and safety measures are in place, you’re ready to begin troweling.
Step-by-Step Troweling Process
After completing safety checks, start with the floating phase. Use float pans or wide, flexible float blades set at zero pitch and run the machine at about 3/4 speed. This step helps level high spots and fill in low areas. Maintain a steady speed of 90–120 RPM, overlapping each pass by 2 to 8 inches to ensure a smooth and even finish. For walk-behind models, remember: lifting the handle moves the machine left, and pushing down moves it right.
When the surface firms up, transition to the finishing phase. Replace the float blades with narrow, rigid finishing blades. Gradually increase both the speed and the blade pitch, but keep the angle under 1 inch during finishing passes. If you notice "trowel chatter" – ridges forming on the surface – reduce the blade angle immediately to smooth things out. Avoid staying in one spot for too long, as this can create ridges and prematurely seal the pores, which could delay drying time for any coatings.
After finishing, clean the blades right away using a scraper or stiff brush and water. Leaving hardened concrete residue on the blades can cause imbalance and reduce the machine’s effectiveness in future projects.
Conclusion
Power troweling is the final, crucial step in preparing concrete for high-performance coatings. This process creates smooth, dense, and durable surfaces, making it an ideal foundation for coatings used in large commercial spaces, warehouses, and medium-sized projects like driveways or residential garages. Its efficiency truly stands out in these applications.
Timing and technique are everything. Begin troweling when the concrete can support the machine – this is typically when a footprint leaves an indentation of about 1/8 to 1/4 inch deep. Be careful not to over-trowel, as this can seal the surface pores and trap moisture, which could lead to future issues.
When it comes to polyurea coatings – such as those offered by Atlas Concrete Coatings – precision during troweling is key. By creating a uniform, void-free surface, the process ensures strong adhesion and long-lasting durability. Proper troweling eliminates imperfections like surface blemishes, bug holes, and air pockets, while also improving the concrete’s resistance to wear and moisture. This results in a surface that not only looks refined but also performs exceptionally well over time.
FAQs
Do I need to power trowel if I’m planning to coat the floor?
Using a power trowel might not be required for every floor coating job, but it does have its perks. It creates a smoother, denser surface, which not only enhances how well the coating sticks but also boosts the floor’s durability in the long run.
How can I tell the concrete is ready for a power trowel?
When using a power trowel, timing is everything. The concrete is ready when it can support the machine’s weight without sinking too much or sticking to your shoes. A good rule of thumb is to look for footprints that are about 1/8" to 1/4" deep – this shows the surface has the right balance of firmness and moisture. This stage usually happens 2 to 4 hours after pouring, though factors like temperature and humidity can affect the timing. Make sure the surface feels solid enough to hold your weight without leaving noticeable dents or clinging to your footwear.
What finish should I use on outdoor concrete to prevent slipping?
For outdoor concrete, a slip-resistant finish is a smart choice for improving safety. Options such as anti-slip coatings or textured finishes are popular for minimizing the risk of slipping, particularly in wet conditions. These finishes not only last a long time but also offer extra traction, making outdoor areas safer and more functional.