Polyurea coatings are a top choice for durable, long-lasting floors, but proper installation is key to their performance. Here’s what you need to know:
- Why Polyurea? It bonds deeply with concrete, is 4x stronger and more flexible than epoxy, cures up to 70x faster, and resists UV damage.
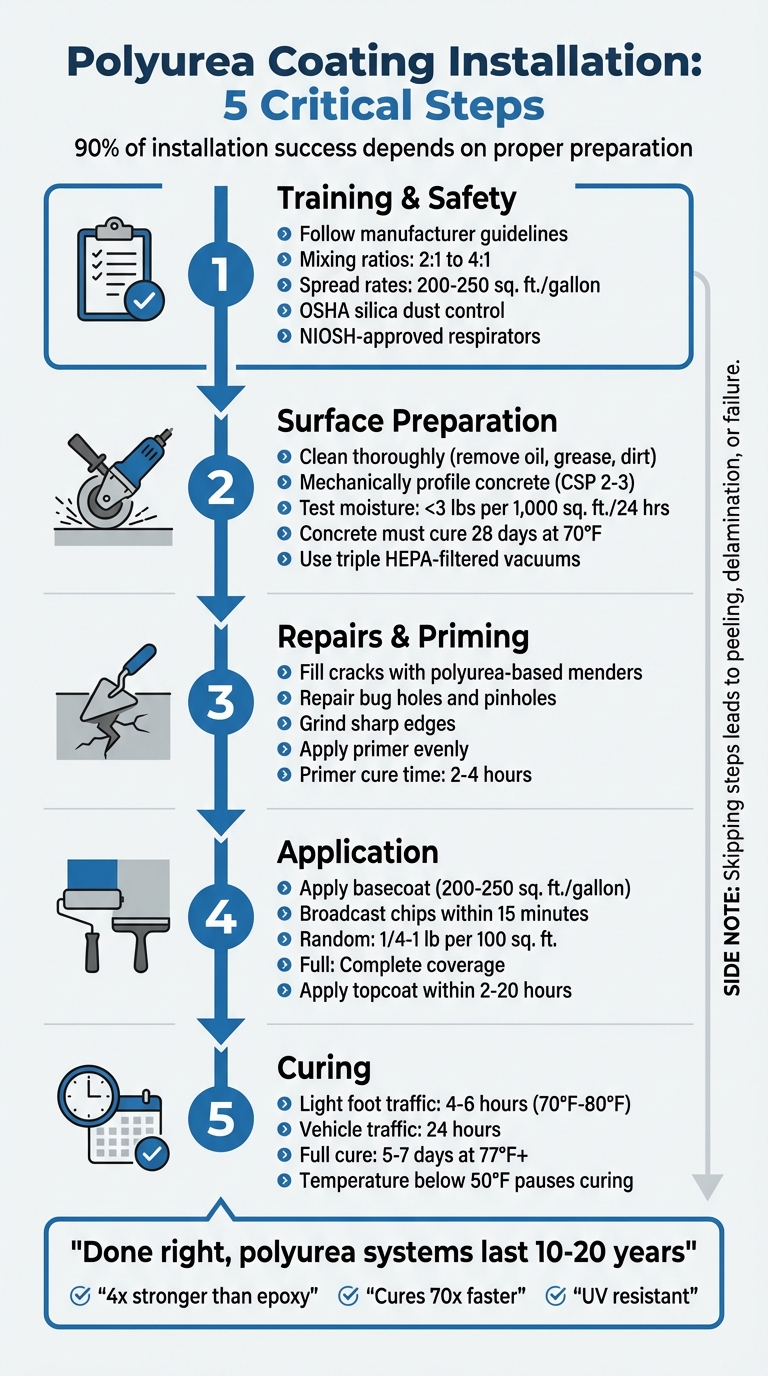
- Preparation Is Critical: 90% of installation success depends on proper preparation, including cleaning, grinding, and moisture testing.
- Key Steps:
- Training: Follow manufacturer guidelines for mixing ratios (2:1–4:1) and safety protocols.
- Surface Prep: Clean thoroughly, mechanically profile the concrete, and test for moisture.
- Repairs & Priming: Fix cracks, apply a primer for a strong bond.
- Application: Mix and apply the basecoat, broadcast chips, and finish with a topcoat.
- Curing: Allow proper curing time for long-term durability.
Skipping any of these steps can lead to peeling, delamination, or failure. Done right, polyurea systems can last 10–20 years. Atlas Concrete Coatings ensures precision at every stage, backed by a 15-year residential warranty.
5-Step Polyurea Coating Installation Process Guide
How to Install a Polyurea Floor- Using E-Green Polyurea
sbb-itb-4b4bb37
Pre-Installation Preparation
Getting the groundwork right is crucial for achieving a flawless polyurea floor. Every step after this depends on proper preparation.
Verify Team Training and Manufacturer Guidelines
Your installation team needs to be trained according to the manufacturer’s specific instructions. As Citadel Floors advises:
When possible, train directly with the manufacturer, preferably in-person at their facility, so you can get answers from the source on specific product questions, as well as hands-on experience.
This training should include details like exact mixing ratios (2:1 to 4:1) and spread rates (200–250 sq. ft. per gallon).
Safety is just as critical. Teams should follow OSHA guidelines for silica dust control, using industrial triple-HEPA-filtered vacuums during grinding. They also need to wear NIOSH-approved respirators during application and understand professional testing standards like ASTM F1249-13 for moisture testing.
Prepare the Site
Begin by organizing and verifying all materials. Unpack everything, check for completeness, and arrange items by their application stage. Make sure to turn off pilot lights and remove any open flames from the workspace. The floor must be spotless – free of grease, oil, dirt, tire marks, or old sealers. For stubborn oil stains, use industrial-grade cleaners.
Ventilation is key. Set up proper airflow and close all windows and doors a few hours before starting to stabilize humidity levels. Gather the necessary tools, including diamond grinders with HEPA attachments for edge work, professional sprayers, and complete personal protective equipment for the team.
Check Environmental Conditions
Environmental factors can make or break your installation. Start by testing the concrete’s moisture level using a digital moisture meter or a calcium chloride test, following ASTM F1249-13 standards. The Water Vapor Transmission Rate should not exceed 3 pounds per 1,000 sq. ft. over 24 hours. Additionally, check porosity by spraying water on the surface – if it beads or pools, further mechanical preparation is required.
Avoid applying polyurea on concrete that’s too hot or exposed to direct sunlight. Low humidity is best, as it speeds up bonding and curing times. Lastly, ensure the concrete has cured for at least 28 days at 70°F before applying the coating.
Surface Preparation
Getting the surface right is absolutely critical for a successful polyurea installation. Even the highest-quality materials can fail if the surface isn’t properly prepared.
Clean the Surface Thoroughly
Start by eliminating every trace of contamination. Use pressure washers or industrial-grade chemical solvents to get rid of oil, grease, tire marks, and other residues. The concrete must be spotless – free of dirt, old sealers, or anything that could prevent a strong bond. As Garage Flooring LLC puts it:
Surface preparation is the key element for long term success. The concrete surface must allow the coating to absorb into the surface of the concrete to create a strong mechanical bond.
Once cleaned, let the surface dry completely. Only after achieving a clean, dry base can you move on to the next crucial step: mechanical profiling.
Mechanically Profile the Concrete
Mechanical profiling removes the thin, weak top layer (called laitance) and opens up the concrete’s pores. Depending on the project, you can use propane grinders (typically around 30 inches and 750 lbs), shot blasters, or scarifiers. Diamond-tipped attachments are ideal for creating a uniform texture and achieving a Concrete Surface Profile (CSP) of 2–3, which feels like medium-grit sandpaper.
To keep dust under control, connect grinding equipment to a triple HEPA-filtered vacuum. This setup can capture up to 90% of airborne dust, preventing it from settling back into the freshly profiled surface. Be extra thorough in corners and edges using handheld grinders, as these areas are prone to failure if not properly prepared.
After profiling, test the surface’s porosity by spraying water on it. If the water beads or pools, you’ll need to continue mechanical preparation. A well-prepared surface ensures the coating bonds properly, delivering durability and a flawless finish.
Test for Moisture Levels
Once the surface is cleaned and textured, check for moisture. Excess moisture can compromise the bond and lead to failure. Use a Calcium Chloride test, following ASTM F1249-13 standards, to measure the water vapor transmission rate. It should be under 3 lbs per 1,000 sq. ft. over 24 hours. Test multiple areas to confirm consistent results. Keep in mind that concrete must be fully cured before testing. As Polyurea Systems advises:
Concrete systems often require vapor barriers or other means of waterproofing to prevent water intrusion, which can ultimately lead to delamination and failure of the coating system.
Make sure the surface is completely dry before moving forward, as moisture is a major threat to a strong, lasting bond.
At Atlas Concrete Coatings, we follow these rigorous preparation steps to deliver a clean, solid foundation that ensures the longevity and performance of every polyurea installation.
Repairs and Priming
Once the surface is properly prepared, the next steps focus on fixing any defects and applying a primer to ensure the coating adheres effectively. After completing profiling and moisture testing, it’s crucial to address structural flaws to avoid imperfections in the final finish.
Repair Cracks and Imperfections
Start by routing out cracks and filling them with polyurea-based menders mixed with silica quartz or sand. This creates a bond that’s even stronger than the original concrete slab. For bug holes or pinholes, use the same filler to achieve a smooth surface.
Once the filler has cured, grind down any sharp edges, particularly around corners, to ensure an even surface. Thoroughly vacuum the area to remove all dust and debris – any leftover particles can interfere with the primer’s ability to bond.
Apply Primer
Primers work by penetrating the concrete’s pores, creating a strong foundation for the coating. Use a squeegee to spread the primer evenly, following the thickness recommended by the manufacturer. The primer typically takes 2–4 hours to cure.
Avoid applying the primer under direct sunlight or on hot surfaces, as this can lead to application issues.
At Atlas Concrete Coatings, we rely on polyurea-based repair materials and primers that are perfectly suited to our coating systems. This ensures each layer bonds seamlessly, delivering durability and top-tier performance. Once the primer is set, the surface is ready for the polyurea coating process to complete the installation.
Polyurea Application
Once repairs are complete and the primer is set, the next step is applying the polyurea coating. Timing is key – after the primer cures, polyurea should be applied quickly and evenly to ensure a smooth, uniform finish.
Mix and Apply Polyurea Basecoat
Polyurea typically requires a mixing ratio between 2:1 and 4:1 (Component A to Component B). Use a paddle mixer attached to a power drill in a clean container, ensuring you scrape the sides to achieve a consistent blend. For tinted systems, pre-mix the colored materials in a single container to maintain uniform color throughout the application.
Be careful not to over-mix, as this can introduce air bubbles and generate excess heat, which may lead to premature curing.
When applying the basecoat, you can choose between two methods:
- Method A: Dip and Roll
Use a paint tray and a 3/8" nap roller, covering around 225–250 sq. ft. per gallon. This method is ideal for achieving maximum coverage. - Method B: Ribbon and Squeegee
Pour the polyurea in ribbons, spread it with a 1/8" notched squeegee or 3/8" nap roller, and lightly back-roll to create a thicker system. This approach covers about 200 sq. ft. per gallon.
As Garage Flooring LLC explains:
You are not painting the floor. You are building a three-dimensional system. Failure to use all your material may result in system failure.
Work in manageable sections, such as 3’x6′ or 5’x10′, to keep the coating wet for the next step: broadcasting chips. Apply the basecoat within 2–4 hours of the primer curing, and make sure to apply the next coat within 20 hours to avoid additional prep work like sanding or solvent wiping. Once the basecoat is evenly applied, immediately move on to broadcasting the chips.
Broadcast Chips or Flakes
Timing here is critical. You’ll need to broadcast the chips within 15 minutes of rolling out the basecoat. Toss the chips upward by hand for even, vertical distribution. Unlike epoxy, polyurea’s lower viscosity allows the chips to settle smoothly and lie parallel to the floor, enhancing both appearance and durability.
- For a random broadcast, use 1/4 to 1 pound of flake per 100 sq. ft., leaving portions of the basecoat visible.
- For a full broadcast, apply chips until the basecoat is completely covered. This creates a granite-like finish with enhanced slip resistance and requires at least two clear topcoats to properly seal the system.
At Atlas Concrete Coatings, we specialize in polyurea-based chip floor coatings that combine visual appeal with long-lasting performance. These systems are designed for fast installation and meet the demands of residential, commercial, and industrial environments. Once the basecoat cures, scrape off any angular chips and vacuum thoroughly to remove debris before applying the topcoat.
Finishing and Curing
Once the basecoat has cured and the chips have been broadcasted, the next steps include scraping, applying the topcoat, and allowing proper curing. After curing the basecoat for 2–6 hours, the surface is ready for the final steps to ensure a smooth, polished finish.
Scrape and Vacuum Excess Chips
Use a floor scraper to firmly scrape the surface, removing any loose or protruding chips.
"We scrape it hard with a floor scraper to clean up the vinyl chips. That makes it smoother and also reduces the amount of product needed in the top coat to cover the vinyl chips."
Focus only on removing the loose chips. For random broadcast systems, use a shop vacuum with a floor attachment wrapped in duct tape to avoid scratching the coating. If you’re working on a full broadcast floor, you can opt to use a floor buffer with fine sandpaper for an extra-smooth finish. After scraping, vacuum thoroughly to remove all dust and debris. This prepares the surface for the topcoat application.
Apply Topcoat
The topcoat needs to be applied within a 2 to 20-hour window after the basecoat to ensure proper chemical bonding. If this window is missed, you’ll need to sand, vacuum, and clean the surface with a solvent before continuing.
Start by applying the topcoat with a flat-blade squeegee, then use a 3/8" nap roller to spread it evenly over small sections (approximately 3’x6′) to maintain a wet edge. The typical application rate is 200 square feet per gallon, resulting in a 5-mil dry film thickness. Indirect lighting can help you spot missed areas in the clear coat. Replace the roller covers every 400–500 square feet to prevent buildup that could affect the finish. Once applied, immediately inspect the surface for any imperfections.
Inspect and Allow Full Cure
Check the surface for pinholes or thin spots while the topcoat is still wet, and touch up as needed. For light foot traffic, the floor can typically be used after 4–6 hours at temperatures between 70°F–80°F. Vehicle traffic can resume after 24 hours, but full curing takes 5–7 days at 77°F or higher.
If temperatures drop below 50°F, the curing process will pause, and those hours won’t count toward the total cure time.
| Traffic Type | Wait Time (70°F–80°F) | Wait Time (Below 60°F) |
|---|---|---|
| Light Foot Traffic | 4–8 hours | 12–24 hours |
| Heavy Foot Traffic | 8–12 hours | 24–36 hours |
| Vehicle Traffic | 24 hours | 48 hours |
| Full Chemical Cure | 5–7 days | 7–10 days |
Proper curing is critical to achieving a durable, long-lasting finish, so be sure to monitor both temperature and time closely.
Conclusion
Sticking to a detailed checklist for polyurea coating installation isn’t just a good idea – it’s absolutely necessary. Polyurea’s fast cure time means even minor errors during surface preparation or curing can lead to problems. In fact, almost 90% of coating failures stem from poor preparation. When done right, polyurea systems can last 10 to 20 years or longer, proving the importance of a thorough and precise installation process. This is why having a skilled, well-trained team is so critical.
Atlas Concrete Coatings ensures professional results by combining expert training with strict adherence to manufacturer guidelines. Their certified team, trained directly by Penntek, follows every step with precision, delivering top-tier quality and customer satisfaction. Each part of their process is designed to achieve the durability and performance that polyurea coatings are known for.
"The polyurea solution bonds to the concrete and is stronger and more flexible than epoxy. The base coat bonds to open pours in the concrete and adheres deep into the concrete becoming a permanent part of the floor."
- Atlas Concrete Coatings
Whether it’s a residential garage, a commercial property, or an industrial facility, Atlas Concrete Coatings provides floors that are both durable and visually appealing. With a 15-year warranty on residential installations and a one-day installation process that allows use within 24 hours, their approach ensures the lasting results outlined in this checklist.
FAQs
What environmental factors should you check before applying polyurea coatings?
To get the best results from a polyurea coating installation, you need to pay close attention to the conditions around you, as they can directly impact the coating’s adhesion and longevity.
Temperature plays a big role here. Polyurea coatings are known for curing quickly and staying flexible, even in colder climates. That makes them a solid choice for various environments. But if you’re dealing with extreme heat or cold, you might need to tweak the application process to ensure everything goes smoothly.
Moisture levels are just as important. The concrete surface should be fully cured – this usually takes at least 28 days at 70°F – and tested to confirm there’s no lingering moisture. High humidity or water vapor transmission can cause the coating to fail, so managing these factors is non-negotiable.
By carefully evaluating temperature, humidity, and the condition of your surface before starting, you can set the stage for a durable, high-quality polyurea finish.
Why is proper surface preparation crucial for the durability of a polyurea coating?
Proper surface preparation plays a key role in making sure polyurea coatings bond effectively to the substrate. Neglecting this step can result in problems like delamination, blistering, and weak adhesion, all of which can drastically shorten the coating’s life and even cause it to fail prematurely.
By thoroughly cleaning, repairing, and preparing the surface, you create a solid base that enhances the coating’s durability and performance. Cutting corners on this process can lead to expensive repairs and reduce the overall lifespan of your flooring system.
Why is it crucial to follow the manufacturer’s instructions during polyurea coating installation?
Properly following the manufacturer’s instructions is key to a successful polyurea coating installation. These guidelines cover crucial steps like surface preparation, testing, and treatment, all designed to ensure strong adhesion and lasting durability. Ignoring or modifying these steps can result in problems such as peeling, cracking, or even early failure of the coating.
Sticking to the recommended process not only enhances the coating’s performance but also safeguards your investment. It ensures the finished surface delivers both the look and functionality you expect.