
Cracks in concrete can ruin the durability and look of polyurea coatings. To ensure a smooth, long-lasting finish, it’s critical to repair cracks before applying the coating. This process involves cleaning, shaping, and filling cracks with the right materials, like polyurea fillers, and using proper tools to prepare the surface. Here’s what you need to know:
- Why Repair Cracks? Cracks cause poor adhesion, uneven surfaces, and moisture issues like blistering or delamination.
- Tools You’ll Need: Pressure washer, angle grinder, trowel, industrial vacuum, and protective gear.
- Materials to Use: Low-viscosity polyurea fillers, foam backer rods for wide cracks, and degreasers to remove contaminants.
- Steps to Follow: Inspect cracks, clean and shape them, apply fillers, and sand for a smooth finish.
- Common Mistakes to Avoid: Skipping cleaning, using the wrong materials, or failing to grind repairs flush.
Proper preparation ensures the coating lasts up to 10 years and handles heavy use without peeling or chipping. Repairing cracks isn’t just about aesthetics – it’s essential for durability and performance.
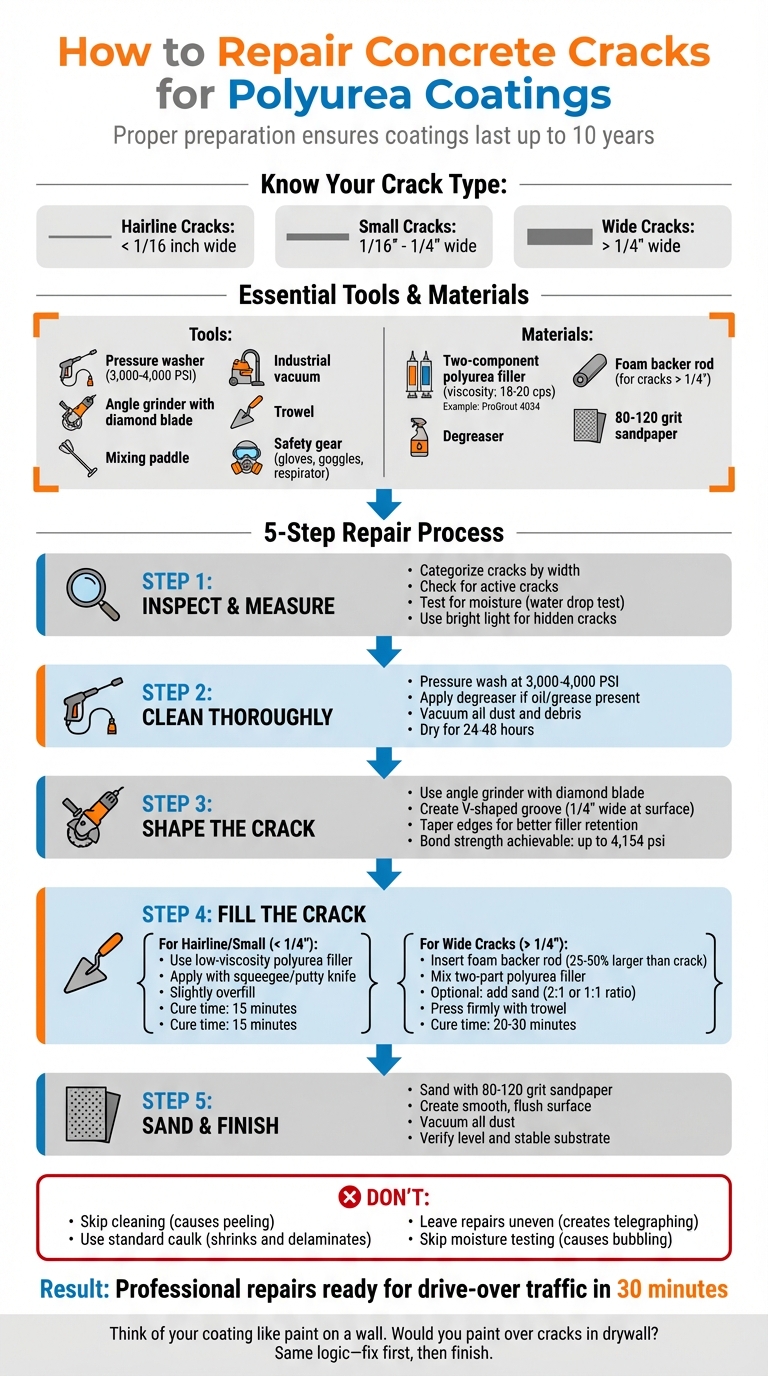
Step-by-Step Guide to Repairing Concrete Cracks Before Polyurea Coating
Crack Repair Polyurea for Concrete Floors
sbb-itb-4b4bb37
Tools and Materials You’ll Need
Before starting, make sure to gather everything you need – polyurea’s quick curing time means there’s no room for delays.
Required Tools
To get the job done right, you’ll need a few key tools:
- Pressure washer: Clears out debris from cracks.
- Industrial vacuum: Removes dust left behind after grinding.
- Angle grinder with a diamond blade: Shapes crack edges into a clean, even profile.
- Trowel: Helps apply fillers smoothly.
- Backer rod insertion tool: Places foam backer rods into wider cracks.
- Mixing paddle: Ensures thorough blending of two-component polyurea fillers.
Don’t forget personal protective gear: gloves, goggles, a respirator, and hearing protection. These tools can be found at home improvement stores like Home Depot or Lowe’s. For more specialized items, such as industrial vacuums or backer rod tools, check with concrete supply stores or order directly from coating suppliers.
Required Materials
The main material for crack repairs is a two-component polyurea crack filler designed to penetrate deeply. For example, ProGrout 4034, with a viscosity of 18–20 cps, can handle drive-over traffic in just 30 minutes. To make it more cost-effective and durable for larger spalls, you can mix the filler with sand in a 2:1 or 1:1 volume ratio.
If you’re dealing with cracks wider than 1/4 inch, use a foam backer rod to control the depth of the filler. A good degreaser is also a must to remove oils and contaminants that could interfere with adhesion. For hairline cracks under 1/4 inch, use a concrete caulk specifically designed for small repairs. Avoid self-leveling sealants or standard caulk since they tend to shrink or remain too flexible, which can compromise the polyurea topcoat’s bond.
Suppliers offer these materials in various kit sizes to suit different project needs. For instance, ProGrout comes in 2-gallon and 10-gallon kits. Versatile Coatings provides a 4930 Polyurea Filler that’s ready for grinding in just 20 minutes, while Sika produces 100% solids polyurea and epoxy products ideal for crack repair.
With the right tools and materials in hand, you’re ready to prepare the concrete for a long-lasting polyurea coating.
How to Prepare the Concrete Surface
Getting the concrete surface ready is a critical step in ensuring a long-lasting polyurea repair. Skipping or rushing through this process can lead to poor bonding, which may result in peeling or cracks reappearing down the line.
Inspect and Measure the Cracks
Start by carefully examining and categorizing the cracks. Cracks can generally be grouped into three categories based on their width:
- Hairline cracks: Less than 1/16 inch wide.
- Small cracks: Between 1/16 inch and 1/4 inch wide.
- Wide cracks: Greater than 1/4 inch wide.
Measuring the cracks is key to deciding the right repair method. For smaller cracks, concrete caulk might suffice, but wider cracks often require a polyurea filler paired with a backer rod. Additionally, check for active cracks – those that are still expanding – and test for moisture issues using a simple water drop test. If water beads up instead of soaking in, contaminants like oil or grease may be present. Use a bright light to locate any hidden cracks, especially in poorly lit areas.
Once you’ve assessed the cracks, the next step is to clean and shape them to ensure the filler adheres properly.
Clean and Shape the Cracks
After measuring, focus on cleaning the cracks thoroughly to remove debris and contaminants. Use a pressure washer set to 3,000–4,000 PSI to clear out loose material, dirt, and other residues. If you detect oil or grease, apply a degreaser, scrub it into the surface, and rinse it off completely. Follow this by using an industrial vacuum to remove any leftover dust and moisture. A clean surface is non-negotiable for proper polyurea bonding.
Next, reshape the crack edges to optimize filler retention. An angle grinder with a diamond blade works well for this task. Create a V-shaped groove by tapering the edges to about 1/4 inch wide at the surface. This shape enhances the mechanical bond of the filler. When applied to properly prepared grooves, low-viscosity polyurea fillers can achieve bond strengths as high as 4,154 psi on hairline cracks.
Finally, let the surface dry completely – this usually takes 24 to 48 hours. Once dry, the cracks will be ready for repair.
How to Repair Different Crack Sizes
Once the cracks are cleaned and prepped, it’s time to fill them. The method you choose will depend entirely on the crack’s width. Using the same approach for a hairline crack and a wider gap can lead to a weak repair that doesn’t hold up.
Fixing Hairline and Small Cracks (Under 1/4 Inch)
For cracks smaller than 1/4 inch, your best bet is a low-viscosity polyurea or epoxy filler. These materials are fluid enough to seep deep into narrow cracks, forming a strong mechanical bond. Avoid using concrete caulk for these types of repairs – it’s not effective for such fine cracks.
To apply, use a squeegee or putty knife, and slightly overfill the crack. This ensures the surface will be flush after sanding. Many polyurea fillers set quickly, curing in as little as 15 minutes. However, always stick to the manufacturer’s guidelines for the best results. Once cured, sand the area with 80–120 grit sandpaper to create a smooth, even finish.
"Think of your coating like paint on a wall. Would you paint over cracks in drywall? Same logic – fix first, then finish." – PowerCOAT Coatings & Equipment
This precise repair method ensures a uniform surface, which is critical for proper polyurea bonding. Starting with a solid, even base is key to long-lasting results.
Fixing Wide Cracks (Over 1/4 Inch)
When dealing with cracks wider than 1/4 inch, you’ll need a different approach. Start by inserting a foam backer rod into the crack. Choose a rod that’s 25% to 50% larger than the crack’s width so it stays securely in place. The backer rod helps control the depth of the filler, reducing waste and providing necessary support. For particularly large gaps, a trimmed pool noodle can work as a budget-friendly alternative.
Next, mix your two-part polyurea filler according to the manufacturer’s instructions. For deeper cracks, you can add sand to the filler to reduce material costs. Use a trowel or putty knife to press the filler firmly into the crack, slightly overfilling it. Be patient and allow the filler to cure completely – rushing this step could trap resin and leave a cloudy or uneven finish. Once cured, sand the patch as described earlier, ensuring it blends seamlessly with the surrounding surface.
This method provides a durable, even base, ready to support your polyurea coating. Proper preparation ensures your repair will hold up over time and deliver a professional-looking finish.
Preparing the Surface for Polyurea Coating
Check Surface Readiness
After completing repairs and sanding, ensure the concrete substrate is both level and stable. Look closely for any bumps or dips that might interfere with the polyurea coating’s performance. Double-check that your repairs have created a smooth, consistent surface. Once everything looks good, move on to priming the surface to ensure the coating adheres properly.
Mistakes to Avoid When Repairing Cracks
When repairing cracks, even small missteps can compromise the durability of your polyurea coating. Here’s a breakdown of common errors and how they affect adhesion and performance.
Skipping thorough cleaning is one of the biggest pitfalls. Contaminants like oil, grease, old curing compounds, or sealers can prevent proper adhesion, leading to peeling or bubbling. A clean, well-prepared surface – even for hairline cracks – can achieve impressive bond strength, reaching up to 4,154 psi.
Using the wrong repair materials is another frequent mistake. Generic concrete patches or caulk often shrink or remain overly flexible, which can result in visible repair lines or "telegraphing" through the final finish. Instead, opt for low-viscosity epoxy or polyurea crack fillers specifically designed for floor coatings. These materials harden without shrinking and are often ready for grinding within 15 minutes.
Failing to grind repairs flush with the surrounding concrete is another issue. Uneven surfaces prevent proper wetting by the polyurea and can lead to inconsistent coating thickness. Prosoco explains this risk well:
Grind too soon and you’ll trap resin – leaving a cloudy finish that never levels right.
Proper grinding ensures a smooth surface, but don’t forget to vacuum thoroughly afterward to remove all dust, as leftover debris can affect the coating’s adhesion.
Common Mistakes and Their Impact
| Mistake | Impact on Final Coating |
|---|---|
| Oil and Grease Left Behind | Prevents chemical adhesion; causes peeling |
| Using Caulk or General Patches | Too soft or prone to shrinkage; leads to delamination |
| Not Grinding Flush | Creates telegraphing and uneven coating thickness |
| Skipping Moisture Testing | Moisture entrapment causes bubbling and lift |
Conclusion
Before applying polyurea, addressing cracks is a must for achieving a durable and polished finish. Even the smallest cracks, if ignored, can lead to peeling, moisture damage, and an uneven surface. As Prosoco points out, "On most jobs, skipping this step [preparation] shortens the life of any concrete crack repair by years." Concrete naturally faces micro-stress from temperature changes and sub-base shifts, making professional-grade materials and careful preparation critical to preventing moisture from compromising the bond lines beneath your coating.
To ensure the best results, use low-viscosity fillers that are compatible with your coating, grind the repairs flush with the surface, and allow sufficient curing time before application. These steps create the solid foundation polyurea needs to perform as intended. A thorough process of inspection, cleaning, and repair ensures strong adhesion and long-lasting durability.
For residential or commercial projects, rely on Atlas Concrete Coatings for expert concrete repair and polyurea application. Their experienced team uses proven techniques and high-quality materials to deliver floors built to endure heavy use and environmental challenges for years to come.
FAQs
Do I need to repair every crack before polyurea?
Yes, it’s important to address all cracks in the concrete before applying polyurea coatings. Filling cracks and repairing spalled areas ensures a smooth, even surface, which helps the coating adhere properly. This step also prevents problems like peeling or delamination and contributes to a more durable finish. Proper preparation is key to achieving long-lasting results and maximizing the performance of the polyurea coating.
How dry does concrete need to be before coating?
The concrete surface needs to be completely clean and dry before applying polyurea coatings. Any moisture can compromise adhesion and durability, so it’s essential to meet all environmental standards. To confirm the surface is ready, use ASTM-standard tests to check for both moisture and porosity. A dry surface is crucial to avoid problems like peeling or delamination, which often happen when water or residual dampness is present.
When should I call Atlas Concrete Coatings?
When you need expert assistance with concrete repair, surface preparation, or applying durable polyurea coatings, reach out to Atlas Concrete Coatings. They specialize in tackling issues like cracks, spalling, and other surface problems that demand professional care. Plus, they offer on-site consultations to evaluate your concrete’s condition and provide precise estimates, ensuring the surface is properly prepared for a finish that lasts.