
Polyurea floor coatings are a big investment, often costing thousands for a standard two-car garage. Before committing, it’s essential to understand warranty terms to protect your investment. Here’s what you need to know:
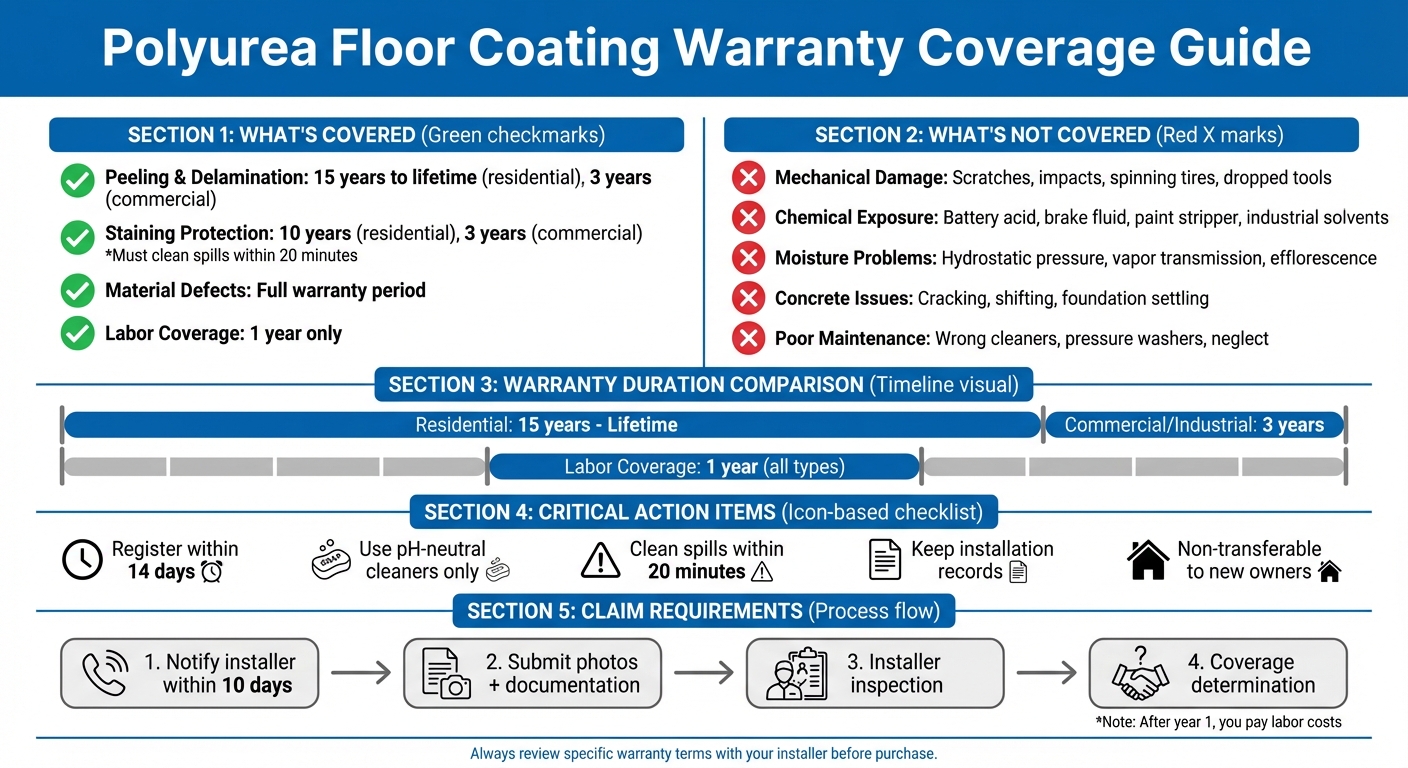
- Coverage: Warranties typically include protection against peeling, delamination, staining (with conditions like cleaning spills within 20 minutes), and material defects. Labor is often covered for just 1 year, while material coverage can last 15 years to a lifetime.
- Exclusions: Issues like concrete cracking, moisture problems, chemical damage (e.g., battery acid), and poor maintenance are usually not covered.
- Transferability: Most warranties are non-transferable, meaning they don’t apply to new property owners.
- Maintenance Requirements: Following care guidelines (e.g., pH-neutral cleaners, avoiding pressure washers) is mandatory to keep the warranty valid.
- Claim Process: Claims require proof of installation, warranty registration (within 14 days), and photos of the issue. Labor costs after the first year are typically out-of-pocket.
Key Takeaway: Review the warranty details carefully, register it on time, and maintain your floor properly to avoid voiding the coverage. Choose a professional installer with a solid warranty for peace of mind.
Polyurea Floor Coating Warranty Coverage Guide: What’s Included vs Excluded
What Your Warranty Should Cover
When choosing a warranty, it’s important to understand what it actually protects. A solid warranty should address common issues like peeling, delamination, staining, limited duration, non-transferability, and material defects. Here’s a closer look at what to expect.
Staining protection is often included and covers spills from substances like oil, transmission fluid, gasoline, and diesel for up to 10 years. However, there’s a catch: spills must be cleaned up within 20 minutes. So, quick action is essential when accidents happen.
The warranty period varies depending on how the space is used. For residential installations, coverage often lasts between 15 years and a limited lifetime, while commercial or industrial applications typically receive only 3 years.
Another thing to check is whether the warranty is transferable to new owners. Many polyurea warranties are limited to the original owner and become void when the property changes hands. For example, South Coast Epoxy Flooring makes it clear:
"Please note that this limited warranty is non-transferable and applies solely to the property owner at the time of contracting".
Non-transferable warranties might lower the appeal of your property to future buyers, whereas transferable ones can enhance buyer confidence.
Lastly, confirm that material defects are covered. This ensures you’re protected if the coating fails due to poor product quality rather than installation mistakes. Keep in mind that while some warranties offer lifetime material protection, labor costs are often only covered for the first year.
Peeling and Delamination Coverage
Your warranty should explicitly cover peeling and delamination, which occur when the coating separates from the concrete. Mike Mincemoyer, President of STRONGHOLD FLOORS, explains:
"The warranty should cover the coatings being properly bonded to the concrete".
This coverage typically applies during normal use, meaning it excludes damage caused by misuse or abuse. For residential garages, this protection often lasts 15 years to a lifetime, while commercial spaces usually receive around 3 years.
Some warranties also address physical abrasion – like chips or scrapes – separately from delamination. Make sure you understand what types of damage are included and what falls outside the warranty’s scope.
Length of Warranty Period
The duration of a warranty depends heavily on the type of installation. Residential floors generally enjoy the longest coverage, ranging from 15 years to a limited lifetime. In contrast, commercial and industrial spaces – which endure heavier traffic – are usually limited to 3 years.
It’s worth noting that "lifetime" often means the lifetime of the original purchaser’s ownership, not the actual lifespan of the floor. If you sell the property, that "lifetime" warranty typically ends.
For staining protection, expect coverage to last about 10 years for residential spaces and just 3 years for commercial ones. Labor coverage is usually shorter than material coverage, often capped at 1 year from the installation date, regardless of whether the space is residential or commercial.
Some warranties also include square footage limits. For instance, residential warranties often cover up to 5,000 square feet. If your project involves a larger area, confirm that the entire space is covered.
Warranty Transfer to New Owners
Most polyurea warranties are non-transferable, meaning they apply only to the original purchaser. Universal Epoxy‘s warranty, for example, states:
Floor coating materials "are warranted to the original consumer purchaser… for as long as the original consumer purchaser owns the home in which the floor coating materials were installed".
Before signing, ask for written clarification on the transfer policy. Some contractors may offer transferable warranties as an upgrade, but if the document doesn’t mention transfers, assume it’s non-transferable and confirm with the provider.
Material Defects and Performance Issues
Make sure your warranty covers product-related failures, such as manufacturing defects. This protects you if the polyurea coating breaks down, discolors prematurely, or fails to meet performance expectations despite proper installation and maintenance.
It’s important to distinguish between material defects and installation errors. If the coating fails due to poor surface preparation or incorrect application, that’s typically covered under installation terms. However, if the product itself is defective, material coverage applies.
For residential warranties, material protection often lasts the full warranty period. In commercial settings, material coverage typically aligns with the shorter 3-year term. Even with lifetime material coverage, labor costs for repairs are usually only included for the first year.
If repairs fall outside the warranty, some companies charge based on current material and labor rates. This means you could face higher costs if prices have increased since your original installation.
What Warranties Typically Don’t Cover
Even the most comprehensive warranties come with limitations. Knowing what’s not covered can save you from unexpected headaches when filing a claim. Most exclusions fall into five main categories: mechanical damage, chemical exposure, moisture issues, concrete problems, and poor maintenance. Being aware of these exclusions can help you make the most of your warranty and avoid expensive repairs down the line.
Mechanical Damage Exclusions
Physical damage caused by everyday use or accidents is generally not covered. For example, Polyurea Concrete Coatings specifies:
"Our warranty excludes damage from outside forces like abuse, neglect, and misuse. What’s that mean? Scratches, damage from impact, spinning tires…"
This includes damage from dropping heavy tools, dragging furniture, or using equipment too soon after installation. Aggressive actions like burnouts or premature machinery use also void warranties. Prime Polymers, Inc. adds:
"This Limited Warranty… DOES NOT EXTEND TO… Gouging, scratching, chipping… or damage resulting from… Facilities, machinery, or equipment being installed and used after the floor system was applied".
Even cleaning with pressure washers, mechanical scrubbers, or buffing machines can void your warranty.
Chemical Exposure Exclusions
Although polyurea coatings resist many chemicals, they’re not invincible. Damage from harsh chemicals like battery acid, brake fluid, paint stripper, or industrial solvents is typically excluded. Polyurea Concrete Coatings notes:
"Our warranty does not cover damage due to harsh chemicals such as: Battery acid, Brake fluid, Paint stripper, Industrial solvents or like products".
Even using the wrong cleaning products can cause issues. Cleaners like vinegar or citrus-based solutions can dull the finish and void the warranty entirely. Titan Concrete Coatings warns:
"DO NOT use a citrus cleaner or vinegar. These types of cleaners are acidic and will dull and wear the top coat layer".
Moisture Problems from Below
Moisture coming up from beneath the concrete is another common exclusion. Issues like hydrostatic pressure, vapor transmission, or efflorescence are generally not covered. Prime Polymers, Inc. explains:
"This limited warranty does not extend to such delamination… if and when delamination of the floor occurs because of a moisture condition that exists beneath the concrete slab".
While some high-end systems with moisture-mitigating primers may offer exceptions, most standard "1-day" polyurea installations exclude moisture-related failures. It’s usually up to the homeowner to test the concrete beforehand and ensure moisture vapor transmission is within acceptable limits (typically under 3 pounds). If moisture-related problems arise, repairs can be costly, with some companies charging a minimum of $250.
Concrete Substrate Problems
Warranties typically cover the coating, not the concrete underneath it. If your slab cracks, shifts, or moves due to ground conditions, the warranty won’t apply. Polyurea Concrete Coatings states:
"Cracking due to substrate movement is not under warranty regardless of whether same was repaired during original installation or not".
Issues like foundation settling, structural movement, or temperature-driven expansion and contraction are excluded. The coating will follow the concrete’s movement, but any resulting damage will be your responsibility.
Poor Maintenance Practices
Neglecting proper maintenance can void your warranty entirely. This includes skipping regular cleaning, using abrasive tools, or ignoring the manufacturer’s care instructions. Many warranties require specific cleaning methods, such as using pH-neutral cleaners and soft-bristle brooms. Keeping documented records of your cleaning routine can help if a claim arises. Without proof that you followed the care guidelines, your claim might be denied.
Installation and Concrete Preparation Requirements
The success of your coating – and the validity of your warranty – starts well before the first layer is applied. Most warranty issues arise because of overlooked steps during the concrete preparation process. To avoid problems, installers must stick to strict preparation and installation protocols to ensure proper adhesion and warranty compliance.
Concrete Inspection Before Installation
Before applying any coating, it’s crucial to test the concrete. Perform an MVT (moisture vapor transmission) test to confirm emissions stay below 3 lbs/1,000 ft²/24 hours. Additionally, check the surface porosity with a simple water spray test. If the surface absorbs water readily, it’s ready for coating. However, if water beads up, the concrete may need further grinding to remove sealers or contaminants. For newly poured concrete, allow a full 30 days for curing.
Inspect and document any existing cracks or shifting in the substrate, as warranties typically don’t cover damage caused by future movement. Lastly, ensure the surface is free of oils, grease, tire marks, and dust. Thorough cleaning is essential for proper adhesion. Keeping records of these tests and inspections helps create a solid foundation for accurate installation documentation.
Installation Documentation
To protect your warranty, maintain detailed records of the installation process. Many warranty programs require proof that the system was purchased and installed by a certified professional. Be sure to document key details such as the contractor’s information, the product used, the installation date, and photographs of the completed work.
A signed proposal or a detailed floor report outlining the installed system and its intended use may also be required. These records are critical to ensure your warranty remains valid and can be easily referenced if needed.
Warranty Registration Steps
Your warranty won’t activate unless you register it promptly. Complete the registration process within 14 days of installation. Failing to meet this deadline will void your warranty, even if the installation was flawless. If you plan to sell your home, check whether the warranty can be transferred to the new owner. Some warranties may require additional paperwork or fees for transferability. Proper registration ensures you’re covered and makes future claims much smoother.
sbb-itb-4b4bb37
How to File Claims and Understand Warranty Limits
If you spot a defect, notify your installer within 10 days of discovering the issue. Be sure to take clear photos from multiple angles and send them via email to your contractor. Include a detailed description of the problem, the purchase date, and the specific materials used. Following these steps can help streamline the claims process and clarify your financial obligations.
Steps to File a Warranty Claim
Start by gathering your installation records, including your invoice, warranty registration, and product specifications. When submitting your claim, attach clear photos showing the damage. The installer will then inspect the floor to confirm whether the issue falls under warranty coverage. It’s important to note that labor coverage typically expires after the first year. After that, you may only qualify for replacement materials and will need to cover any additional installation costs yourself.
Pro-Rata Cost Sharing
Some warranties operate on a cost-sharing basis, depending on the age of your flooring. Even if the warranty covers full material replacement, you’ll still be responsible for any price increases since the original installation. For instance, if the cost of materials rises from $2,000 to $2,400, you’ll need to pay the $400 difference. Additionally, labor fees after the initial coverage period can add $250 or more to your expenses.
Repair Limitations
There are also specific limitations to what repairs can address. Warranties typically cover only the damaged section, which means you might notice differences in color or texture after repairs. For example, one warranty states:
"Areas repaired under this warranty may vary in color and texture from areas originally installed which are not repaired".
Factors like UV fading, discontinued color options, and natural aging can also impact the appearance of your flooring. So, a floor installed three years ago might not match perfectly with newly applied materials. This is considered standard and does not qualify as a warranty defect.
How to Keep Your Warranty Valid
To ensure your warranty stays intact, it’s crucial to follow the manufacturer’s care instructions. Ignoring approved cleaning methods or skipping regular maintenance could void your warranty, leaving you to cover repair costs out of pocket.
Proper Cleaning and Maintenance
Daily cleaning is key, but it’s important to use the right tools and products. Stick to soft-bristled brooms, microfiber mops, or sponges paired with a mild, pH-neutral cleaner. Avoid abrasive tools like scouring pads, pressure washers, or mechanical scrubbers, as these can damage the surface and void your warranty. Acidic cleaners, including vinegar or citrus-based products, are also off-limits because they can wear down the protective topcoat. One manufacturer, Titan Concrete Coatings, emphasizes this:
"Use a mild or PH-Neutral cleaner… DO NOT use a citrus cleaner or vinegar. These types of cleaners are acidic and will dull and wear the top coat layer." – Titan Concrete Coatings
Spills should be addressed immediately, especially if they involve oils, grease, or acids. For incidents like battery acid or antifreeze, neutralize the spill with a baking soda and water paste before rinsing thoroughly. Some warranties even require periodic professional inspections and topcoat refreshes every five to seven years. Be sure to keep detailed records of any professional cleanings or inspections to support potential warranty claims.
Proper cleaning is just one part of the equation – how you use your flooring matters just as much.
Usage Guidelines
In addition to cleaning, following usage guidelines is essential for protecting your floor coating and maintaining your warranty. Activities that cause mechanical stress, such as spinning tires or heavy impacts, are considered misuse and can void your coverage. Similarly, damage caused by harsh industrial chemicals – like battery acid, brake fluid, paint stripper, or industrial solvents – is typically not covered.
After installation, adhere to the return-to-service timeline: avoid foot traffic for 24 hours, refrain from placing heavy items for 72 hours, and keep vehicles off the surface for seven days (unless a fast-set product is specified). To prevent scratches, use furniture pads under heavy or movable items. By combining proper cleaning with careful usage, you’ll not only maintain your warranty but also extend the life and performance of your flooring.
Conclusion
Before investing in polyurea floor coatings, take the time to carefully review the warranty details. Pay close attention to what’s included – like protection against peeling, delamination, and UV-related yellowing – and what isn’t, such as problems with the concrete substrate, moisture issues, or certain types of chemical damage. Knowing these specifics can help you sidestep unexpected repair costs.
Make sure to register your warranty within 14 days of installation and stick to the recommended maintenance guidelines. Skipping proper upkeep could void your warranty, leaving you responsible for repair expenses.
Understanding the finer points of your warranty is also essential. Look out for terms like pro-rata clauses, who covers labor costs, and whether the warranty can be transferred to a new owner.
Choosing a professional installer with a solid warranty can offer real peace of mind. Be sure to keep detailed records of both the installation and your maintenance efforts to protect your investment for years to come.
FAQs
What should I do if my polyurea floor coating starts peeling or coming loose?
If your polyurea floor coating starts to peel or separate, contact Atlas Concrete Coatings right away. Make sure to report the problem within the time frame specified in your warranty (for example, within 10 days of noticing the issue) to qualify for a repair or replacement.
To prevent further damage and keep the coating in good shape, follow all post-installation care instructions provided. Atlas Concrete Coatings will assist you through the warranty process and coordinate the required service to get your floor back to its original state.
Is the warranty for my polyurea floor coating transferable if I sell my home?
Yes, many polyurea floor coating warranties, including limited-lifetime options, can be transferred to a new homeowner. However, this is usually allowed only once and must happen while the original warranty remains valid. To transfer the warranty, you’ll likely need to complete specific paperwork as detailed in the warranty terms. Make sure to carefully review your warranty’s conditions for the exact requirements.
What do I need to do to maintain my polyurea floor coating warranty?
To keep your polyurea floor coating in top shape and maintain your warranty, stick to these maintenance tips:
- Use a pH-neutral cleaner for regular cleaning to prevent any harm to the coating.
- Wipe up spills immediately to avoid stains or damage.
- Steer clear of abrasive tools or harsh chemicals that might scratch or wear down the surface.
- Shield your floors from extreme heat and prolonged UV exposure, as these can affect the coating’s longevity.
- Check your floor regularly for any chips or cracks, and take care of repairs quickly to stop further issues.
- Follow the manufacturer’s maintenance guidelines and schedule to ensure proper care.
These simple steps will help keep your polyurea floor coating looking great and your warranty intact.