
Maintaining polyurea-coated floors requires avoiding common cleaning errors that can damage their durability and finish. Here’s what you need to know:
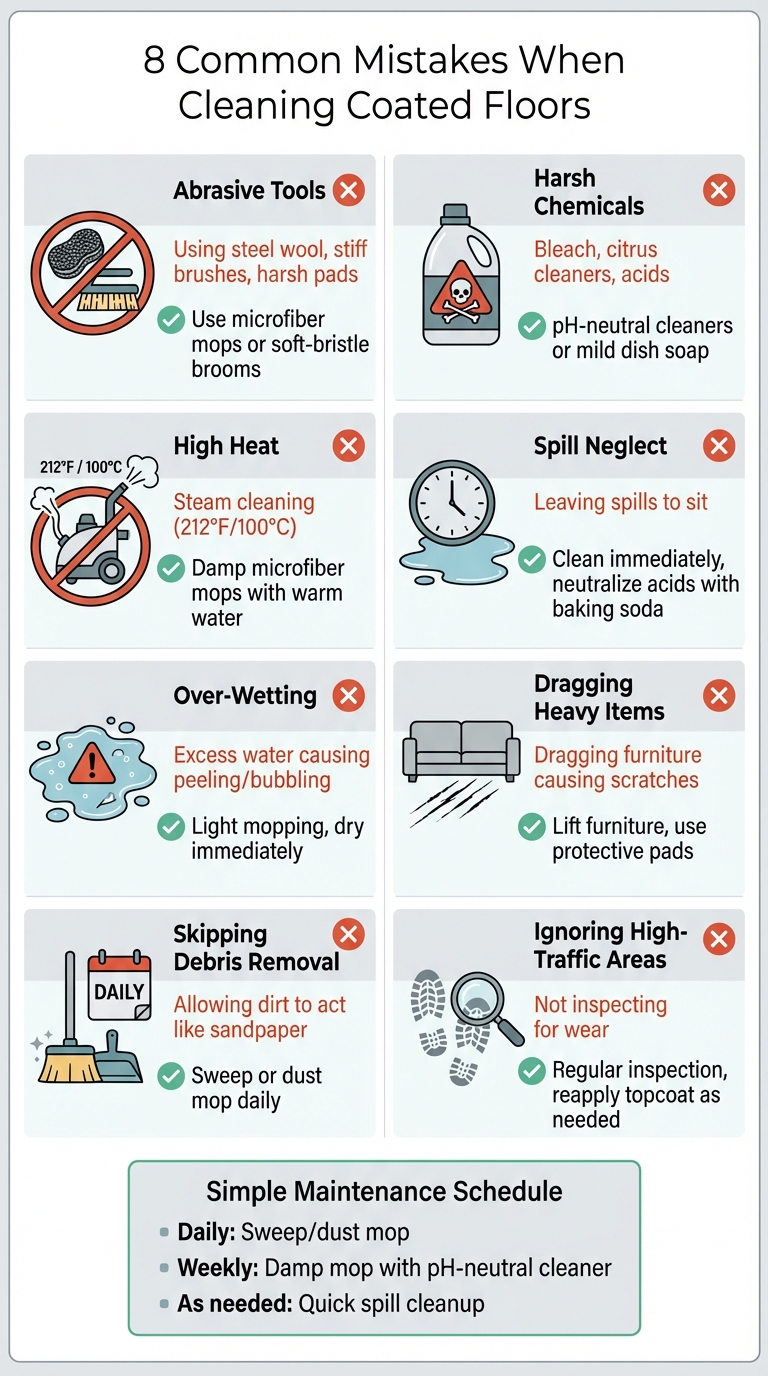
- Abrasive Tools: Steel wool, stiff brushes, and harsh pads can scratch the surface. Use microfiber mops or soft-bristle brooms instead.
- Harsh Chemicals: Bleach, citrus-based cleaners, and acids cause discoloration and peeling. Stick to pH-neutral cleaners or mild dish soap.
- High Heat: Steam cleaning softens the coating and leads to warping. Use damp microfiber mops with warm water.
- Spill Neglect: Clean spills immediately to avoid etching or weakening the coating. Neutralize acidic spills with baking soda paste.
- Over-Wetting: Excess water seeps into cracks, causing peeling or bubbling. Mop lightly and dry the surface immediately.
- Dragging Heavy Items: Lift furniture or use protective pads to prevent scratches and dents.
- Skipping Debris Removal: Dirt acts like sandpaper, creating scratches. Sweep or dust mop daily.
- Ignoring High-Traffic Areas: Inspect regularly for wear and reapply topcoat as needed.
Simple habits like daily sweeping, weekly damp mopping, and quick spill cleanup protect your investment and keep your floors looking great for years.
8 Common Mistakes When Cleaning Polyurea-Coated Floors
Are you making these three mistakes with epoxy floors?
1. Using Abrasive Tools and Pads
Avoid abrasive brushes, steel wool, and harsh pads on polyurea floors. These tools can cause immediate scratches and etching, leaving permanent damage on the surface. As one expert puts it:
"Never use steel wool, abrasive powders, or harsh scrub brushes that can scratch the finish".
The problem goes beyond appearance. Scratches create grooves where dirt accumulates, making cleaning harder and speeding up wear and tear. What starts as minor dulling can escalate into peeling or flaking if the surface integrity is compromised.
Stick to safe tools like microfiber mops and soft-bristle brooms for everyday cleaning. These options pick up dust and debris without harming the floor. For more intensive cleaning, use non-abrasive, color-coded nylon pads (white or red). In commercial settings, automatic floor scrubbers should be equipped with red pads and operated at low speeds to maintain the floor’s glossy finish.
| Safe Cleaning Tools | Damaging Abrasive Tools |
|---|---|
| Microfiber mops and pads | Steel wool and wire brushes |
| Soft-bristle brooms | Stiff-bristle or metal brushes |
| Soft nylon scrub brushes | Abrasive scouring pads |
Using the right tools is essential to keep your floor looking great and lasting longer. Proper care helps maintain its durability and protects the finish for years to come. Up next, we’ll look at how harsh chemicals can also harm your floor.
2. Using Harsh Chemicals and Cleaners
Acidic and alkaline cleaners can damage polyurea coatings, leading to dulling, discoloration, and peeling. Common culprits include bleach, citrus-based cleaners, and harsh acids. If you use bleach-based disinfectants, rinse them off immediately to minimize harm.
So, what should you use instead? Let’s look at cleaning agents that help maintain your floor’s coating.
Stick to pH-neutral cleaners for regular upkeep. These cleaners effectively remove dirt without causing chemical reactions that could weaken the coating. For instance, products like Zep Neutral pH Industrial Floor Cleaner or Bona Multi-Surface Floor Cleaner work well when diluted – just 1 ounce per gallon of water does the trick. For a more affordable option, warm water mixed with a small amount of mild dish soap is usually all you need.
| Safe Cleaners | Avoid These Cleaners |
|---|---|
| pH-neutral floor cleaners | Bleach or chlorine-based products |
| Mild dish soap diluted in water | Citrus-based cleaners |
| Baking soda paste | Harsh acids and alkaline solutions |
If you’re dealing with acidic spills like battery acid or antifreeze, start by neutralizing the area with a paste made from baking soda and water. Afterward, rinse the spot thoroughly with clean water. Always spot-test any new cleaner before using it on the entire floor. Using the wrong cleaning product can leave a residue that not only attracts dirt but also makes future cleaning more challenging.
3. Steam Cleaning or Using High-Heat Methods
Polyurea floors may seem tough, but steam cleaning can actually do more harm than good. Despite appearing effective, steam cleaners can seriously damage polyurea surfaces. With temperatures reaching 212°F (100°C), the high heat softens the polyurea elastomer, weakening its structure and durability.
The combination of heat and moisture is particularly problematic. Steam forces vapor into tiny pores, seams, and cracks, breaking down the bond over time. Industry professionals warn that steam not only softens adhesives but also compromises the finish.
Repeated exposure to steam can lead to issues like delamination, bubbling, and warping. In fact, many manufacturers explicitly exclude steam cleaning from warranty coverage because of these risks.
To check if your floor is ready for wet cleaning, try the water bead test. Place a few drops of water on the surface – if it beads up, the seal is intact. If the water absorbs, the floor is porous and at risk for moisture damage.
For a safer alternative, opt for a microfiber mop dampened with warm (not hot) water and a pH-neutral cleaner. If you’re tackling a larger area, a floor scrubber with soft brush attachments can clean effectively without the risks associated with heat.
4. Delaying Spill Cleanup
Cleaning up spills immediately is crucial to maintaining the integrity of polyurea floors. Allowing substances like battery acid or brake fluid to sit for too long can weaken the protective coating.
"It is strongly recommended that if something is spilled on the floor that these spills be wiped up quickly as some liquids if left for a period of time may etch into the finish and discolor or dull the finish." – Xtreme Floor Systems
Spills can also trap dirt and grit, which can scratch the surface over time. In garages, oil and grease spills are particularly dangerous, as they can create slippery conditions and reduce the effectiveness of non-slip additives.
For oil or automotive fluid spills, use absorbent materials to blot (not rub) the area. If the spill involves acidic substances, wear protective gear, neutralize the acid with a baking soda paste, rinse the area thoroughly, and use a squeegee to remove any leftover water.
Up next: discover how over-wetting can also damage your floor’s finish.
5. Over-Wetting or Soaking the Floor
Too much water can damage polyurea coatings. When excess water seeps into seams, cracks, or damaged spots, it weakens the coating’s ability to stick to the concrete. As Southwest Exteriors points out:
"Once the coating comes in contact with any moisture, it stops bonding to the concrete."
When adhesion is lost, the coating can loosen and eventually peel or flake. Moisture trapped between the coating and the concrete can also cause outgassing, which shows up as bubbles or blisters on the surface. For the best results, the concrete’s moisture level should stay below 5 pounds per 1,000 square feet over a 24-hour period. These problems highlight the importance of using careful and controlled cleaning methods.
The fix is straightforward: use a damp mop instead of a wet one. Lightly moisten the mop with a mild detergent solution, ensuring it doesn’t drip. After cleaning, dry the surface immediately with a clean towel or a squeegee, paying extra attention to seams and edges where water could seep through. For those using a pressure washer, stick to a low-pressure setting and avoid spraying directly on vulnerable areas like control joints or cracks.
Flat-head microfiber mops are a great choice because they apply moisture evenly without over-saturating. On the other hand, traditional string mops can hold too much water, creating puddles that might lead to damage. While polyurea coatings are water-resistant on the surface, any moisture that finds its way underneath through cracks or seams can cause serious issues. Using the right cleaning tools and techniques helps preserve the bond, ensuring your polyurea floor stays strong and durable.
sbb-itb-4b4bb37
6. Dragging Heavy Objects Across the Surface
Dragging furniture or equipment across a polyurea floor creates friction that can damage the coating. Even though polyurea is known for its durability, it’s not immune to scratches, scuffs, and scrapes caused by heavy items. As George Apap from George Apap Painting points out:
"Polyurea coatings are tough, but dragging heavy objects can leave behind scuffs or scrapes."
When heavy furniture is dragged, it can dent or gouge the surface, especially if the item has sharp edges. Adding dirt or debris into the mix only makes things worse – dragging objects over a dirty floor acts like sandpaper, wearing down the coating and dulling its finish. Beyond scratches and gouges, this can even result in cracks or chips .
The fix? Lift, don’t drag. Brian Deas from Deas Garage Floors stresses this:
"When moving furniture or heavy objects, lift them completely off the ground to avoid dragging and scratching."
For added protection, consider using felt or rubber pads on furniture legs. Soft-wheeled dollies or protective mats are also great for moving heavier equipment. And before placing tools or equipment on the floor, check for sharp edges to prevent accidental damage.
Up next, we’ll cover how regular debris removal can help keep your floor looking its best.
7. Skipping Regular Debris Removal
Keeping up with routine debris removal is essential for protecting the integrity of polyurea-coated floors. Dirt and grit may seem harmless, but they can act like sandpaper underfoot. As people walk across the surface, these tiny particles grind into the coating, leading to scratches and a dull finish. Regular cleaning isn’t just about appearances – it’s about extending the life of your floor.
As George Apap puts it:
"A clean concrete floor doesn’t just look better – it lasts longer." – George Apap
Over time, even fine debris can cause cumulative damage, creating scratches that make the floor look worn and potentially shortening its lifespan, which typically ranges from 15 to 25 years. To avoid this, sweep daily using a soft-bristled broom or a microfiber dust mop. Brian Deas of Deas Garage Floors emphasizes this point:
"Sweeping away dirt, dust, and debris with a soft-bristled broom or a microfiber mop will prevent them from scratching the surface as you walk around." – Brian Deas, Deas Garage Floors
For extra protection, consider placing entrance mats at doorways to catch dirt before it reaches your floor. If vacuuming, stick to soft-bristled attachments to avoid damage. A little daily maintenance can go a long way in preventing costly repairs down the road.
8. Ignoring High-Traffic Area Inspections
High-traffic areas take the brunt of daily wear and tear, making regular inspections essential. While routine cleaning helps maintain appearance, inspections help catch early signs of damage before they escalate into costly repairs. Entryways, walkways, and work zones endure constant foot traffic, equipment movement, and debris buildup, making them especially vulnerable.
Set aside time each week to inspect these areas for signs of wear, such as scratches, chips, dull spots, or peeling. According to DFW Classic Coatings:
"Addressing these issues early can prevent more extensive repairs in the future." – DFW Classic Coatings
Particular attention should be given to seams and edges, as these spots often show wear first under heavy use. If you notice the floor beginning to lose its shine or developing scratches, it might mean the protective topcoat is thinning. Catching this early could mean a simple reapplication instead of a full replacement, saving both time and money while extending the floor’s lifespan.
In commercial or industrial spaces, adding professional inspections to your maintenance routine is a smart move. Scheduling these inspections monthly or quarterly can help identify minor issues before they grow into major problems. As Duraamen Engineered Products advises:
"Monthly or quarterly inspections by a floor maintenance professional can catch minor issues before they become significant problems." – Duraamen Engineered Products
Keep in mind that pure polyurea coatings are designed to last up to 15 years, but only with proper care and monitoring. Spending just a few minutes each week inspecting high-traffic zones can go a long way in protecting your investment and keeping your floors in top condition for years to come.
Correct Cleaning Practices for Polyurea-Coated Floors
To keep your polyurea-coated floors in great shape, it’s essential to follow proper cleaning routines. Daily sweeping or dust mopping helps remove dirt and grit that could harm the surface. A soft-bristle broom or microfiber dust mop works best to clear debris without scratching the coating. These regular habits go a long way in preserving the floor’s durability and maintaining its polished look.
For weekly cleaning, use a microfiber mop dampened with warm water and a pH-neutral cleaner. As DB Concrete Coatings explains:
"Polyurea floor coatings are very durable and easy to clean. You can use a mild detergent and water solution to clean most spills and messes." – DB Concrete Coatings
After mopping, rinse the floor with clean water and dry it immediately to avoid streaks and slippery spots.
| Cleaning Frequency | Recommended Action | Tools/Materials Needed |
|---|---|---|
| Daily | Debris removal & spot cleaning | Soft-bristle broom, microfiber cloth |
| Weekly | General mopping | Microfiber mop, warm water, pH-neutral cleaner |
| Monthly/Quarterly | Deep cleaning & inspection | Floor scrubber (soft brush), TSP solution, inspection for chips |
| As Needed | Spill cleanup & neutralization | Absorbent rags, baking soda paste, degreaser |
For tougher cleaning tasks, try these methods: stubborn stains can often be removed with trisodium phosphate (TSP) or a specialized polyurea degreaser, paired with a non-abrasive scrub pad. If you encounter spills like battery acid or antifreeze, neutralize the area with a baking soda and water paste before rinsing thoroughly. For large commercial spaces, deep cleaning every few months using a floor scrubber with a soft brush attachment or a low-pressure washer (under 1,000 psi) is highly effective.
Simple preventative measures can also make a big difference. Place mats at entryways to catch dirt before it reaches the floor, and use felt pads under furniture legs to avoid scuffs or scratches. These small steps help maintain your floor’s appearance and strength over time.
Why Proper Maintenance Matters for Atlas Concrete Coatings
Atlas Concrete Coatings uses thick polyurea blends that penetrate deep into concrete pores, creating a strong, seamless bond rather than just forming a thin surface layer. Regular cleaning is essential to keep this bond intact and ensure top-notch performance.
One of the standout features of Atlas’s coating is its durability. These polyurea coatings offer four times the tensile strength of epoxy and are 98% more flexible. While professional epoxy coatings typically last 3–5 years, a fully polyurea-coated floor can last 15 years or more. For a standard two-car garage (525 sq. ft.), maintenance costs average around $5,500 over its lifespan – nearly half the $11,025 you’d typically spend on epoxy due to its shorter lifespan and more frequent replacements.
Atlas installations also come with lifetime product warranties and excellent service guarantees. However, keeping these warranties intact requires proper maintenance. Neglect, such as leaving battery acid on the surface or using abrasive cleaning tools, can damage the coating and void warranty coverage. As Atlas Concrete Coatings puts it:
"Our reliable blends have true staying power, and will not discolor, fade, or peel even when exposed to heat, chemicals, or the unpredictable climate".
This durability, though, relies heavily on regular upkeep.
Atlas coatings are designed to be 100% UV stable and resistant to heat and chemicals. Routine cleaning helps maintain the coating’s reflective brightness, which can improve ambient lighting and reduce energy costs. Accumulated dirt, oil, or grease can dull this brightness and even create slip hazards, despite the coating’s slip-resistant additives like silica sand.
For cleaning Atlas floors, a simple solution works best: mix 1/2 cup of ammonia with one gallon of warm water to remove dirt and residue. Following these guidelines not only protects the advanced coating but also ensures it performs well for years to come.
Conclusion
Taking care of your floors the right way isn’t just about keeping them looking good – it’s about protecting their durability and functionality for the long haul. Simple habits like daily sweeping to remove debris and weekly damp mopping with a pH-neutral cleaner can go a long way in preventing scratches and wear over time. As Duraamen Engineered Products puts it:
"Better maintenance equals better performance, and a well-cared-for floor coating is a cost-effective and long-lasting solution."
However, common mistakes can undo all your efforts. Missteps such as using abrasive tools, harsh cleaning chemicals, high heat, or even delaying spill cleanup can weaken the protective coating and compromise the floor’s durability. Over-wetting, dragging heavy furniture, skipping routine debris removal, and ignoring high-traffic areas are other culprits that can shorten your floor’s lifespan.
For those using Atlas Concrete Coatings, proper upkeep is especially important to protect your investment and maintain your lifetime warranty. Quick spill cleanup, lifting heavy objects instead of dragging them, and using entry mats to trap dirt and debris are simple yet effective steps to ensure your floor stays in great shape.
FAQs
What are the best tools for cleaning polyurea-coated floors?
To keep polyurea-coated floors looking their best, it’s important to use cleaning tools that are effective yet gentle on the surface. A soft-bristle mop or a high-quality microfiber mop is ideal for everyday cleaning. Pair these with a pH-neutral floor cleaner to easily tackle dirt and spills without harming the coating. For stubborn spots, a non-abrasive nylon-bristle brush can help – just apply light pressure to avoid scratches.
Once you’ve finished cleaning, use a wet-vac or a squeegee to remove any leftover water. This prevents streaks and helps the floor dry faster. For those hard-to-reach edges and corners, microfiber cloths or pads are perfect for precise cleaning. These tools not only preserve the floor’s durability but also keep its glossy finish intact while protecting the surface layer.
What’s the best way to clean up spills on polyurea-coated floors without causing damage?
To clean up spills on polyurea-coated floors without causing damage, start by blotting the spill immediately with a soft, lint-free cloth to avoid stains. Mix warm water with a mild pH-neutral detergent and gently clean the area. Afterward, rinse thoroughly with clean water to remove any residue. Steer clear of abrasive pads, harsh chemicals like acidic or solvent-based cleaners, or heavy scrubbing, as these can harm the coating and shorten its lifespan. With proper care, your floor will maintain its appearance for years.
Why shouldn’t you use steam cleaners on polyurea-coated floors?
Steam cleaning is not recommended for polyurea-coated floors. The intense heat and moisture can compromise the coating, making it soft, prone to peeling, and less durable. This can reduce the floor’s lifespan and affect its overall look. Opt for gentler cleaning methods to maintain the quality and appearance of your floors.