
When it comes to floor coatings, edges are where most failures begin. Poor preparation can lead to peeling, bubbling, and cracking – often within weeks. Here’s what you need to know:
- Why Edges Fail: Sharp corners and contaminated surfaces resist coatings, causing them to pull away during curing. Moisture and inadequate profiling worsen the problem.
- Key Preparation Steps: Grinding edges, creating a chamfer, and removing contaminants are essential. Mechanical methods like diamond grinding provide a stronger bond than chemical etching.
- Moisture Matters: Hidden moisture causes bubbling and delamination. Testing with ASTM probes ensures the slab is ready for coatings.
- Long-Term Benefits: Proper edge prep can extend coating life to 15–20 years, saving thousands in repair costs.
If you skip these steps, expect early failures. Read on to learn the techniques professionals use to ensure durable, long-lasting results.
How to Prepare an Edge for a New Coating | Residential Garage Slab
sbb-itb-4b4bb37
Why Floor Coatings Fail at Edges
Edge failures don’t happen randomly. Studies indicate that about 99% of bond failures are tied to poor or incomplete surface preparation. Edges, being the most exposed and vulnerable areas, are often the first to show signs of failure.
Contaminants and Surface Cleanliness
Concrete edges are magnets for contaminants like grease, wax, oils, dirt, dust, laitance, and curing compounds. These substances act as barriers, preventing the coating from properly adhering.
"Even microscopic contamination acts as a bond breaker. In commercial coatings environments, oils, chemicals, and airborne dust accumulate quickly. Coating over them guarantees early failure." – Select Coatings
Chemical residues – such as adhesives, solvents, caustics, and acids – further complicate matters. These interfere with the curing process, leading to issues like peeling, bubbling, cracking, or delamination. Often, these failures occur just weeks after application.
To spot hidden contaminants, practical tests can be used. For instance:
- Heat Test: Heating a small area to about 150°F with a heat lamp can reveal oils if the surface feels greasy.
- Muriatic Acid Test: Applying muriatic acid can identify grease or wax by showing no reaction when a sealer is present.
Next, let’s explore how moisture plays a role in these failures.
Moisture Vapor Transmission
Moisture moving through concrete slabs – via capillary action or vapor pressure gradients – often condenses beneath non-breathable coatings. As temperatures rise, this trapped moisture generates vapor pressure that pushes outward against the coating. The weakest points, like edges and joints, bear the brunt, leading to bond failure.
"Moisture trapped beneath coatings creates vapor pressure as temperatures rise. That pressure pushes outward, cracking or blistering the coating." – Ethan Knobloch, Owner, Select Coatings
Concrete slabs need significant drying time – anywhere from six weeks to over a year. Manufacturers typically recommend keeping the moisture vapor emission rate (MVER) between 3 and 5 pounds per 1,000 square feet over 24 hours. Testing methods, like Relative Humidity Probes (ASTM F 2170), help predict moisture behavior by measuring humidity levels deep within the slab.
Now, let’s look at how surface profiling impacts coating performance.
Inadequate Surface Profiling
Surface profiling is critical for creating a strong bond. This process ensures the coating material fills microscopic valleys in the concrete, forming a mechanical lock. Without proper roughness, coatings are prone to fail. In fact, 83% of premature coating failures are due to insufficient surface profiling.
Coatings with adhesion strengths above 900 psi can last 15–20 years, but those below 500 psi often fail within just two years. Edges are particularly vulnerable because smooth surfaces prevent the coating from properly anchoring. This can cause shifting during curing, leading to ripples, bubbles, and uneven wear.
The cost of repairing poorly prepared floors is steep – 8 to 10 times more than the cost of preventive profiling. For example, a South Florida facility extended its coating lifespan from 2 years to 9 years by using aggressive profiling (CSP 4-5) and applying moisture-tolerant primers within two hours of preparation.
Effective Edge Preparation Techniques
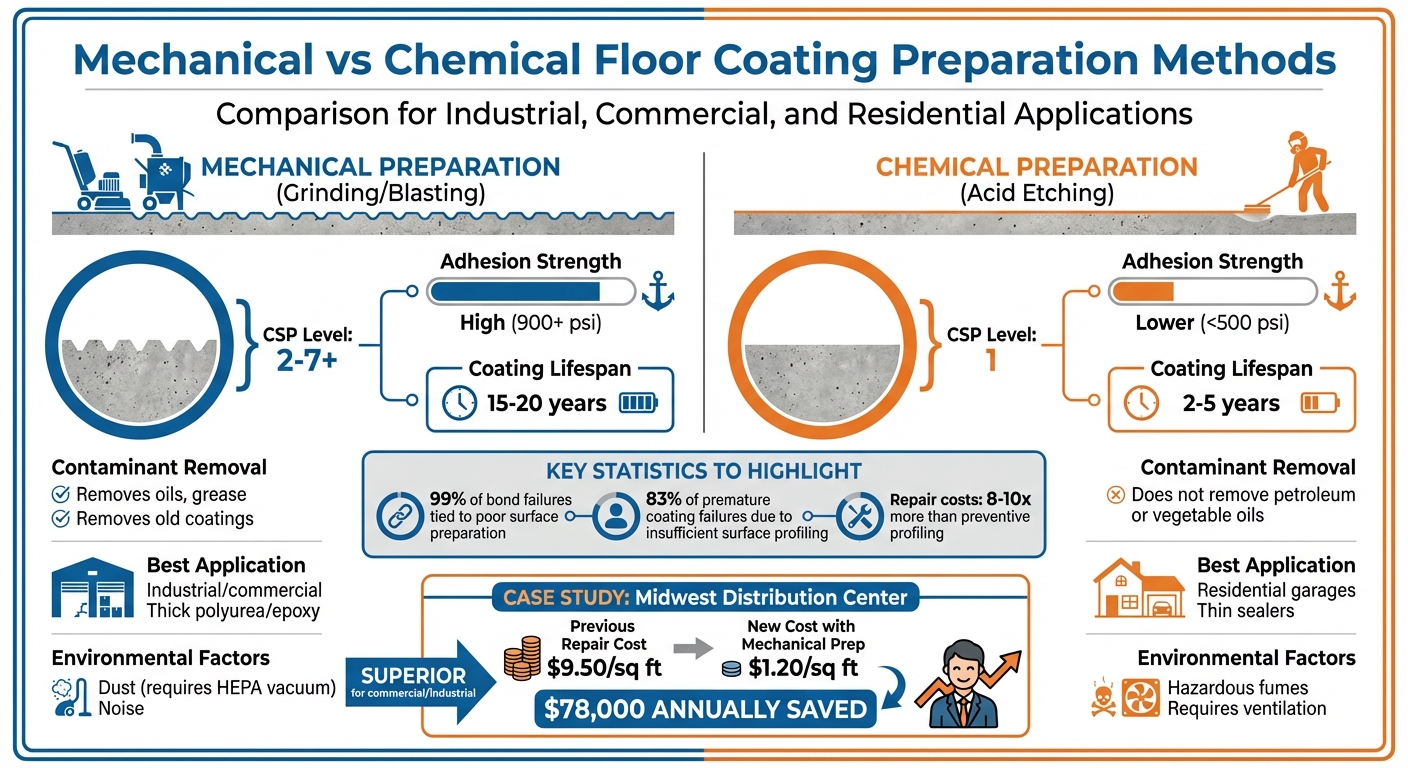
Mechanical vs Chemical Floor Coating Preparation Methods Comparison
Getting the edges right is a critical step for ensuring coating adhesion and durability. By addressing the common causes of edge failure, these techniques help create a solid foundation for coatings that last.
Mechanical Preparation Methods
Mechanical methods are the go-to choice for professionals because they produce the deep surface profiles needed for strong bonds. For example, diamond grinding achieves a Concrete Surface Profile (CSP) of 2–3, making it perfect for epoxy and polyurea coatings ranging from 10–40 mils in thickness. Specialized concrete edge grinders – like low-profile rotary or planetary machines – are designed to get closer to walls than standard equipment, ensuring even pressure and a clean edge line.
Shot blasting is another effective option, using steel beads to clean and profile surfaces to a CSP of 3–7. While it’s often used for larger floor areas, edge-specific attachments can handle perimeter work. For industrial coatings over 40 mils that need to endure thermal expansion, scarifying achieves a CSP of 4–6 using rotating blades.
For tight spaces like corners, closets, or stair landings, handheld angle grinders are invaluable. The trick is to match the diamond grit sequence to the main floor. For instance, if the floor was prepared with 30-grit metal bond, the edges should follow suit to maintain a uniform scratch pattern and avoid visible "halos."
"Failing to prep the edges to the same Concrete Surface Profile (CSP) as the field area compromises the adhesion of coatings… This often leads to premature failure, peeling, or chipping along the perimeter." – Niagara Machine, Inc.
A simple but effective technique is grinding a 1/16" chamfer on the edge. This prevents the coating from thinning at sharp corners, ensuring a more durable bond across the surface.
Chemical Preparation Methods
Acid etching is a chemical approach that dissolves the concrete’s surface layer to create texture. However, it only achieves a CSP of 1, which is the shallowest profile. This method works best for thin residential sealers (less than 10 mils) in well-ventilated, spark-free environments.
That said, acid etching has its drawbacks. It struggles to remove petroleum-based products or vegetable oils, which act as bond breakers. Coatings applied over acid-etched surfaces often fail within two years, with adhesion strength rarely exceeding 500 psi.
"Acid etching can provide adequate surface preparation for horizontal installations of coatings and toppings in areas that are well ventilated and require a spark and dust free environment. But they will not remove petroleum-based products or animal vegetable oils from the concrete." – Thomas Kline, Structural Preservation Systems
Before applying any coating, always perform the water drop test. If water beads on the surface, it indicates contamination from sealers or oils, requiring additional preparation.
Mechanical vs. Chemical Methods Comparison
The differences between mechanical and chemical preparation methods are stark, especially for demanding coatings like polyurea. Here’s a quick comparison of their performance:
| Feature | Mechanical (Grinding/Blasting) | Chemical (Acid Etching) |
|---|---|---|
| CSP Level | 2–7+ | 1 |
| Adhesion Strength | High (900+ psi) | Lower (<500 psi) |
| Coating Lifespan | 15–20 years | 2–5 years |
| Contaminant Removal | Removes oils, grease, old coatings | Does not remove petroleum or vegetable oils |
| Best Application | Industrial/commercial, thick polyurea/epoxy | Residential garages, thin sealers |
| Environmental Factors | Dust (requires HEPA vacuum), noise | Hazardous fumes, requires ventilation |
In July 2025, a Midwest distribution center significantly reduced costs by switching to a mechanical preparation process. Their previous coatings, applied with minimal surface prep, peeled within 18 months and cost $9.50 per square foot to repair. By adopting aggressive mechanical profiling, they achieved 1,100 psi adhesion strength, cutting repair costs to just $1.20 per square foot and saving $78,000 annually.
For polyurea coatings – which average an impressive 891 psi adhesion strength – mechanical preparation is essential. The deeper surface profile provides the mechanical lock these coatings need to deliver their full 15–20 year lifespan.
How Edge Preparation Affects Polyurea Coating Performance
When it comes to polyurea coatings, edge preparation plays a crucial role in ensuring optimal performance. Properly treating edges can significantly enhance adhesion strength and extend the lifespan of the coating. Research confirms that a well-prepared edge is essential for achieving consistent and durable results.
Durability and Lifespan Benefits
Sharp, 90° edges are a common weak point for coatings. During curing, polyurea tends to shrink and pull away from these edges – a process called "edge pull" – which leads to thinner areas that are more prone to failure. To address this, grinding a chamfer of 1/16-inch or 1/8-inch along the edges is recommended. This adjustment allows the polyurea to flow evenly, creating a uniform thickness. A coating is considered "edge-retentive" if it maintains at least 70% of its film thickness at a 90° angle compared to flat surfaces.
"Many industrial structures contain edges, corners, weldments… these geometries pose real challenges for coatings and are frequently the first to show signs of rust staining and eventual corrosion." – KTA-Tator
For applications requiring high performance, applying a stripe coat on edges, welds, and corners provides an additional layer of protection. Brush application is ideal for weldments and crevices, while spray application is better suited for edges to reduce the risk of coating pull-off. This approach is especially important in highly corrosive or immersion environments.
These steps not only improve the uniformity of the coating but also contribute to better moisture control and primer performance.
Moisture Control and Primer Application
While chamfering and stripe coats enhance durability, addressing moisture is equally vital for successful primer application. Moisture trapped beneath the coating can weaken adhesion. Proper edge preparation removes surface pores and weak layers that could trap moisture. Jamie Gillespie of CPC Floor Coatings highlights this issue:
"Moisture is a common source of bubbling or shifting where the coating makes contact with the flooring."
Primers also require a well-textured surface to bond effectively. A proper surface profile prevents uneven thickness and primer displacement. The ICRI 310.2R-2013 guideline offers visual benchmarks for surface profiles, with CSP 10 being the most aggressive option for heavy-duty applications.
Before applying any primer, repairing spalling and cracks is essential to achieve a smooth surface. Unrepaired grooves can lead to pitting, undermining the entire coating system. Additionally, removing oils, grease, and old sealers ensures that high-performance polyurea coatings adhere properly.
Best Practices and Testing Protocols
Addressing the challenges of edge failures requires more than just surface-level fixes. Robust testing protocols ensure that no weak points are overlooked. Proper edge preparation involves more than mechanical profiling – it’s about verifying that substrates meet critical benchmarks. Specifically, a compressive strength of at least 3,626 psi and a pull-off strength of 218 psi are required. These steps significantly reduce the nearly 80% failure rate attributed to improper preparation.
Moisture Testing and Mitigation
Concrete slabs often hide their true moisture levels. While the surface might appear dry, the core could still be saturated. Relying solely on surface tests can lead to premature coating application, resulting in issues like peeling or blistering. To avoid this, ASTM F2170 in-situ probes are inserted to 40% of the slab’s depth to measure internal relative humidity. These probes require 72 hours to stabilize, offering a reliable moisture reading. For quicker checks, ASTM F2659 moisture meters can scan up to 1 inch below the surface.
Environmental factors are just as crucial as substrate moisture. The substrate temperature must stay at least 5°F above the dew point to prevent condensation, which can lead to adhesion failures. A simple water bead test can reveal residual contamination. Additionally, pH testing with distilled water and pH paper (allowing a 60-second reaction time) ensures proper decontamination. Normal concrete should have a pH between 11 and 13; anything below 10 signals the need for further cleaning.
These tests are essential for confirming moisture readiness before moving on to profile verification. Once moisture levels are in the acceptable range, attention shifts to ensuring the edge profile and primer penetration are up to standard.
Verifying Surface Profile and Primer Penetration
Visual inspection plays a key role in verifying the surface profile. Using ICRI profile replica blocks, technicians can ensure edges meet the specified Concrete Surface Profile (CSP). The International Concrete Repair Institute (ICRI) outlines 10 distinct profiles, with CSP 1–3 suitable for grinding and CSP 3–7 recommended for shot blasting. For tight or hard-to-reach areas, hand-held diamond grinders and crack chasing saws are effective tools. Proper profiling is critical for creating the mechanical lock needed for durable polyurea adhesion.
"The concrete substrate must be sound and possess a minimum compressive strength of 3626 psi (25 N/mm² or 25MPa) with a minimum pull-off strength of 218 psi (1.5 N/mm² or 1.5 MPa)." – Sika
Control joints also require careful attention. These should be filled with semi-rigid polyurea or epoxy fillers and machined smooth to create a flush surface. This helps prevent chipping under traffic and ensures a consistent profile. Additionally, avoid using aluminum oxide pads during grinding, as they tend to polish the surface rather than profile it. A polished surface can seal the concrete, blocking primer penetration and compromising adhesion.
Atlas Concrete Coatings Case Study
Atlas Concrete Coatings provides a clear example of how these rigorous testing protocols translate into success. Their polyurea-based chip floor installations follow a meticulous process that includes verifying substrate strength, moisture levels, and surface profile before applying any coating. Every edge is carefully chamfered, decontaminated, and tested to ensure uniform bonding across the entire floor surface. This attention to detail is why the company confidently offers a lifetime warranty on its chip systems. By addressing vulnerable perimeter zones – where coating failures often begin – their process ensures a durable, long-lasting finish.
Conclusion
Proper edge preparation is the cornerstone of a durable floor coating system. Studies show that poor surface preparation is one of the main reasons coatings fail, with edges and perimeters being especially prone to issues like delamination. When coatings pull away from sharp edges during curing due to surface tension, they can lose as much as 30% of their protective thickness. Techniques such as adding a 1/16" chamfer and applying stripe coats have become standard practices to mitigate these risks.
The lifespan of a floor coating – whether it bubbles prematurely or lasts for decades – often depends on key factors like moisture control and achieving the right surface profile. For heavy-duty polyurea systems, a CSP 3–5 texture is recommended to create the mechanical interlock needed to endure thermal cycling, chemical exposure, and heavy use.
"Understanding and implementing proper surface profile requirements… represents a fundamental competency that separates successful flooring contractors from those who struggle with adhesion failures." – Chris Lavin, Owner, National Concrete Polishing
As highlighted in the discussion of mechanical and chemical preparation methods, a well-prepared edge is critical for the adhesion and durability that high-quality polyurea coatings promise. These coatings are designed to flex with concrete movement, and when paired with proper edge preparation, they form a true mechanical bond rather than merely resting on the substrate.
Steps like 72-hour moisture testing and verifying the correct surface profile not only reduce the likelihood of callbacks but also significantly extend the life of the floor. By following these proven protocols, contractors can deliver floor systems that withstand harsh environments while keeping long-term maintenance to a minimum.
FAQs
What edge prep mistakes cause coatings to peel first?
Proper edge preparation plays a critical role in preventing coatings from peeling prematurely. Common mistakes, such as insufficient cleaning, incorrect surface profiling, or failing to address cracks and uneven surfaces, can severely weaken adhesion. These oversights reduce the coating’s durability and lead to early failure. Taking the time to prepare edges correctly ensures stronger adhesion and extends the coating’s lifespan.
How do I know if slab moisture is too high to coat?
You can determine if slab moisture levels are too high by conducting tests such as calcium chloride testing. If the moisture vapor emission rate surpasses the recommended range – usually 3–4 lbs per 1,000 sq ft over 24 hours – it indicates the slab might be too damp for applying a coating. Accurate testing is crucial to ensure your floor coating adheres properly and lasts as expected.
What CSP should my edges be for a polyurea coating?
For a polyurea coating to perform effectively, edges need a Concrete Surface Profile (CSP) between 3 and 5. This level of preparation helps the coating adhere properly and boosts its durability over time.