Skipping moisture testing for concrete floors can lead to costly failures. Moisture trapped in concrete can cause bubbling, peeling, and delamination of coatings like polyurea. This guide covers why moisture testing matters, common problems caused by excess moisture, and how to test effectively.
Key Takeaways:
- Why Test? Around 70% of resinous flooring failures are due to moisture. For example, a restaurant in Florida faced $84,000 in repairs after skipping testing.
- Testing Methods: Use ASTM-standard tests like calcium chloride, RH probes, or plastic sheet tests to measure moisture levels.
- Moisture Limits: Polyurea coatings require moisture content below 4.5%, ≤3 lbs/1,000 sq. ft. (calcium chloride), or <75% RH.
- Fixing Issues: Use dehumidifiers, vapor barriers, or professional services if moisture levels exceed limits.
Proper moisture testing avoids expensive repairs and ensures long-lasting floors. Keep reading to learn how to test and prepare your concrete for coatings.
Testing For Moisture Vapor In Your Concrete (Calcium Chloride Test)
sbb-itb-4b4bb37
Why Moisture Testing Matters for Polyurea Coatings
Polyurea coatings create a non-permeable barrier over concrete surfaces. However, if moisture gets trapped underneath, it can lead to water vapor pushing upward. This process weakens the bond between the polyurea and the concrete slab, increasing the risk of coating failure. Knowing the exact moisture limits is critical to ensuring a durable and reliable application.
Moisture-related flooring issues are responsible for over 90% of all flooring claims, resulting in damages exceeding $1 billion annually. Studies show that coating failures are 63% more likely when the concrete’s moisture content surpasses 4.5%. In 2023, professional testing revealed that 38% of concrete slabs that seemed dry actually had moisture levels above acceptable thresholds.
Acceptable Moisture Thresholds
To ensure proper adhesion, polyurea coatings require concrete moisture levels to stay within specific limits. The industry relies on three primary testing methods:
| Test Method | Industry Standard | Max Allowable Value |
|---|---|---|
| Calcium Chloride Test | ASTM F1869 | ≤ 3 lbs/1,000 sq. ft./24 hours |
| Relative Humidity Probe | ASTM F2170 | < 75% RH |
| Concrete Moisture Meter | ASTM F2659 | < 4.5% Moisture Content |
Exceeding these limits significantly reduces the coating’s adhesion strength. For example, during a residential project in Bonita Springs, technicians found dark spots on a garage floor indicating 98% humidity. By addressing the moisture issue before applying the coating, they helped the homeowner avoid an estimated $47,000 in potential replacement costs.
Problems Caused by High Moisture
When moisture levels exceed acceptable thresholds, several problems can arise:
- Osmotic Blistering: Excess vapor pressure creates bubbles beneath the coating.
- Efflorescence: Salts carried by moisture form white crystalline deposits that interfere with bonding.
- Physical Deformations and Cracks: Damp concrete expands and contracts differently than the coating due to temperature changes, leading to structural issues.
- Polymer Degradation: Alkaline moisture breaks down the polymers in the coating, weakening its chemical structure.
- Coating Delamination: The coating can completely separate from the concrete surface.
In a retail space at Venetian Village in Naples, FL, ASTM F2170 testing revealed moisture levels 65% higher than the manufacturer’s allowable limits. By implementing a 72-hour stabilization and targeted drying process, technicians successfully prevented a complete floor failure.
How to Prepare for Moisture Testing
Getting the preparation right is key to ensuring accurate moisture testing results and avoiding misleading data.
Conditioning the Concrete Slab
Before testing, maintain the environment around the concrete slab at a temperature between 65–85°F (18–30°C) and a relative humidity (RH) of 40–60% for at least 48 hours. It’s also important to check that the slab’s surface temperature is at least 10°F (5°C) above the dew point. This prevents condensation from forming, which could skew the results. If the temperature difference isn’t sufficient, postpone testing to ensure moisture doesn’t migrate between warmer and cooler areas, which could affect accuracy.
Cleaning and Selecting Test Locations
Start by cleaning the slab’s surface thoroughly – remove any dust, debris, or contaminants that might interfere with testing. Use a moisture meter to scan the area and pinpoint spots with higher moisture levels. According to ASTM F2170 guidelines, you need at least 3 sensors for the first 1,000 square feet of the slab, and an additional sensor for every extra 1,000 square feet. For instance, testing a 2,500-square-foot slab would require 5 test locations.
After marking the test spots, drill each hole to the correct depth – 40% of the slab thickness for one-sided drying or 20% for two-sided drying. Be sure to vacuum out any dust or debris from the holes before inserting the sensor liners.
With the slab conditioned and test locations prepared, you’re ready to move on to the actual testing process for dependable moisture assessment.
3 Moisture Testing Methods for Concrete Floors
Concrete Moisture Testing Methods Comparison Chart
Once your concrete slab is prepped and test locations are marked, you can choose from three main methods to test for moisture. Each method has its own strengths and is suited to specific needs when assessing the slab’s moisture levels.
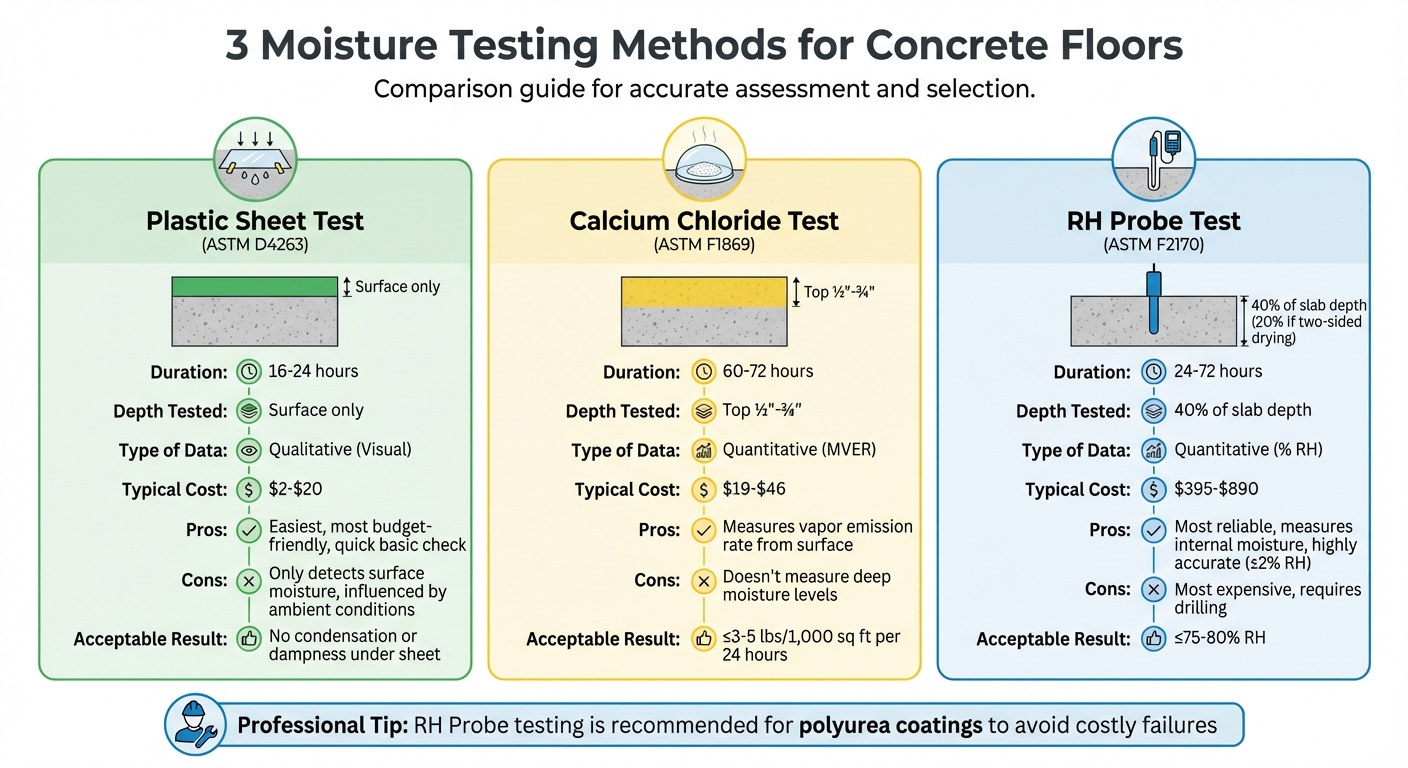
Plastic Sheet Test (ASTM D4263)
This is the easiest and most budget-friendly option for a quick, basic check. To perform this test, cut a clear polyethylene sheet (18×18 inches or 24×24 inches) and tape it securely on all four sides with high-quality tape to create an airtight seal. Leave the sheet in place for 16 to 24 hours – though some guidelines suggest extending the test up to 72 hours. Afterward, check underneath the sheet. If you see condensation or the concrete appears darker, moisture is present. Materials for this test usually cost between $2 and $20. However, keep in mind that this method only detects surface moisture and is influenced by factors like ambient temperature and dew point. A dry result doesn’t necessarily mean the deeper layers of the slab are moisture-free.
Calcium Chloride Test (ASTM F1869)

This method measures the Moisture Vapor Emission Rate (MVER) from the slab’s surface. To begin, place a dish of anhydrous calcium chloride on the cleaned concrete surface and cover it with a sealed plastic dome. Leave it undisturbed for 60 to 72 hours. The calcium chloride absorbs moisture vapor emitted by the slab. By weighing the dish before and after the test, you can calculate how much water was absorbed. Results are expressed in pounds of moisture per 1,000 square feet over a 24-hour period. Kits for this test typically cost between $19 and $46. While this method focuses on the top ½ to ¾ inch of the slab – where most moisture vapor escapes – it doesn’t provide information about deeper moisture levels.
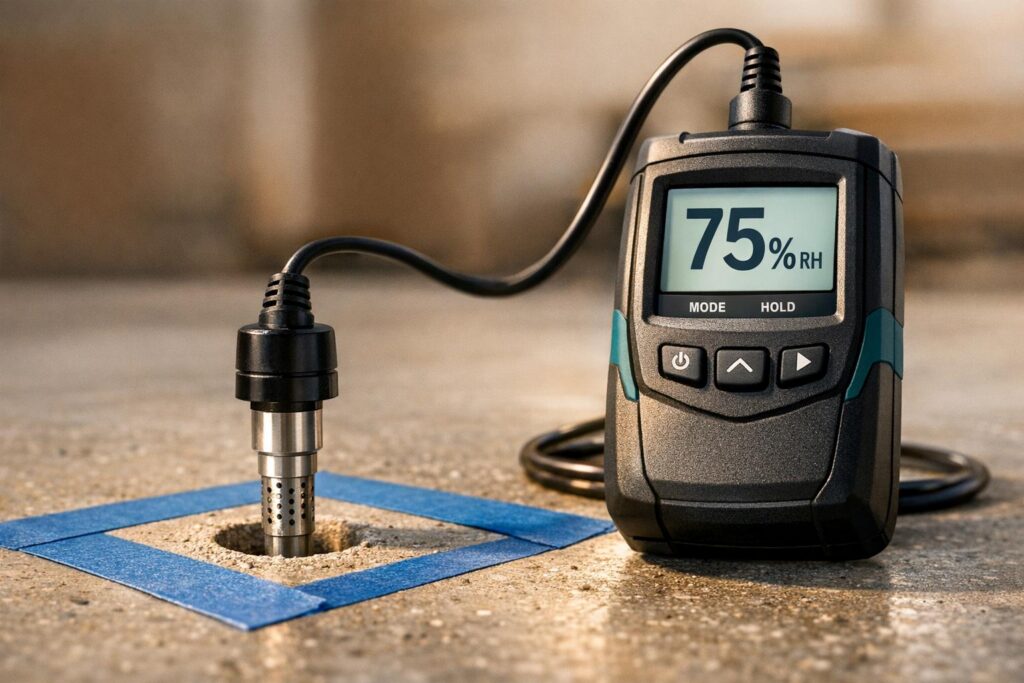
Relative Humidity Probe Test (ASTM F2170)
This method is widely regarded as the most reliable for measuring internal moisture levels. It involves drilling into the slab to 40% of its thickness (or 20% if drying occurs from both sides) and inserting electronic probes, which are then sealed in place. After 24 hours, the probes are ready to provide readings using a thermo-hygrometer. Unlike surface tests, RH probes measure moisture deep within the slab, offering highly accurate results with a margin of ±2% RH. This makes the method less affected by surface conditions, mix design, or aggregate type. Professional RH test kits are more expensive, typically ranging from $395 to $890, but they deliver the detailed data needed to avoid costly issues like coating failures.
| Test Method | Duration | Depth Tested | Type of Data | Typical Cost |
|---|---|---|---|---|
| Plastic Sheet (ASTM D4263) | 16–24 Hours | Surface only | Qualitative (Visual) | $2–$20 |
| Calcium Chloride (ASTM F1869) | 60–72 Hours | Top ½"–¾" | Quantitative (MVER) | $19–$46 |
| RH Probe (ASTM F2170) | 24–72 Hours | 40% of slab depth | Quantitative (% RH) | $395–$890 |
How to Read Test Results and What to Do Next
Once you’ve completed moisture testing, it’s time to interpret the results to decide if your concrete is ready for polyurea application. Each testing method has specific thresholds to determine whether you can move forward or need to address moisture issues first.
Moisture Limits for Polyurea Coatings
Each test method has its own acceptable moisture limits. For the plastic sheet test, any signs of condensation or dampness under the sheet signal a moisture issue that needs to be resolved before applying the coating. The calcium chloride test measures the vapor emission rate, and the results should typically be no higher than 3 to 5 pounds of moisture per 1,000 square feet over 24 hours. The RH probe test, which measures internal humidity, usually requires levels to be between 75% and 80% relative humidity.
Keep in mind that acceptable moisture levels can vary depending on the product, often ranging from 3.5% to 4.5%. Always check the manufacturer’s Product Data Sheet for exact limits. For below-ground areas like basements, you’ll need to be extra cautious, as hydrostatic pressure and ground moisture can increase risks.
| Test Method | Acceptable Limit | Recommended Action |
|---|---|---|
| Plastic Sheet Test | No condensation/dampness | Use a dehumidifier and retest; investigate the moisture source |
| Calcium Chloride | ≤3–5 lbs/1,000 sq ft | Apply a moisture-mitigating vapor barrier or sealer |
| RH Probe Test | ≤75–80% | Consult professionals for further evaluation |
If your test results exceed these limits, you’ll need to take steps to address the moisture problem before proceeding.
How to Fix Excess Moisture
If your tests reveal excess moisture, you’ll need to resolve the issue before applying polyurea. Here’s what to do:
For minor issues detected by the plastic sheet test, run a dehumidifier in the room for 24 to 48 hours, then retest the area. This can often lower ambient moisture to acceptable levels.
If the calcium chloride or RH probe tests show elevated moisture, more robust solutions are necessary. Applying a moisture-mitigating vapor barrier or a specialized sealer can create a protective layer, preventing vapor transmission that could lead to bubbling or delamination. For severe or persistent moisture problems, especially in below-ground spaces, it’s best to consult professionals. They can identify the source of the moisture and recommend comprehensive solutions. Companies like Atlas Concrete Coatings specialize in diagnosing moisture issues and ensuring your polyurea coating performs as intended.
It’s worth noting that moisture-related failures are responsible for over 90% of flooring claims, leading to over $1 billion in damages annually. Addressing moisture problems now can save you from expensive repairs and replacements later on.
When to Retest or Call a Professional
Once you’ve applied moisture mitigation measures, it’s time to retest the concrete to ensure the moisture levels meet acceptable standards. Reliable results typically require waiting 24–72 hours after testing begins. This step is especially important for older slabs or those that have had moisture problems in the past.
If your initial tests revealed high moisture levels and you’ve taken action to address them, follow up with retesting using methods like RH probes or calcium chloride tests. These are essential for confirming the success of your mitigation efforts. While electronic moisture meters can be helpful for quick checks, always validate findings with ASTM-standard tests before moving forward with polyurea applications.
"Identifying moisture issues early allows teams to adjust the flooring system, include moisture mitigation if needed, or plan installation more effectively."
- Tom Dassie, CustomCrete
There are times when calling in a professional is the best move. For example, if you’re experiencing coating issues like bubbling or peeling, need documented testing for manufacturer warranties, or are installing high-performance systems like polyurea in commercial or industrial settings, professional help is invaluable. Companies such as Atlas Concrete Coatings offer thorough testing and mitigation services, using both RH probes and calcium chloride tests to provide a complete picture of your slab’s condition. They also ensure all testing meets warranty requirements and recommend the right mitigation strategies.
Starting moisture testing early in your project can help avoid delays. Taking the time to do it right now can save you from the frustration and cost of repairing failed floor coatings later.
Conclusion
Moisture testing plays a key role in ensuring a successful polyurea coating installation. Because concrete is naturally porous, it can lead to outgassing, which may cause issues like bubbling, peeling, or delamination. Taking the time to test for moisture properly can save you from these failures and the high repair costs that often come with them.
By addressing moisture concerns early, you not only prevent premature coating failure but also maintain the quality of the finish and protect the long-term value of your property. Professional testing offers precise measurements that guide effective mitigation strategies, such as using moisture barriers or selecting the right coating formulations. This process creates a solid foundation for achieving optimal coating performance.
"Addressing moisture issues up front ensures that your flooring system performs optimally over time, reducing maintenance and replacement needs." – ArmorPoxy Inc
While DIY methods can provide a general idea, professional testing ensures accuracy and helps meet warranty requirements. Atlas Concrete Coatings uses advanced testing techniques and expert analysis to verify that your floor is ready for polyurea application. Their comprehensive approach ensures your coating will deliver long-lasting results, whether for residential, commercial, or industrial spaces. With proper moisture testing and preparation, your polyurea coating will perform as designed for years to come.
Taking the step to test for moisture now is a smart investment. It prevents expensive issues down the road and ensures your flooring system will stand the test of time.
FAQs
How long should I wait after a new slab pour before moisture testing?
You should wait 24 to 48 hours after pouring a new concrete slab before performing moisture testing. This waiting period allows the concrete to set properly, ensuring more reliable test results. Testing too soon can lead to inaccurate readings and increase the chance of moisture problems when applying coatings. Timing it right is key to ensuring durable and long-lasting results with polyurea coatings.
Can a slab pass a surface test but still fail an RH probe test?
Absolutely. A slab might pass a surface moisture test but still fail an RH (relative humidity) probe test. Here’s why: surface moisture tests only measure the moisture content at the slab’s surface. This can give the impression that the slab is dry.
However, RH probes dig deeper – literally. They measure the moisture vapor trapped within the slab’s interior. Even if the surface seems dry, the internal moisture levels could be high enough to cause issues with coatings, adhesives, or finishes. It’s a reminder that relying solely on surface tests can be misleading when evaluating a slab’s readiness for flooring or other applications.
What causes high moisture readings even when the concrete looks dry?
Concrete can sometimes give high moisture readings even when it looks dry. This happens because of hidden factors like vapor moving up from beneath the surface or moisture still trapped inside the concrete. Additionally, water from past exposure might remain in the concrete’s pores. While this doesn’t always appear as surface dampness, it can still cause elevated readings during tests.