
Want to refresh your pool deck quickly and effectively? Here’s what you need to know: polyurea coatings are a game-changer for pool deck resurfacing. They’re durable, UV-stable, slip-resistant, and can be installed in just 24 hours. Proper preparation and the right materials are key to success.
Key Steps for Pool Deck Resurfacing:
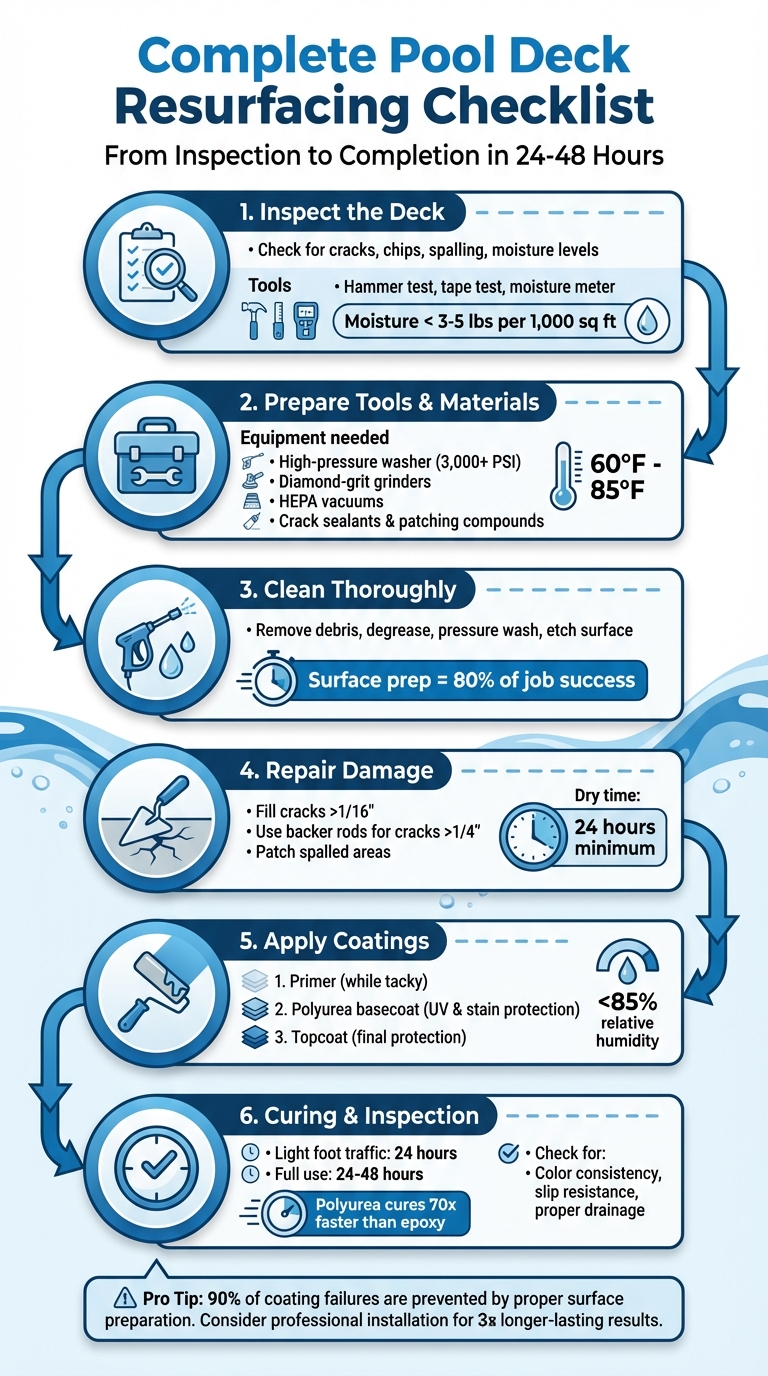
- Inspect the Deck: Check for cracks, chips, spalling, and moisture levels.
- Prepare Tools & Materials: Use high-pressure washers, grinders, crack sealants, and patching compounds.
- Clean Thoroughly: Remove debris, stains, and etch the surface for better adhesion.
- Repair Damage: Fill cracks and spalled areas to create a smooth base.
- Apply Coatings: Start with a primer, then add a polyurea basecoat and topcoat for protection.
- Curing & Inspection: Allow 24-48 hours for curing, inspect for defects, and ensure slip resistance.
Pro Tip: Surface preparation makes up 80% of the job’s success. Skipping steps can lead to peeling or bubbles later. Consider hiring professionals for long-lasting results.
Resurfacing your pool deck doesn’t have to be a long, drawn-out process. With the right approach, you can have a safer, more durable deck ready to use in no time.
6-Step Pool Deck Resurfacing Process with Timeline
Installing COOL! Pool Deck Resurfacing Step By Step with Jeff
sbb-itb-4b4bb37
Pre-Project Preparation Checklist
Getting your pool deck resurfacing off to the right start is crucial. Surface preparation alone contributes to 80% of installation success and helps avoid 90% of potential failures.
Assess the Pool Deck Condition
Start by carefully inspecting the deck. Look for cracks – both hairline and wider ones – along with chips and areas of spalling. Pay special attention to crack patterns, as they might indicate water leaks beneath the surface.
Use the hammer and tape tests to uncover hidden issues. Tapping the surface can reveal hollow spots that suggest delamination, while pressing clear tape on the surface can help detect dust transfer, a sign of poor adhesion readiness.
Document all damage with photos and check moisture levels. Moisture readings should stay under 3–5 pounds per 1,000 square feet over 24 hours to ensure proper adhesion.
Gather Materials and Tools
Having the right tools and materials is half the battle. For surface preparation, you’ll need:
- High-pressure washers (3,000+ PSI)
- Diamond-grit grinders
- Industrial HEPA vacuums
For repairs, stock up on flexible concrete crack sealants, rigid epoxy fillers, foam backer rods, and patching compounds for spalled areas.
Additionally, prepare application tools like heavy-duty drills with mixing paddles, steel trowels, squeegees, and rollers. Testing tools – such as moisture meters, pH strips, and infrared thermometers – will help confirm the substrate is ready. Don’t forget to protect surrounding areas. Use painter’s tape to cover pool coping, drains, and railings, and lay down drop cloths or plastic sheeting to shield landscaping.
Temperature plays a big role, too. Make sure the concrete surface stays between 60°F and 85°F during application. Check the weather forecast to ensure at least three warm, dry days with low humidity.
Schedule and Coordinate the Team
Plan the work during cooler parts of the day – early mornings or late afternoons – and ensure you have at least three consecutive dry days for cleaning, repairs, and application.
If you’re considering professional help, it might save you time and reduce risks. Companies like Atlas Concrete Coatings offer free estimates to help you define your project scope. Statistics show that 63% of DIYers regret skipping professional help due to unexpected costs or safety concerns. Plus, professional installations often last three times longer than DIY efforts and can be completed in as little as 24 hours with polyurea coatings.
With your assessment complete and tools in hand, you’re all set to tackle the surface preparation phase with confidence.
Surface Preparation Checklist
Now that you’ve completed your assessment and planning, it’s time to focus on surface preparation. This step is essential to ensure the durability and smooth application of polyurea coatings. As Husky Coatings puts it:
"Proper preparation is the foundation of a successful floor coating application." – Husky Coatings
Clean the Pool Deck Thoroughly
- Start by sweeping away loose debris like leaves, dirt, and other organic material that could interfere with adhesion.
- Use a pressure washer to remove embedded grime, mold, or algae.
- For stubborn stains caused by oil or grease, apply a degreaser, scrub with a stiff brush, and rinse thoroughly.
- Treat mildew or algae-affected areas with a solution of water and bleach.
- If you’re working with a concrete deck, apply a diluted muriatic acid solution to etch the surface. This opens up the pores, improving the coating’s ability to bond.
- For loose or spalling concrete, lightly grind the damaged sections to remove weak material and any old coatings. Then, clear away all dust using a vacuum or a strong leaf blower.
Once the surface is clean, move on to repairing any visible cracks or damage to create a uniform base.
Repair Cracks and Damage
- While hairline cracks can usually be coated over, any crack wider than 1/16 inch needs to be filled.
- For cracks larger than 1/4 inch, insert foam backer rods or dry sand into the gap, leaving 1/4 to 3/8 inch at the top. Fill the remainder with crack sealant, and sprinkle dry sand over the wet sealant to create a textured surface for better bonding.
- Use a high-strength patching compound to fill spalled or pitted areas.
- Once the repairs have dried, smooth them out using a hand grinder or rubbing stone. This ensures the patched areas are level with the rest of the deck.
After completing the repairs, check that the surface is dry and evenly textured before moving forward.
Ensure a Dry and Even Surface
- Moisture can ruin adhesion, so if you’ve pressure washed the deck, allow at least 24 hours for it to dry completely. To speed up the drying process, use a strong leaf blower or vacuum to clear out any lingering moisture.
- Check for uneven spots or low areas, and use leveling compounds as needed to create a smooth surface.
- Tap the deck lightly with a hammer – if you hear a hollow sound, it could indicate delamination that might need professional attention.
- The surface should feel dry and have a fine, sandpaper-like texture. Any trapped moisture can lead to bubbles, peeling, or blistering in the final coating.
Coating Application Checklist
Follow these steps to apply each coating layer in sequence, ensuring a durable and weather-resistant pool deck.
Apply Primer for Adhesion
Primers play a key role in bonding the concrete surface to the polyurea coating, minimizing the chances of peeling or delamination. Before starting, confirm that the relative humidity is below 85%, the surface temperature is at least 5°F above the dew point, and concrete moisture levels are below 8%.
For two-part epoxy primers, mix the components according to the manufacturer’s specified ratio – usually between 2:1 and 4:1. Use a power drill equipped with a mixing paddle for thorough blending. Apply a thin, even coat using a roller or brush, paying close attention to edges for complete coverage. It’s crucial to apply the polyurea basecoat while the primer remains "tacky" for optimal adhesion. If you need to step on the tacky surface, use plastic booties to avoid introducing dirt.
Start the polyurea basecoat application immediately after the primer to take advantage of the tacky surface for better bonding.
Spray the Polyurea Basecoat
The polyurea basecoat provides protection against UV rays, stains, and weather damage. Apply it when the temperature ranges between 50°F and 90°F, ideally during early morning or late evening to avoid direct sunlight and rapid drying. Follow the product’s recommended application method.
If you’re adding broadcast aggregates for slip resistance, sprinkle them within 10–15 minutes before the basecoat begins to set. Use a squeegee to spread the texture evenly, working in small sections to maintain a "wet edge" and prevent visible seams.
Add the Topcoat for Protection
Once the basecoat is in place, proceed with the topcoat application. This layer acts as the final shield against UV rays, pool chemicals, and daily wear. Choose a topcoat material like polyaspartic or urethane that offers resistance to both UV exposure and chemicals. Apply the topcoat evenly over the basecoat using a roller or sprayer. For added slip resistance in wet areas, mix in silica sand or similar materials. Allow a curing period of 24–48 hours, keeping the area dry to ensure proper sealing.
Post-Project Curing and Inspection
Allow for Proper Curing
Polyurea coatings cure much faster than epoxy – about 70 times faster – often making it possible to install a deck and have it ready for use within just 24 hours. This speed is due to the base coat penetrating deeply into the concrete’s open pores, creating a bond that becomes part of the floor rather than merely sitting on the surface.
"Typically the process will take 24 hours from start to finish… you can enjoy your new floor within 24 hours." – Atlas Concrete Coatings
During the curing period, it’s critical to keep the area completely dry. Even minor moisture exposure can disrupt the chemical bonding process, leading to defects like bubbles or peeling. Allow at least 24 hours before light foot traffic, and 24–48 hours before placing heavy items. Full use may take a few days, depending on weather conditions.
Inspect and Test the Surface
Once the coating has fully cured, conduct a detailed inspection to ensure the quality of the work. Check for consistent color and opacity across the deck – no areas of concrete or primer should be visible through the topcoat. Pay close attention to surface imperfections such as bubbles, pinholes, or peeling, as these often indicate issues like moisture entrapment or inadequate surface preparation. Additionally, ensure that previously repaired cracks are not visible through the coating, which can occur if joints were not properly filled before application.
Use an infrared thermometer to verify that the substrate temperature is within the ideal range of 60°F to 85°F. Also, test the coating’s slip resistance under wet conditions to confirm it provides adequate traction. Lastly, check that water drains effectively toward floor drains without pooling in low spots. This step ensures the final surface meets the standards set during the project’s initial planning phase.
Clean Up and Document the Work
After completing the inspection, wrap up the project with a thorough cleanup and proper documentation. Remove all temporary equipment and clean tools immediately to maintain their condition. Organize and file all relevant manufacturer documentation, including product details, curing times, and warranty information. Take photos of the finished surface to document the work, which can be useful for warranty claims in the future.
Keep a record of material usage and establish a maintenance schedule. Most polyurea-coated pool decks require periodic inspections or resealing every 1–3 years, depending on the climate and usage patterns. By recording the completion date and scheduling future check-ups, you can ensure the deck retains its durability and appearance over time. This proactive approach ties directly to the long-term care emphasized throughout the process.
Conclusion
This checklist highlights that success in pool deck resurfacing depends on careful attention to every stage of the process. The foundation of a durable result lies in thorough surface preparation, high-quality polyurea coatings, and skilled installation. In fact, surface preparation alone contributes to 80% of a coating’s success, and using the right techniques can prevent up to 90% of coating failures. Skipping any critical steps can lead to issues like peeling, bubbling, or delamination.
Equally important is selecting the right materials. Professional-grade polyurea coatings not only provide long-lasting durability but also offer UV protection and slip resistance, ensuring a safer and more resilient surface.
FAQs
Is polyurea pool deck resurfacing really ready in 24 hours?
Yes, it is! Polyurea pool deck resurfacing is known for its rapid curing time. In most cases, the surface is walkable within just a few hours, and the full curing process is typically finished in under 24 hours. This quick turnaround makes it an ideal choice for those looking to refresh their pool deck without long delays.
How do I know if my pool deck is too wet to coat?
Before applying a coating to your pool deck, it’s crucial to check for moisture. Excess moisture can lead to issues like peeling or delamination after the coating is applied. To avoid this, use standard moisture testing methods, such as ASTM procedures, to ensure the surface is dry. Make sure the deck is completely dry, clean, and free of any water or lingering moisture. This step is essential for the coating to adhere properly and last longer.
When should I hire Atlas Concrete Coatings instead of DIY?
When your project calls for expert surface preparation, advanced tools, or skilled craftsmanship, Atlas Concrete Coatings is the team to trust. Their expertise can help you avoid common issues like peeling, delamination, or uneven finishes. If your pool deck is showing signs of damage, cracks, or moisture concerns, professionals can step in to handle repairs, conduct moisture testing, and ensure the surface is prepped correctly. This level of care and precision ensures a finish that lasts – something DIY methods often fall short of achieving.