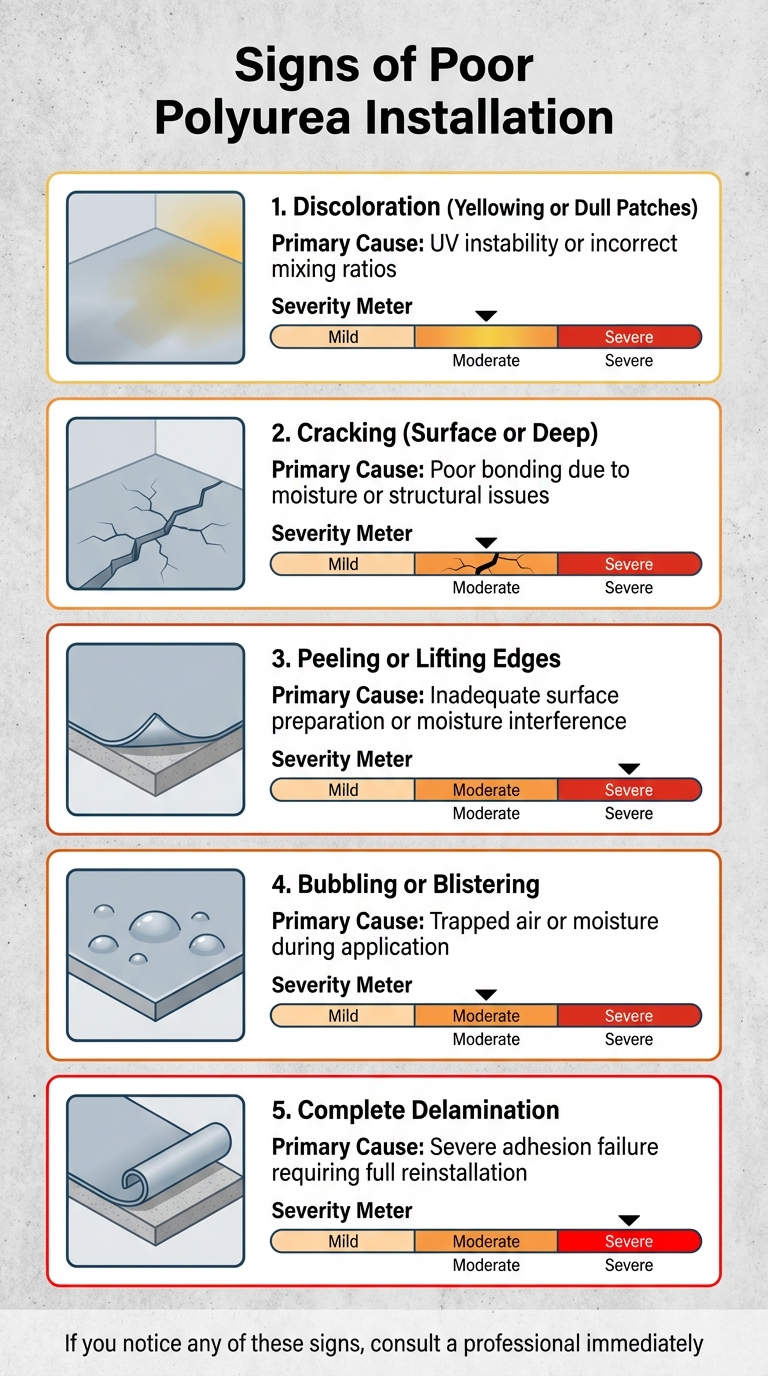
Polyurea coatings are highly durable and fast-curing solutions for protecting concrete surfaces, but improper installation can lead to serious issues. Common problems include discoloration, cracking, peeling, bubbling, and complete delamination, often caused by poor surface preparation, moisture, or incorrect application methods. Early detection and professional assessment are key to addressing these failures before they escalate. Proper surface preparation, moisture control, and skilled application are essential to ensure long-lasting results and avoid costly repairs.
Key warning signs to watch for:
- Discoloration (yellowing or dull patches): Indicates UV instability or incorrect mixing ratios.
- Cracking (surface or deep): Suggests poor bonding due to moisture or structural issues.
- Peeling or lifting edges: Often caused by inadequate surface preparation or moisture interference.
- Bubbling or blistering: Results from trapped air or moisture during application.
- Complete delamination: Points to severe adhesion failure, requiring full reinstallation.
If you notice any of these issues, document them and consult a professional immediately to assess the damage and determine the best course of action.
5 Warning Signs of Poor Polyurea Installation and Their Causes
Problems with a Polyurea Concrete Coating (or Polyaspartic)
Early Warning Signs of Poor Installation
Spotting early issues can save you from expensive repairs down the line. Problems often show up within weeks or months, offering clues to potential installation faults that need attention.
Dull or Discolored Surface
If you notice yellowing or "ambering", it’s a strong indicator of poor installation. This discoloration often happens when aromatic, non-UV-stable polyurea is used in areas exposed to direct sunlight. As Floor Shield Coatings explains:
"Polyurea is not naturally UV stable, leading to ambering (yellowing) and degradation if not protected by a topcoat".
For outdoor spaces like patios or driveways, it’s crucial to confirm that your contractor applies an aliphatic (UV-stable) topcoat to prevent this problem. Additionally, dull or transparent patches might point to an incorrect resin-to-isocyanate ratio during application.
Small Cracks or Surface Crazing
Fine cracks, often referred to as "crazing", can be an early red flag for bonding problems. These hairline fractures suggest the polyurea didn’t properly penetrate the concrete, which is often due to moisture interference. UV exposure can make bonding problems worse, as highlighted by Ultimate Linings.
Polyurea’s rapid curing process also adds complexity. If it isn’t spread quickly and evenly, internal stresses can lead to surface cracks. Some formulations reach 90% of their cure within just 10 to 15 minutes. To check for proper curing, you can perform the thumb test – press your thumb on the coating. If it feels gummy or shifts, the coating is under-cured.
Lifting or Peeling at the Edges
Edges are particularly vulnerable to lifting or peeling because they’re harder to prepare thoroughly and are more prone to moisture-related bonding issues. This often happens when the concrete surface isn’t adequately prepared. Proper preparation involves grinding or shot blasting to create a porous surface for the coating to bond to. Victor Hubbard, owner of Solid Custom Floor Coatings Utah, explains:
"Peeling can result from a failure to properly prepare the floor. Floors should be ground or shot blasted and have all contaminants removed".
Southwest Exteriors adds:
"When a polyurea coating comes in contact with concrete, it bonds into the concrete while searching for moisture. Once the coating comes in contact with any moisture, it stops bonding to the concrete".
Another culprit is air bubbles created during high-speed mixing. These bubbles weaken the edges, and when they pop, they leave openings for moisture and debris, which can lead to chipping and peeling. Always test the concrete’s moisture levels and apply a moisture barrier if necessary.
Next, we’ll look at more severe installation failures.
Serious Signs of Installation Failure
After addressing the subtle warning signs, it’s crucial to recognize the more severe indicators of installation failure. These issues signal a breakdown in the process and demand professional attention. Here are three major signs that point to significant problems with bond integrity.
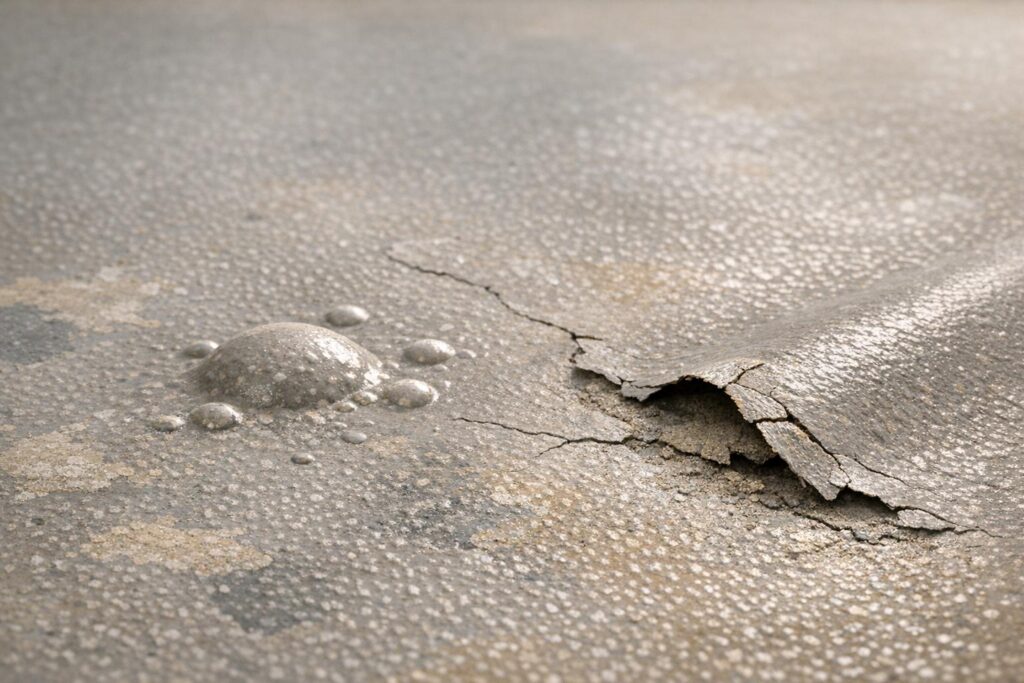
Bubbling or Blistering
Bubbles form when air or moisture becomes trapped beneath the coating during application. This often happens if the concrete wasn’t fully cured or if subsurface moisture is present. When that moisture vaporizes, it creates pressure pockets that push the coating upward. Another common cause is applying polyurea in direct sunlight or at excessively high temperatures. In such conditions, the material cures too quickly – sometimes reaching near-complete cure within 10–15 minutes – trapping gases before they can escape.
Blisters may appear immediately or within a few days. To confirm moisture is the culprit, cut into a blister and check for trapped water. If moisture is present, you’ll need a specialized moisture remediation system before attempting repairs. In most cases, the failed coating must be ground down to the substrate. To prevent bubbling, schedule applications when temperatures are cooling down or ensure the workspace is properly climatized to avoid rapid curing.
Complete Delamination or Peeling
"One of the quickest ways to spot a failed coating is when the material lifts up in sheets, like a sticker peeling off a surface".
When the coating completely separates from the concrete, it’s a clear sign of severe adhesion failure. This kind of issue compromises the entire system and is often caused by poor surface preparation, high moisture vapor emissions, or skipping the primer step.
Delamination goes beyond bubbling, as it reflects a systemic bonding problem. Polyurea coatings require a Concrete Surface Profile (CSP) of 2–3, typically achieved through mechanical grinding, to ensure a strong physical anchor into the concrete. Spot repairs won’t work here; the entire affected area must be removed and recoated. Before starting repairs, use tools like a Tramex moisture meter or an ASTM F2170 in-slab RH testing kit to confirm the concrete’s moisture levels. If moisture is too high, apply a moisture-tolerant epoxy primer or a specialized vapor barrier before reapplying the polyurea basecoat.
Cracks Reaching the Concrete Below
Deep cracks that extend into the concrete substrate are often signs of structural damage or improper bonding of the polyurea coating. If the coating lacks flexibility or the slab itself has structural issues, cracks can form and allow moisture to seep in, speeding up the degradation of the concrete.
Amvet Concrete Coatings highlights the importance of flexibility in polyurea systems:
"Polyurea remains flexible, meaning it moves with your concrete instead of working against it. This prevents those dreaded cracks that ruin the look (and function) of your floor".
Polyurea is designed to be ten times more flexible than epoxy, enabling it to expand and contract along with the substrate. When cracks penetrate to the concrete, Desert Polymer Flooring recommends:
"The best course of action is to install a flexible coating system. Perform structural repairs to the concrete slab such as stitching and or epoxy injection".
Timely repair of cracks is essential to prevent further structural damage. After grinding and addressing the structural issues, patch the cracks with compatible fillers, then apply the final topcoat to restore the coating’s integrity.
sbb-itb-4b4bb37
Common Installation Mistakes That Cause Failures
When it comes to polyurea coatings, many failures can be traced back to common installation errors. These mistakes often stem from rushing through or overlooking critical steps, and they can severely impact the durability and performance of the coating. Let’s break down three key areas where things often go wrong.
Poor Surface Preparation
The success of any polyurea coating starts with how well the concrete surface is prepared. For the coating to bond effectively, it needs to penetrate the surface and create a strong mechanical anchor. Skipping essential steps like grinding, shot blasting, or acid etching leaves the coating sitting on top of the surface like a layer of paint, instead of bonding securely to the substrate. Residues like grease, oil, or laitance (a weak, powdery layer) act as barriers and prevent proper adhesion.
"SURFACE PREPARATION is the key element for long term success. The concrete surface must allow the coating to absorb into the surface of the concrete to create a strong mechanical bond." – Garage Flooring LLC
Another common misstep is failing to remove all the dust after grinding or neglecting to fill cracks with compatible materials before applying the coating. Surface porosity should also be checked to ensure it’s ready for the coating. Additionally, concrete must cure for at least 28 days at 70°F before any coating is applied.
Moisture control is another critical factor tied to surface preparation.
Excess Moisture in the Concrete
Too much moisture in the concrete can ruin the bonding process. When moisture levels are too high, the coating fails to adhere properly and sits on the surface, often peeling or lifting within weeks. Trapped vapor can also cause bubbling and delamination, leading to premature failure.
To avoid this, industry standards recommend keeping moisture vapor emission below 3 pounds per 1,000 square feet over 24 hours, with relative humidity levels under 75%. Standard moisture tests can help verify whether the substrate is ready for coating. Visual signs like efflorescence (white salt deposits) or dark patches often indicate moisture issues.
"If your prospective installer suggests a ‘1-day’ polyurea polyaspartic system without first measuring the moisture in your concrete floor, let the buyer beware!" – Robert Hanson, President and Founder, GarageFloorCoating.com
Even with proper preparation and moisture control, application errors can still derail the project.
Incorrect Application Methods
Mistakes during the application process can be just as damaging. For instance, mixing the coating too quickly introduces air bubbles, which can burst and leave chips in the surface. Getting the mixing ratio wrong creates a coating that either stays sticky and never cures or evaporates too quickly, leaving behind a thin, fragile layer. A simple "thumb test" can help confirm proper curing: press your finger on the coating. If it feels sticky or shifts, the mix wasn’t done correctly.
Timing is also crucial. Delayed application can lead to premature setting, which results in an uneven surface. Extreme temperatures, improper mixing, or delays can all cause uneven curing and weaken adhesion. Additionally, using aromatic polyurea outdoors is a common mistake, as it lacks UV stability and can yellow or degrade quickly under sunlight. These missteps often lead to the early signs of failure discussed earlier.
How to Fix and Prevent Installation Problems
Document and Track Warning Signs
Start by documenting every issue with clear photos taken from multiple angles and note the date each problem appears. Regularly monitor these issues to see if they worsen over time. This kind of tracking helps determine whether you’re dealing with a minor surface-level problem or something more serious that requires immediate attention.
Pay close attention to when the issues show up. Problems that appear within hours or days of installation often point to application errors – things like incorrect mixing ratios or trapped air. On the other hand, problems that emerge months later are usually tied to factors like UV exposure or moisture migration. It’s also important to record environmental conditions during installation, as direct sunlight or high heat can cause the coating to cure too quickly, potentially trapping air bubbles in the process.
Here’s a quick test: after 24 hours, press your thumb against the coating. If it shifts or feels gummy, the mix was likely off. For bubbles, carefully cut into one – if you find moisture underneath, a moisture remediation system will be necessary before making any repairs.
Early detection is critical. Once you’ve documented everything, the next step is to bring in a professional for a thorough assessment.
Get a Professional Assessment
After documenting the issues, it’s time to consult a professional. Look for experts who specialize in polyurea installations. For example, companies like Atlas Concrete Coatings use calibrated moisture meters to detect excessive moisture in the concrete – a leading cause of coating delamination and peeling. These professionals can also differentiate between surface problems, like UV yellowing, and deeper structural issues, such as hydrostatic pressure forcing moisture up from beneath the slab.
"If your prospective installer suggests a ‘1-day’ polyurea polyaspartic system without first measuring the moisture in your concrete floor, let the buyer beware!" – Robert Hanson, President and Founder, GarageFloorCoating.com
Professionals will also check the thickness of the coating to ensure it hasn’t partially evaporated due to improper mixing, which can compromise durability. For accuracy, they’ll take at least three moisture readings per 100 square feet of concrete surface. This evaluation can reveal whether bubbling was caused by trapped moisture during application or by mixing the product too quickly.
Best Practices for Long-Lasting Results
To avoid future problems, follow these proven best practices. Start with proper moisture testing – this step is critical and should never be skipped. Professional moisture testing ensures that levels are within acceptable ranges, preventing delamination down the road. For outdoor installations, always choose a UV-resistant polyaspartic topcoat to protect against yellowing and sun damage.
Surface preparation is equally important. Industrial-grade grinding equipment is a must; acid etching alone won’t cut it. Grinding creates the right surface profile, allowing the polyurea to penetrate the concrete pores and form a strong bond instead of just sitting on the surface like paint. Watch for white salt deposits, known as efflorescence, which indicate moisture migration. If present, use a moisture-mitigating primer before proceeding.
"Polyurea concrete coatings have no margins for error. Using the correct equipment and being fully educated is a requirement when mixing the compounds to get the right results." – BattleBorn Concrete Coatings
Finally, hire experienced installers who work in teams and have the specialized tools needed for proper application. Polyurea’s fast cure time requires precision, making it unsuitable for DIY projects. Companies like Atlas Concrete Coatings even offer free consultations to assess your specific needs, helping you avoid costly mistakes and ensuring a successful installation from the start.
Conclusion
Spotting early warning signs like dull surfaces, peeling edges, and bubbling can save you from expensive repairs or even full replacements. Identifying issues such as cracking early on not only protects your concrete from the elements but also safeguards the investment you’ve made in premium coatings.
Beyond detection, the importance of professional application can’t be overstated. Expert services bring industrial-grade equipment, perform essential moisture testing, and apply coatings with precision. These steps are critical to avoid the common mistakes that often occur with DIY attempts.
"Polyurea concrete coatings are not a project for DIYers. When Polyurea is not applied by a professional it will lead to errors that will ruin the longevity and durability of the concrete coatings."
- BattleBorn Concrete Coatings
Polyurea coatings, being about four times stronger than traditional epoxy options, require proper installation to ensure their long-term durability. Companies like Atlas Concrete Coatings offer free consultations and back their residential installations with a 15-year warranty, giving homeowners peace of mind.
If you notice any warning signs, make sure to document them and reach out to a certified professional right away.
FAQs
What can I do to prevent discoloration in polyurea coatings?
To keep polyurea coatings from discoloring, begin with a well-cleaned and properly prepped concrete surface. Apply a UV-stable polyurea coating of excellent quality, making sure experienced professionals handle the application while adhering to the manufacturer’s recommendations for temperature and humidity. For extra defense against fading, finish the surface with a UV-resistant primer or topcoat, which helps preserve its appearance and durability over time.
What should I do if my polyurea coating starts bubbling?
If you spot bubbling in your polyurea coating, it’s important to stop using the surface right away and reach out to a professional installer, like Atlas Concrete Coatings. Bubbling usually happens due to problems such as too much moisture in the concrete, poor surface preparation, or mistakes during the mixing or application process.
A professional can conduct tests for moisture vapor emissions, check if the surface was prepared properly, and fix any application errors. Once the root cause is addressed, the damaged area can be re-coated to bring back its strength and appearance. Acting promptly helps prevent further issues and ensures the coating performs as it should.
Why is managing moisture important during polyurea installation?
Properly managing moisture is a critical step when installing polyurea coatings. If the concrete contains too much moisture, the coating may not stick as it should, leading to problems like bubbling, peeling, or even early failure.
Taking the time to address moisture levels before applying the coating helps guarantee a strong, durable finish. This not only extends the lifespan of the coating but also saves you from expensive repairs or reapplications down the line.