Polyurea floors are known for their durability and quick curing time, making them a popular choice for spaces like garages, warehouses, and commercial areas. Adding stencils to these floors allows you to create custom designs, patterns, or logos, turning functional surfaces into visually appealing ones. Here’s a quick guide to the process:
- Prepare the Surface: Mechanically grind the concrete for proper adhesion. Ensure it’s clean, dry, and free of debris.
- Apply the Basecoat: Spread the polyurea evenly and let it cure fully.
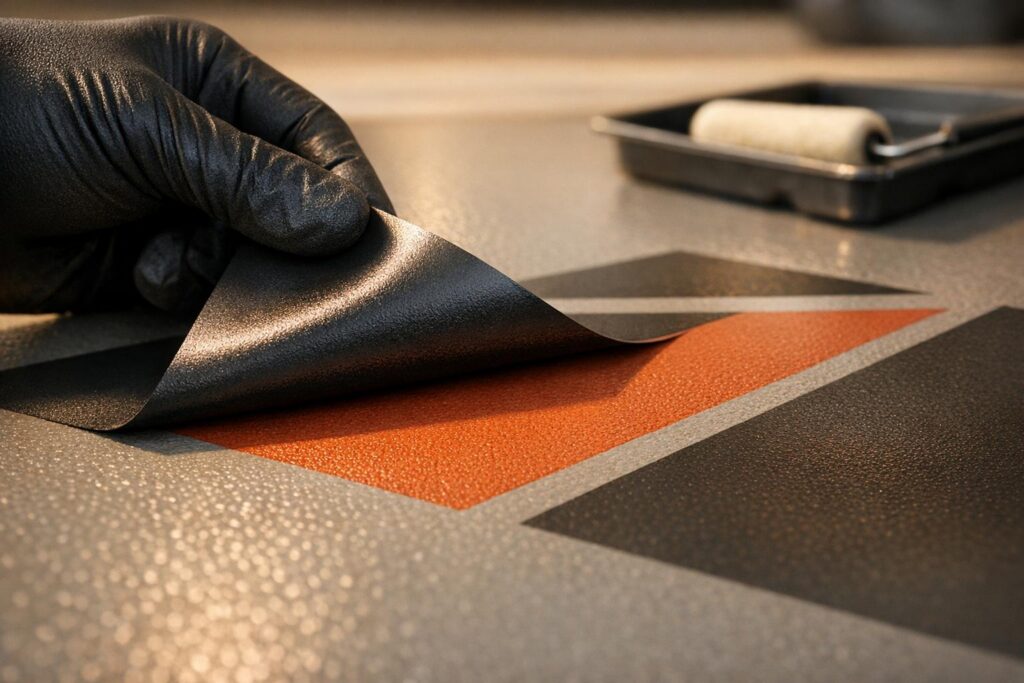
- Place the Stencil: Use adhesive-backed vinyl stencils for sharp, clean designs. Align and secure them carefully.
- Apply the Design Layer: Use dyes or stains to add color through the stencil. Work in thin, even layers to avoid bleeding.
- Remove the Stencil and Seal: Peel off the stencil promptly, then apply a clear topcoat for protection.
With the right tools, materials, and timing, you can achieve long-lasting, professional results. Whether you’re enhancing a commercial space or personalizing a residential floor, stenciling adds a creative touch to polyurea coatings.

5-Step Process for Adding Stencils to Polyurea Floors
How To: Polyaspartic Flake Pattern Floor
Tools and Materials Needed for Stenciling
Before diving into your polyurea stenciling project, it’s crucial to gather the right tools, materials, and safety gear. This preparation is especially important since polyurea cures quickly, leaving little room for delays.
Tools for Stenciling
For polyurea floors, adhesive-backed vinyl stencils are a top pick. They prevent color bleed and can be custom-cut for designs like logos, medallions, or intricate patterns. Standard concrete stencil rolls, which are about 3 ft wide and 335 ft long, typically cost around $350 each. To ensure crisp design lines, use a stencil roller or float to press the stencil firmly onto the surface. For larger patterns – like tile designs up to 4 ft x 6 ft – having an extra pair of hands will help with precise alignment.
When applying solvent-based dyes, an airbrush is ideal because the fast-drying color minimizes the risk of wicking. For water-based or acid stains, brushes or rags used with a dry application method can keep edges sharp. Other essential tools include scissors, masking tape, and a power drill with a mixing paddle for trimming, securing, and mixing materials evenly.
Materials for Coating and Design
Start with a high-quality polyurea coating system, which includes a basecoat and topcoat. These are typically mixed in ratios ranging from 2:1 to 4:1, depending on the manufacturer’s guidelines. For better adhesion to the concrete surface, use an epoxy or acrylic primer.
When it comes to coloring, solvent-based dyes work particularly well with stencils due to their quick drying time. However, you can also use water-based stains, acid stains, or highly pigmented acrylic stains for layering colors. If you want to add texture or improve slip resistance, mix in silica powder or other mineral additives. These can help you achieve anything from a glossy showroom finish to a surface that mimics natural stone. Finally, apply a UV-stable clear topcoat to protect your design and ensure it lasts. Keep some sandpaper on hand for touch-ups to smooth out any rough spots.
Safety Equipment
Safety is non-negotiable when working with polyurea. Equip yourself with chemical-resistant gloves to avoid skin contact with the materials, and wear safety goggles to protect your eyes from splashes during mixing and application. A respirator is a must, especially when working with solvent-based dyes or polyurea in enclosed spaces, as it shields you from harmful fumes. This gear ensures you can work safely and confidently throughout your project.
Once you’ve organized these tools, materials, and safety essentials, you’ll be ready to tackle your stenciling project with ease.
How to Add Stencils to Polyurea Floors
Preparing the Surface
Start by mechanically abrading the concrete surface. The best tool for the job is a 750-pound propane grinder equipped with diamond tooling, which ensures the surface is evenly roughened and porous enough for the polyurea to bond effectively. For smaller areas, you can use acid etching or light sandblasting as alternatives. These methods help create the mechanical bond needed for the coating to adhere permanently.
Use a HEPA-filtered vacuum system alongside your grinding equipment to capture about 90% of airborne dust. This keeps the area clean and prevents dust from interfering with adhesion. Make sure to remove any oil, grease, tire marks, or laitance – a weak, powdery layer that can form on concrete surfaces.
To check porosity, spray water on the concrete. If the water beads or pools, you’ll need to regrind or etch the surface. Don’t overlook the corners and edges – use handheld tools to profile these areas as thoroughly as the main floor. Before applying any coating, test for moisture vapor emissions using a calcium chloride test. The emission rate should be less than 3 pounds per 1,000 square feet over 24 hours. Additionally, ensure the concrete is completely dry, as trapped moisture is a common cause of coating failure.
Applying the Basecoat
Follow the manufacturer’s instructions to mix the polyurea basecoat. The mixing ratio is typically between 2:1 and 4:1. Use a power drill with a mixing paddle to blend the components thoroughly. If your system requires a primer, apply an epoxy or acrylic primer first to improve adhesion.
Spread the basecoat evenly across the surface using a roller or squeegee. Work quickly and methodically, as polyurea cures fast. Keep the workspace temperature between 70°F and 80°F, and avoid direct sunlight to ensure proper curing. Let the basecoat cure completely – usually around 24 hours – before moving on to stencil placement. The surface should be smooth, clean, and free of dust or debris at this stage.
Placing and Securing the Stencil
Adhesive-backed vinyl stencils are ideal for hardened polyurea basecoats, as they stay in place during the design application process. For large stencils, such as those measuring 4 by 6 feet, it’s helpful to have two people for accurate placement. Melanie Royals from Modello Designs highlights the importance of teamwork for large patterns:
At that size [4 by 6 feet], it’s best to have two sets of hands for installation. The difficulty in laying out large patterns is that you need to match up the tiles carefully to ensure that the pattern is laid out correctly.
When unrolling the stencil, keep the transfer tape on until it’s fully secured. Press the stencil from the center outward to eliminate air bubbles and ensure the edges are firmly adhered. This prevents any bleeding under the stencil during the design application. If your project involves multiple stencil tiles, align each new tile’s grout line with the previous one for a seamless pattern. Trim any excess material around walls or fixtures for a clean finish.
Applying the Design Layer
With the stencil securely in place, you can apply the design layer. Solvent-based dyes work best with an airbrush, as they dry almost instantly and minimize the risk of bleeding under the stencil edges. For water-based or acid stains, apply them sparingly with a rag or brush to maintain sharp edges. If you’re layering colors, start with lighter shades for translucent designs or use lighter acrylic stains over darker ones to create depth.
Avoid using highly diluted stains on porous surfaces, as they can spread beyond the stencil boundaries. Apply the color in thin, even layers instead of one heavy coat. This approach gives you better control and reduces the chance of pooling or bleeding.
Removing the Stencil and Applying Topcoat
After the design layer has been applied, remove the stencil promptly to preserve clean edges. Do this within 24 hours. Peel the stencil away slowly at a 45-degree angle to avoid damaging the fresh design. If you used transfer tape, carefully remove it before lifting the stencil.
Once the design layer has cured, apply a UV-stable clear topcoat to protect the floor. Use a roller or sprayer for even coverage, and a brush for precision work around edges and corners. Make sure the surface is clean before applying the topcoat to avoid imperfections. At optimal temperatures (70°F to 80°F), the floor will be ready for light traffic in 24 hours and heavy traffic in 72 hours.
sbb-itb-4b4bb37
Tips for Better Results
Choosing the Right Stencil Design
Once you’ve prepped and applied your base, the stencil design becomes the star of the show. To make the most of your stenciling project, align the pattern with your space’s overall vibe. For example, stone, slate, or brick patterns are a natural fit for rustic or classic settings, while geometric tiles and subtle textures bring a sleek touch to modern spaces.
If you’re just getting started, smaller patterns like medallions, tiles, and borders are a great way to ease into stenciling. Melanie Royals, founder of Modello Designs, shares this advice:
For beginners, we recommend starting with smaller patterns, such as medallions, tiles, and borders. You can use them to make great focal point designs in a lobby, living room, or patio area.
For smoother application, adhesive-backed vinyl stencils are a reliable choice. If you’re planning a custom stencil design, factor in extra time for production. Larger patterns, like full-floor tiles measuring 4 by 6 feet, can be tricky to align, so having a partner to help with placement – especially for mortar joints – can make a big difference.
Working with Polyurea’s Fast Curing Time
Polyurea’s quick curing time means you’ll need to work efficiently. Start by marking and measuring your layout ahead of time to streamline the process. This preparation helps you keep up with the rapid setting of both the basecoat and design layers.
To avoid color bleeding, go for fast-drying solvents or use water-based stains applied “dry” with a rag or brush. Polyurea surfaces are typically dry to the touch in about 4 hours and ready for foot traffic within 4 to 6 hours, so timing is everything.
Common Mistakes to Avoid
One of the most common culprits behind coating failures is poor surface preparation. To ensure proper adhesion, the concrete must be mechanically profiled – through grinding, shot blasting, or acid etching – and completely free of grease, oil, or dust.
Bleeding edges can ruin the clean look of your design. This often happens when the stencil isn’t lying flat or too much color is applied. To avoid this, unroll the stencil carefully and weigh it down to ensure smooth contact with the surface. Apply thin, even layers of color instead of one heavy coat, and use a spray box to control overspray.
Timing is another critical factor. Steve VandeWater, owner of ArtistiCrete LLC, emphasizes the importance of removing stencils promptly:
Never leave stencils on a slab overnight. Doing so will almost guarantee the need to pick it out in maddeningly small pieces, aided by a chisel, screwdriver or other scraping device.
To prevent smudging, take off the stencils as soon as the design layer sets. Following these steps will help your stenciling efforts blend seamlessly with the technical aspects of the project.
Conclusion
Summary of the Stenciling Process
Stenciling transforms polyurea floors from simple protective coatings into personalized design statements. The process involves five essential steps: diamond grinding to ensure a strong bond, applying a polyurea basecoat for the foundation color, carefully placing adhesive-backed vinyl stencils, applying the design layer with precision, and finally, removing the stencil before sealing it with a clear topcoat. Timing is critical throughout – polyurea cures quickly, so stencils must be removed within 24 hours to achieve sharp, clean edges.
When done correctly, a polyurea floor with stenciling can last 15 to 20 years or longer in residential spaces. Plus, because polyurea is 100% UV stable, your design will resist yellowing and fading over time.
Professional Installation with Atlas Concrete Coatings
Atlas Concrete Coatings specializes in expertly installed stenciled polyurea floors. Trained by Penntek, their team uses a polyurea formula that’s 4 times stronger and more flexible than epoxy, with a curing time that’s 70 times faster. This allows them to complete most projects – including preparation, stenciling, and topcoating – within just 24 hours.
Their process ensures the basecoat penetrates deeply into the concrete’s pores, creating a durable bond that’s part of the floor itself, not just a surface layer. Whether you want a custom logo for your business, an intricate medallion for your entryway, or a full-floor design resembling natural stone, their expertise ensures stencils are applied and removed at the perfect time. Residential installations come with a 15-year warranty, and their all-inclusive pricing covers everything – diamond grinding, materials, and labor.
FAQs
Can I stencil over an existing polyurea floor?
Yes, you can stencil over an existing polyurea floor, but getting the surface ready is key to making it work. Start with thorough cleaning to remove any dirt, grease, or debris. Next, use mechanical profiling (like sanding or grinding) to create a surface texture that helps the stencil stick. Finally, perform a moisture test to ensure the floor is dry enough for the application. Skipping these steps can lead to problems like peeling or poor adhesion, so proper preparation is a must for a smooth, lasting result.
How do I keep dye or stain from bleeding under the stencil?
To keep dye or stain from seeping under stencils on polyurea floors, make sure the stencil is completely flat and firmly secured to prevent any shifting. Applying a sealant or a base coat beforehand can help form a barrier, particularly on uneven surfaces. Additionally, proper surface preparation – like thorough cleaning, repairing any damage, and profiling the floor – plays a key role in achieving sharp lines and reducing bleed-through.
When can I walk or park on a freshly stenciled polyurea floor?
You can usually walk on a newly stenciled polyurea floor within 4 to 8 hours of application. For parking, it’s best to wait around 24 hours. Always check and follow the specific curing instructions provided for your floor to ensure it lasts and performs well.