
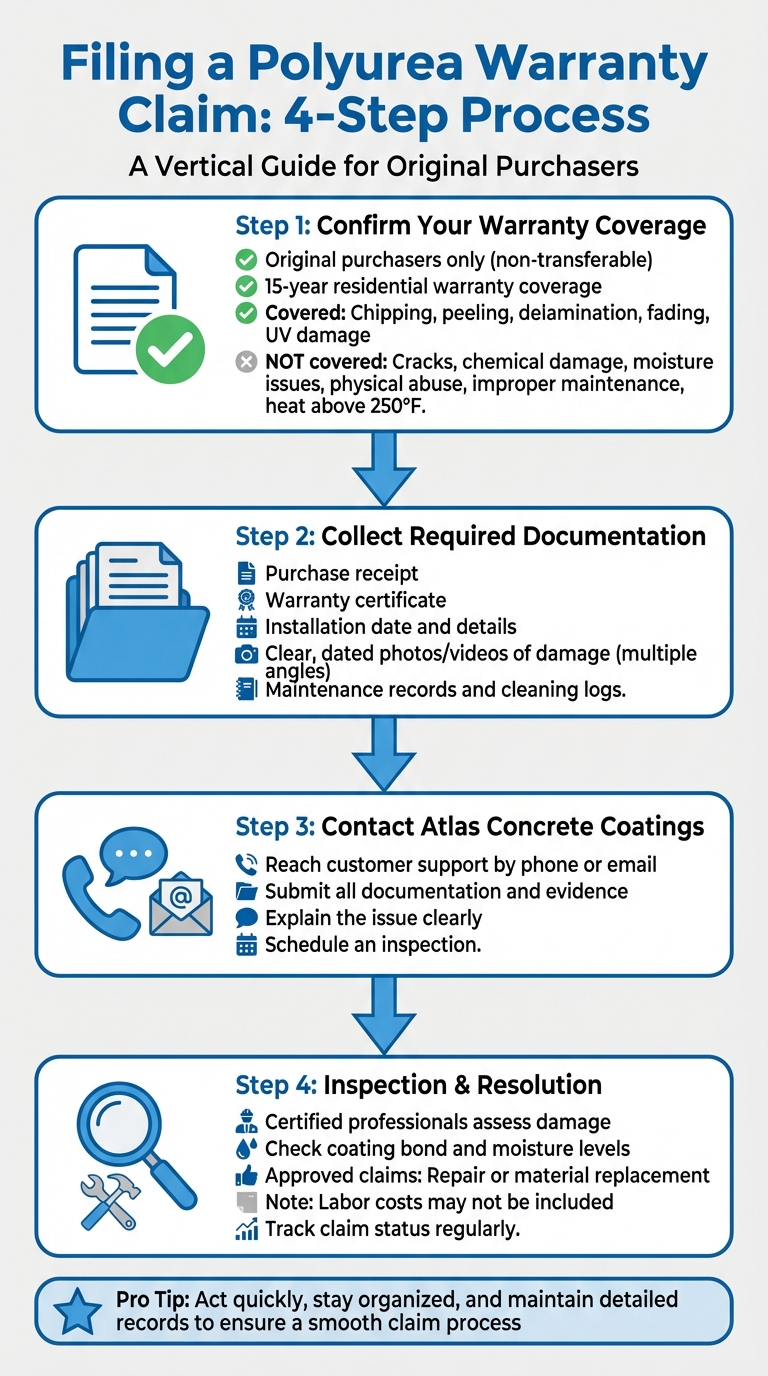
Filing a polyurea warranty claim doesn’t have to be complicated if you follow a clear process. Here’s what you need to know:
- Confirm Coverage: Ensure your warranty is valid and the issue qualifies (e.g., peeling, fading, or UV damage). Only original purchasers qualify, and warranties don’t transfer to new homeowners.
- Know What’s Excluded: Damage from cracks, chemicals, moisture, impacts, or improper maintenance isn’t covered.
- Gather Documents: Collect your purchase receipt, warranty certificate, installation details, and maintenance records. Take clear, dated photos of the damage.
- Contact Atlas Concrete Coatings: Submit your claim with all required documents and evidence. Be prepared to explain the issue.
- Inspection and Resolution: Atlas will inspect the damage to confirm eligibility. Approved claims may involve repairs or material replacement, but labor costs might not be included.
Act quickly, stay organized, and maintain communication with Atlas to ensure a smooth process. Proper maintenance and detailed records can help you avoid issues in the future.
4-Step Process for Filing a Polyurea Warranty Claim
Step 1: Confirm Your Warranty Coverage
Before moving forward, double-check that your warranty is valid and that your specific issue qualifies. This will help you avoid unnecessary delays.
Check Eligibility Requirements
The warranty is available only to original purchasers who had the installation completed by Atlas-certified professionals. This applies to installations in Pennsylvania (Philadelphia and Montgomery County) or New Jersey. Keep in mind, the warranty does not transfer to new homeowners.
Once you confirm eligibility, take a closer look at the issues covered under the warranty.
Review Covered Issues
The residential warranty provides coverage for 15 years and includes defects like chipping, peeling, delamination, fading, and damage caused by UV exposure. For example:
- If your outdoor deck shows discoloration or sun damage, it qualifies as a covered defect.
- Natural separation of the polyurea base from the concrete (as long as it’s not caused by external factors) is also covered.
After reviewing what’s included, it’s equally important to understand what’s not covered.
Identify Warranty Exclusions
Certain types of damage are excluded from coverage, including:
- Issues caused by moisture vapor, hydrostatic pressure, efflorescence, or concrete movement.
- Cracks or any crack repairs, no matter when they occur.
- Chemical damage from substances like battery acid, brake fluid, paint stripper, or industrial solvents.
- Physical abuse, such as dragging heavy objects, impacts, or spinning tires.
- Improper maintenance, like using pressure washers or harsh cleaning chemicals.
- Exposure to extreme heat above 250°F.
To keep your warranty intact, make sure to follow proper maintenance guidelines and keep detailed maintenance records. This can save you headaches down the road.
sbb-itb-4b4bb37
Step 2: Collect Required Documentation and Evidence
Once you’ve confirmed your warranty is valid, the next step is gathering all the necessary paperwork and evidence to support your claim. Being organized and prepared with these materials before contacting Atlas Concrete Coatings can help make the process smoother and quicker.
Locate Purchase and Installation Records
Start by finding your purchase receipt. This document is essential for verifying transaction details, pricing, and services. Additionally, ensure you have your warranty certificate, which outlines the terms and the 15-year coverage period for residential floors. Make sure to also locate and digitally store information about your installation date, as this will help confirm compliance with the warranty terms.
Document the Damage
Take immediate action to document any defects by capturing clear, dated photos or videos. Use high-resolution images to provide a detailed view of the issue. Be thorough – take pictures from multiple angles to highlight the problem. For example, if the coating is peeling off the concrete, this would likely be covered, whereas scratches or impact damage typically are not. Close-up shots of the coating defects can make your case stronger.
Gather Maintenance and Repair History
Keep a record of all maintenance activities, including cleaning logs and service receipts. Make sure these records show adherence to approved cleaning methods, as improper care may void the warranty. For instance, Polyurea Concrete Coatings emphasizes that their warranty excludes damage caused by negligence, such as improper cleaning or lack of maintenance: "Our warranty excludes damage to or dulling of finish caused by prolonged use or customer negligence which includes, but is not limited to… Lack of maintenance and care". If you’ve had a professional perform inspections or repairs, retain their signed service records as proof of proactive care. Once you’ve compiled all these documents, you’re ready to move forward with filing your claim with Atlas Concrete Coatings.
Step 3: Contact Atlas Concrete Coatings to File Your Claim
Once you’ve gathered all your documentation, it’s time to contact Atlas Concrete Coatings to officially start the claim process. Acting quickly not only helps move things along but also shows that you’re serious about resolving the issue.
Reach Out to Customer Support
Get in touch with Atlas Concrete Coatings’ customer support team by phone or email to report the issue. Make sure you have your warranty certificate, receipt, and installation date on hand. Since the company offers a 15-year warranty for residential polyurea floors, confirming your floor type and installation details upfront will help them verify your claim eligibility. Be ready to explain the problem clearly, whether it’s peeling, adhesion issues, or another defect covered under the warranty.
Provide Documentation and Evidence
Submit all your collected evidence, including high-resolution photos and videos of the defect, along with your warranty-related documents. Make sure the photos are dated and clear to avoid delays. Follow the company’s instructions for submitting these materials. A thorough submission will help speed up the review process, so don’t leave anything out.
Arrange an Inspection
After submitting your documentation, Atlas Concrete Coatings will schedule an inspection to evaluate the damage. During this visit, they’ll confirm whether the issue falls under the warranty and discuss possible solutions. This step is critical to ensure the problem qualifies for coverage and to finalize the next steps for resolving it.
Step 4: Inspection, Resolution, and Follow-Up
Inspection Process
When it comes to inspections, Atlas Concrete Coatings sends out certified professionals to assess the situation thoroughly. These experts check the bond between the polyurea coating and the concrete, ensuring the coating has adhered deeply into the substrate. They also measure moisture levels using tools like MVER or Tramex readings and evaluate surface profiles to determine if the issue qualifies for warranty coverage.
The inspection aims to identify whether the problem stems from the product itself or external factors such as substrate movement, hydrostatic pressure, or even customer negligence. Since Atlas’s polyurea coating is engineered to be four times stronger and more flexible than standard epoxy, the team will examine whether the damage impacts its key features like durability, flexibility, or UV protection. This detailed process ensures that warranty claims are only approved for product-related issues.
Resolution and Remedies
Once the inspection is complete and the claim is approved, Atlas Concrete Coatings moves forward with resolving the issue. The typical solution involves either repairing the damaged areas or replacing materials. While the warranty covers replacement materials, labor costs or recoating services might not be included. In some instances, Atlas may opt to recoat the entire area to maintain a uniform appearance, but this decision is at their discretion.
"Areas repaired under this warranty may vary in color and texture from areas originally installed which are not repaired." – Polyurea Concrete Coatings
It’s worth noting that if material prices have increased since your initial installation, you may be responsible for covering the difference, as outlined in the warranty terms. To avoid surprises, carefully review your contract and the specifics of Atlas’s 15-year residential warranty.
Track Claim Status
Once resolution steps are outlined, staying in touch is key. Regularly communicate with customer support to monitor progress and request a clear timeline during the inspection phase. This will help ensure the process moves along smoothly.
"If you ever have any questions, want something looked at or adjusted, or for some reason need something fixed, always call the polyurea concrete floors team." – Polyurea Concrete Coatings
Keeping an open line of communication ensures you’re updated at every stage and helps address any concerns promptly. This proactive approach can make all the difference in resolving issues efficiently.
Conclusion
Filing a warranty claim for your polyurea coating doesn’t have to be complicated if you follow a clear, step-by-step approach. Start by confirming your coverage, gathering all required documents, and staying in regular contact with the Atlas Concrete Coatings team. Knowing what’s covered – like peeling or floor failure – and what isn’t – such as damage caused by harsh chemicals or ground shifts – can save you time and help you avoid unnecessary delays.
Keeping detailed records of maintenance and installation is crucial. Since the 15-year residential warranty depends on proper installation by Atlas-certified professionals, having organized documentation can speed up the verification process. By ensuring your coverage and compiling the necessary records, you’ll streamline the transition from submitting your claim to scheduling an inspection.
It’s worth noting that repaired areas might not perfectly match the original color or texture. Acting quickly allows Atlas-certified professionals to evaluate your claim and address the issue as soon as possible.
FAQs
How soon should I file a warranty claim after I notice damage?
Filing a warranty claim as soon as you spot damage is crucial to ensure it’s covered within the warranty period. Warranty lengths can differ significantly – some material-only warranties might last around a year, while others for particular systems could stretch up to 15 years. Acting quickly helps prevent unnecessary delays in resolving the problem.
What’s the best way to photograph and document the issue for my claim?
When preparing to file a warranty claim, it’s crucial to document the issue properly. Start by taking clear, well-lit photos of the problem as soon as you notice it. Make sure to focus on the specific area of concern, and capture it from multiple angles to provide a comprehensive view. If possible, timestamp the images to establish when the issue was identified.
Additionally, jot down detailed notes about the location and nature of the problem. This combination of photos and written information not only helps streamline the claims process but also ensures the issue is thoroughly documented for quality assurance purposes.
If my claim is approved, what costs could I still have to pay?
Even if your claim gets approved, you might still be responsible for costs tied to damages caused by external factors, improper use, neglect, exposure to harsh chemicals, or problems with the concrete substrate – like heaving or moisture issues. These situations are generally not included in warranty coverage.