
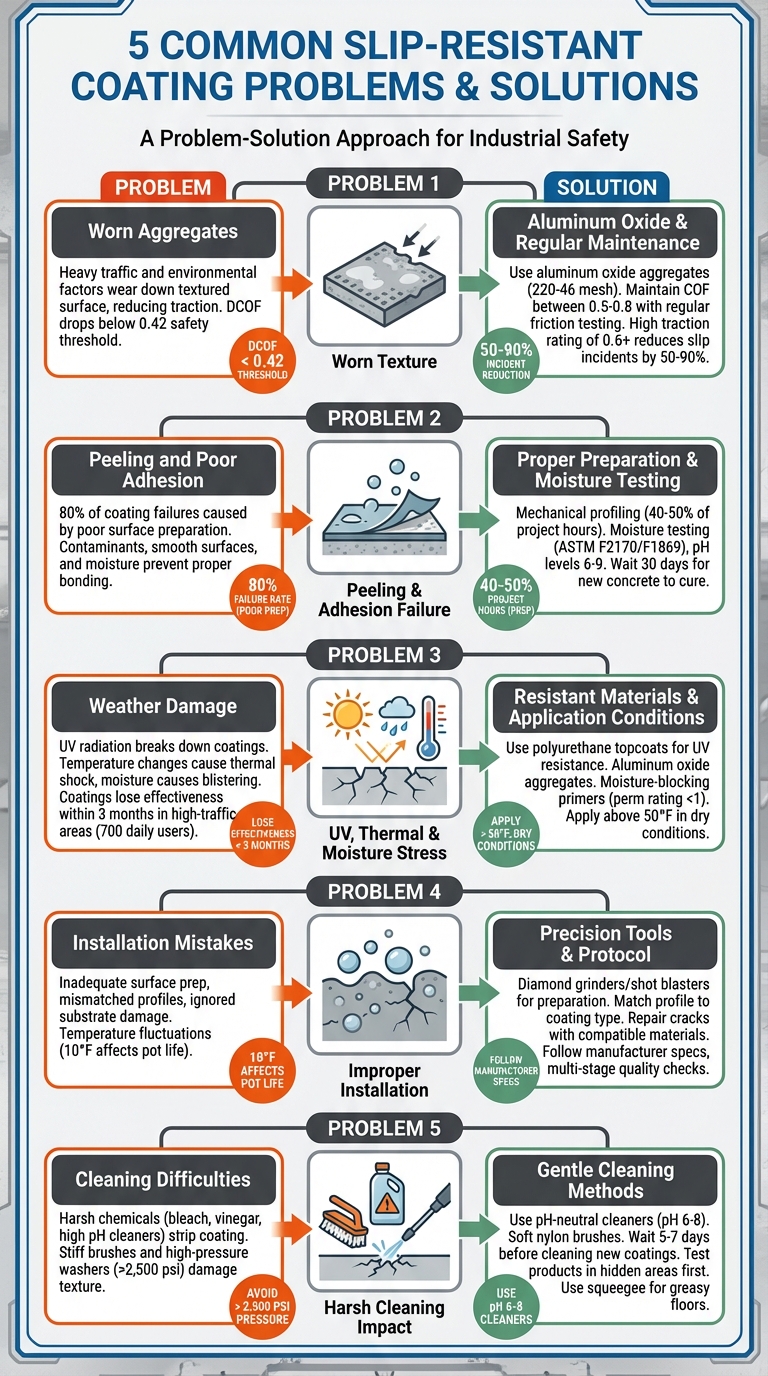
Slip-resistant coatings are designed to improve floor safety but often face challenges that impact their durability and effectiveness. Key issues include worn aggregates, peeling, weather damage, installation mistakes, and cleaning difficulties. Here’s a quick summary of the problems and their solutions:
- Worn Aggregates: Heavy traffic and environmental factors can wear down the textured surface, reducing traction. Solution: Use durable aggregates like aluminum oxide and regularly test friction levels.
- Peeling: Poor surface preparation leads to adhesion failures. Solution: Ensure proper cleaning, profiling, and moisture testing before application.
- Weather Damage: UV rays, moisture, and temperature changes degrade coatings. Solution: Opt for UV-resistant materials like polyurea and manage moisture with primers.
- Installation Errors: Uneven surfaces or improper application can cause flaws. Solution: Follow strict preparation and application protocols.
- Cleaning Issues: Harsh chemicals and abrasive tools damage coatings. Solution: Use pH-neutral cleaners and soft brushes for maintenance.
Each problem has practical fixes, from choosing the right materials to maintaining a strict cleaning routine. Proper preparation, quality materials, and ongoing care ensure these coatings stay safe and durable over time.
5 Common Slip-Resistant Coating Problems and Solutions
The Problem With Reapplying Anti-Slip Coatings on Showers
Problem 1: Worn Aggregates and Reduced Traction
Over time, the embedded aggregates in flooring can wear away, leaving the surface smoother and more prone to slipping hazards. This wear diminishes the "peak-to-trough differential" – the textured surface that provides friction. As a result, the Dynamic Coefficient of Friction (DCOF) drops below safe thresholds. A floor that once met the recommended 0.42 DCOF standard can quickly become a safety risk, especially when exposed to moisture or contaminants.
What Causes Aggregate Wear
Understanding the causes of aggregate wear is key to preventing and addressing the issue. Heavy foot traffic and the use of mechanical equipment are major factors. Forklifts, pallet jacks, and continuous pedestrian movement grind down or dislodge aggregates from the resin binder. In busy facilities, this type of abrasion can significantly reduce a coating’s effectiveness in a matter of months.
Environmental conditions also play a role. Rapid temperature changes, such as those caused by steam cleaning or seasonal weather shifts, weaken the bond between the coating and the aggregate. Harsh chemicals and frequent high-pressure cleaning further degrade the surface. The type of aggregate used is also critical – cheaper materials like sand wear down much faster than more durable options like aluminum oxide. If the resin binder lacks the strength to hold the aggregates securely, the surface becomes smooth and hazardous under normal use.
How to Restore Traction
Once the causes of wear are identified, restoring traction becomes manageable. Opting for aluminum oxide aggregates is a smart upgrade, as they provide a more durable and longer-lasting surface compared to standard sand. These aggregates come in a range of sizes, from 220 to 46 mesh, allowing customization of traction levels. Pairing them with advanced epoxy formulations ensures a more secure bond.
Regular friction testing is essential to monitor DCOF levels and detect when the surface falls below safety standards. Aim to maintain a Coefficient of Friction between 0.5 and 0.8. Research shows that surfaces with a high traction rating of 0.6 or greater can reduce slip-and-fall incidents by 50% to 90%. For localized wear, sanding or buffing the area before applying a new aggregate topcoat can restore its slip resistance. However, be cautious with the thickness of the lock coat – applying too much can bury the aggregate’s angular profile, negating its effectiveness.
Atlas Concrete Coatings offers polyurea systems designed to withstand mechanical and environmental wear. Their industrial flooring solutions incorporate high-quality aggregates and meticulous installation techniques to ensure durability, even in high-traffic environments with heavy equipment and frequent cleaning.
Problem 2: Peeling and Poor Adhesion
Peeling isn’t just an eyesore – it’s a safety concern. Loose edges can trip people, and exposed concrete loses its slip-resistant qualities. Let’s dive into why adhesion failures happen and how to prevent them.
Why Coatings Peel or Fail to Stick
Adhesion failures often start long before the coating even touches the concrete. Believe it or not, 80% of coating failures are caused by poor surface preparation. Contaminants such as grease, oil, animal fats, and dirt can create an invisible barrier, while leftover curing compounds, sealers, or bond breakers chemically clash with new slip-resistant coatings.
If the surface is too smooth, it lacks the necessary texture – or "tooth" – that helps the coating grip during curing. This can lead to ripples, bubbling, or even complete detachment. Additionally, a fragile top layer of concrete, called laitance, must be completely removed. Otherwise, the coating bonds to this weak layer instead of the solid concrete underneath, leading to failure.
Other culprits include excess moisture and improper pH levels (outside the 6–9 range), which weaken the bond and cause issues like blistering or peeling. Rapid temperature changes, such as those caused by steam cleaning, can also create thermal shock, where the coating and concrete expand at different rates, further damaging adhesion.
How to Prevent Adhesion Failure
Knowing the causes makes it easier to prevent adhesion problems. Surface preparation is critical and should account for 40% to 50% of total project man-hours. Mechanical profiling methods – like shotblasting, diamond grinding, or abrasive blasting – help create the rough texture needed for coatings to adhere properly. The goal is a surface that feels like medium-grit sandpaper.
Before applying any coating, it’s essential to test for moisture. Standards like ASTM F2170 or ASTM F1869 ensure the concrete is dry enough for the coating to stick. In areas prone to high moisture, a moisture-blocking primer adds an extra layer of protection.
Chemical cleaning is another important step, as it removes oils and contaminants that mechanical methods might miss. After profiling, vacuuming thoroughly removes dust and loose particles that could interfere with adhesion. For new concrete, waiting at least 30 days for it to cure at 75°F ensures it’s ready for coating.
At Atlas Concrete Coatings, these preparation steps are treated as non-negotiable. Their polyurea systems use a multi-layer approach, including a primer, a high-build base coat, and a protective topcoat. This method creates strong bonding points, making their coatings resistant to both environmental and mechanical stresses.
Problem 3: Damage from Weather and Environmental Factors
Weather can be tough on slip-resistant coatings. Sunlight, rain, freezing temperatures, and even dirt tracked in from outside can wear them down over time. Knowing how these elements affect coatings is key to picking ones that last.
How Weather Affects Coatings
UV radiation is a major culprit. Over time, it breaks down certain coatings, especially standard epoxies, causing chalking and reducing traction. This isn’t just an aesthetic issue – it can compromise safety by affecting the coating’s performance.
Temperature changes also take a toll. Coatings tend to expand and contract more than the concrete underneath them, especially during rapid temperature shifts or steam cleaning. This leads to thermal shock, which weakens the bond between the coating and the surface. Epoxies are particularly vulnerable to these changes, which can impact both how they cure and how well they perform over time.
Moisture poses another challenge. It seeps into porous concrete, weakening the bond between the coating and the surface. When combined with freeze-thaw cycles, this can cause blistering and delamination.
Outdoor contaminants, like grit and industrial chemicals, also wear down the coating, making it less effective over time. High alkalinity in concrete can add to the problem, leading to peeling or discoloration.
Together, these factors speed up the aging process of coatings, steadily reducing their slip resistance. Studies show that anti-slip coatings can lose effectiveness significantly within three months, especially in high-traffic areas with around 700 daily users.
Ways to Protect Coatings from the Elements
Protecting coatings from weather damage requires a combination of smart product choices and proper application techniques.
Start by selecting the right coating system. For outdoor use, polyurethane-based topcoats are a better option than standard epoxies. They resist UV damage and retain their gloss longer. In areas with extreme temperature changes, high-build systems like 1/4" urethane cement are ideal for their thermal shock resistance.
To improve durability, consider using aluminum oxide aggregates instead of standard sand. These create a tougher, more resilient slip-resistant surface. They come in various sizes, from fine textures (220 mesh) to more aggressive ones (46 mesh).
Managing moisture is also crucial. Before applying a coating, test the concrete using ASTM F2170 or ASTM F1869 standards to ensure it’s dry enough for proper adhesion. In areas with high moisture, moisture-blocking primers or semi-impermeable coatings with a perm rating below 1 can act as effective barriers. Sealing floor-to-wall joints also prevents water from seeping in as the concrete shrinks.
Application techniques matter just as much as the products you choose. The first coat should be thoroughly worked into the surface using back-brushing, followed by a second coat to ensure full coverage. If pinholes remain, additional coats can help seal them. Always apply coatings in temperatures above 50°F and during dry, rain-free conditions to allow proper curing.
Atlas Concrete Coatings offers solutions designed to withstand these challenges. Their polyurea-based systems provide better UV resistance and flexibility compared to standard epoxies. By combining moisture-resistant primers with UV-resistant topcoats, they create a multi-layer defense against weather and environmental stress. For outdoor areas like pool decks, their coatings are built to endure sun exposure, water, and temperature swings while maintaining slip resistance and durability.
sbb-itb-4b4bb37
Problem 4: Inconsistent Texture and Installation Mistakes
Even the best coatings can fail when installation errors lead to uneven, unsafe surfaces. These flaws not only affect the appearance but also pose safety hazards and reduce the coating’s durability.
Common Installation Errors
One of the most frequent mistakes is inadequate surface preparation. Installers often neglect to remove contaminants like oil, grease, or old sealers, which can prevent the coating from bonding properly. This results in peeling or bubbling. As Robert R. Cain, President of Key Resin Company, explains:
"Surface preparation is the most important step in the installation process and is critical to long-term performance of the total system."
Another common issue stems from mismatched surface profiles. If the concrete is too smooth, the coating can’t grip effectively, leading to shifting or rippling during curing. Jamie Gillespie from CPC Floor Coatings highlights this problem:
"Uneven coating, bubbles, or ripples can occur when the texture of the prepared surface is not enough for the coating to ‘grip’ onto while being applied."
On the other hand, applying a thin-film coating (1–10 mils) over a heavily textured surface can reveal imperfections. Cain notes:
"A thin-film coating will require preparation that will not leave a heavy profile. A heavy profile may require a leveling or fill coat before the thin film installation. This could double the estimated material cost."
Ignoring substrate damage is another critical misstep. Cracks, pits, and spalls in the concrete can transfer to the finished coating, creating an uneven, flawed texture. Using incompatible patching materials can also weaken the system. Additionally, temperature fluctuations as small as 10°F can shorten the coating’s pot life and affect its flow. Moisture-related issues, like outgassing, can cause bubbles and pinholes, further disrupting the texture.
To avoid these problems, installers must follow strict preparation and application protocols.
How to Ensure Consistent Results
Achieving a flawless finish starts with proper mechanical preparation and strict adherence to manufacturer guidelines. Tools like diamond grinders or shot blasters are essential for removing the top layer of concrete and creating a clean surface for optimal adhesion.
The surface preparation should match the type of coating being applied. Thin-film coatings require a smoother profile, while high-build systems or slurries can cover minor irregularities but need precise aggregate distribution.
Following manufacturer instructions is non-negotiable. Technical data sheets provide critical details, including ideal working temperatures, humidity levels, and mixing ratios. Repair all cracks and damage with compatible materials, and ensure the substrate is level before applying the coating. Quality checks should be performed at every stage – after surface preparation, priming, and during application – to ensure even aggregate spread and proper thickness.
Atlas Concrete Coatings exemplifies this meticulous approach. Their technicians thoroughly prepare surfaces, check moisture levels and profiles, and apply polyurea systems with precision. Their multi-step quality inspection process catches potential issues early, ensuring that slip-resistant floors perform consistently and safely over time. Careful installation not only enhances immediate safety but also extends the coating’s lifespan.
Problem 5: Cleaning Difficulties and Product Compatibility
Cleaning slip-resistant coatings can be tricky. While these coatings are designed to prevent slips and falls, they require careful maintenance to stay effective. Unfortunately, improper cleaning methods often damage the textured surface, reducing its effectiveness. Using the wrong chemicals or tools can strip the coating, dull its finish, or even create a slippery layer that defeats its purpose.
Why Cleaning Slip-Resistant Coatings Is Difficult
The very texture that provides traction also collects dirt, grease, and debris. These particles can act like sandpaper, scratching and dulling the surface over time. If cleaning methods are too aggressive, they can make the problem worse.
Harsh chemicals are a major culprit. High-concentration degreasers, enzyme-based cleaners, and wax strippers can soften or discolor the coating. Even everyday cleaners like bleach, vinegar, or Pine-Sol can contain acids or alkalis that harm the finish. According to industry guidelines, cleaners with a pH that’s too acidic or too alkaline can dull or strip sealed floors entirely.
The tools used for cleaning can also cause damage. Stiff brushes, abrasive pads, and high-pressure washers can wear down the textured surface. Experts suggest using soft nylon bristle brushes for textured slip-resistant floors. These brushes can clean deep into the surface without causing additional wear.
It’s also important to let new coatings cure properly before cleaning. Coatings need at least five days before they can handle moisture and seven days before mechanical scrubbing. Using pressure washers above 2,500 psi can gouge or even peel the coating. These challenges highlight why cleaning protocols must be as carefully planned as the installation and maintenance processes.
Proper Cleaning and Maintenance Methods
To keep slip-resistant coatings effective, follow these cleaning guidelines:
- For daily cleaning, use neutral cleaners with a pH between 6 and 8.
- In industrial or kitchen settings, where heavy-duty cleaning may be needed, use degreasers with a pH of 9 to 11. These emulsify oils effectively, but it’s crucial to rinse thoroughly to avoid leaving residue. Products like Dawn dish soap, citrus-based cleaners, or Simple Green All-Purpose Cleaner are excellent choices that won’t harm the finish.
Always test new cleaning products in a small, hidden area before applying them to the entire floor. For textured surfaces, use soft nylon bristle brushes to clean deeply without causing damage. Smooth floors, on the other hand, are best cleaned with white or red pads, and scrubbing machine pad loads should stay under 50 lbs.
Let cleaning solutions sit for 5–15 minutes to loosen dirt before scrubbing. Avoid using mops on greasy floors, as they can spread contaminants. Instead, opt for a squeegee or wet vacuum to remove emulsified oils effectively.
Atlas Concrete Coatings supports these practices by providing clients with detailed maintenance guides tailored to their polyurea systems. Their recommendations emphasize using pH-neutral cleaners and proper tools to avoid costly mistakes. By sticking to these protocols, slip-resistant coatings can maintain their safety and appearance for years, protecting both the floor and the people who rely on it.
Conclusion: Maintaining Slip-Resistant Coatings Over Time
Slip-resistant coatings face several common challenges – worn aggregates, peeling, weather damage, installation mistakes, and cleaning issues. Fortunately, each of these problems has a clear solution.
At the heart of long-term performance lies proper surface preparation. Neglecting this step can lead to bond failures and other adhesion problems. For best results, it’s essential to test moisture levels following ASTM standards and thoroughly remove contaminants before applying the coating.
Choosing the right materials also plays a big role in durability. Polyurea systems, for instance, tend to last longer and offer lower lifecycle costs compared to traditional epoxy coatings. Additionally, opting for aluminum oxide instead of sand creates a tougher, more durable slip-resistant surface.
Maintenance is just as important as installation. Regular sweeping removes abrasive debris that could damage the surface, while pH-neutral cleaners and soft nylon brushes help preserve the coating’s texture. Addressing chips or gouges immediately prevents moisture from seeping in and causing further damage. Companies like Atlas Concrete Coatings provide detailed maintenance guides specifically for their polyurea systems, helping users care for their floors and avoid unnecessary repairs.
When you combine professional installation, high-quality materials, and consistent upkeep, you can ensure your slip-resistant coating remains effective. These steps not only enhance safety but also extend the life of the coating, keeping floors protected for years to come.
FAQs
How can I check if my slip-resistant coating is safe and effective?
To check if your slip-resistant coating is doing its job, you can measure its friction levels using widely accepted testing methods. Start by thoroughly cleaning the surface to get rid of any dust or debris. If you’re testing for wet conditions, lightly spray the area with water or an oil-based solution, depending on the type of environment you’re trying to replicate.
Some common testing methods include:
- Pendulum Test: This measures slip resistance on both dry and wet surfaces.
- Dynamic Coefficient of Friction (DCOF) Test: Often carried out using a portable tribometer, this test evaluates how slippery a surface is under specific conditions.
- Oil-Wet Ramp Test: This method is particularly useful for areas exposed to grease or industrial environments.
Once you’ve gathered your results, compare them to safety guidelines like those from the ADA or ANSI. These standards typically recommend a DCOF of 0.5 or higher to qualify as a safe surface.
For added reassurance, consider reaching out to experts. Companies like Atlas Concrete Coatings offer on-site slip-resistance testing and detailed compliance reports. They can help confirm that your flooring meets U.S. safety standards and minimizes the risk of slip-and-fall accidents.
How do I prepare a surface for applying a slip-resistant coating?
To guarantee a long-lasting and effective slip-resistant coating, getting the surface preparation right is crucial. Here’s how to do it:
- Inspect the surface: Look for cracks, stains, loose material, or moisture. Fix any problems, like filling cracks or cleaning up oil and grease.
- Clean thoroughly: Use a degreaser to break down contaminants, then pressure wash the area to remove any residue. Make sure the surface is completely dry and free of dust before moving forward.
- Repair damage: Use a proper filler to patch up any damaged areas. Once repaired, sand or grind these spots to create a smooth and even surface.
- Add texture: Roughen the concrete by diamond grinding or shot-blasting. This step improves adhesion and ensures the slip-resistant aggregates stick properly.
- Apply a primer: Use a high-quality primer to seal the concrete and enhance the bond with the topcoat. Let the primer cure completely before applying the slip-resistant coating.
By following these steps, you’ll create a clean, stable, and textured base, setting the stage for a durable and reliable slip-resistant coating.
What cleaning products are safe to use on slip-resistant coatings without causing damage?
To keep slip-resistant coatings in good condition without risking damage, stick to a neutral-pH floor cleaner (pH between 6 and 8) or a mild degreaser made specifically for slip-resistant surfaces. Steer clear of harsh chemicals like strong degreasers, enzyme-based cleaners, wax strippers, or abrasive products, as these can wear down the coating over time.
For optimal care, always refer to the manufacturer’s cleaning and maintenance guidelines to preserve the coating’s longevity and effectiveness.