
Want a garage floor coating that lasts? Start with the right tools. Proper tools ensure strong adhesion, even application, and a finish that resists wear and tear. Here’s a quick rundown:
- Surface Prep Tools: Diamond grinders (for CSP 3-4), shot blasters (dust-free for industrial projects), handheld grinders for edges, and water testing for porosity.
- Mixing Tools: High-speed corded drills with mixing paddles for uniform blending.
- Application Tools: 1/8" notched squeegees, 3/8" nap rollers, and spiked shoes for precision.
- Safety Gear: NIOSH-approved respirators, nitrile gloves, goggles, and ear protection.
Key Tip: Achieving a CSP 3-4 with diamond grinding ensures a bond up to 4x stronger than standard epoxy coatings. Use these tools to avoid peeling, bubbling, or delamination and get a professional-grade finish.
Now, let’s dive into the details.
These will make your Epoxy Jobs Easier!
Surface Preparation Tools
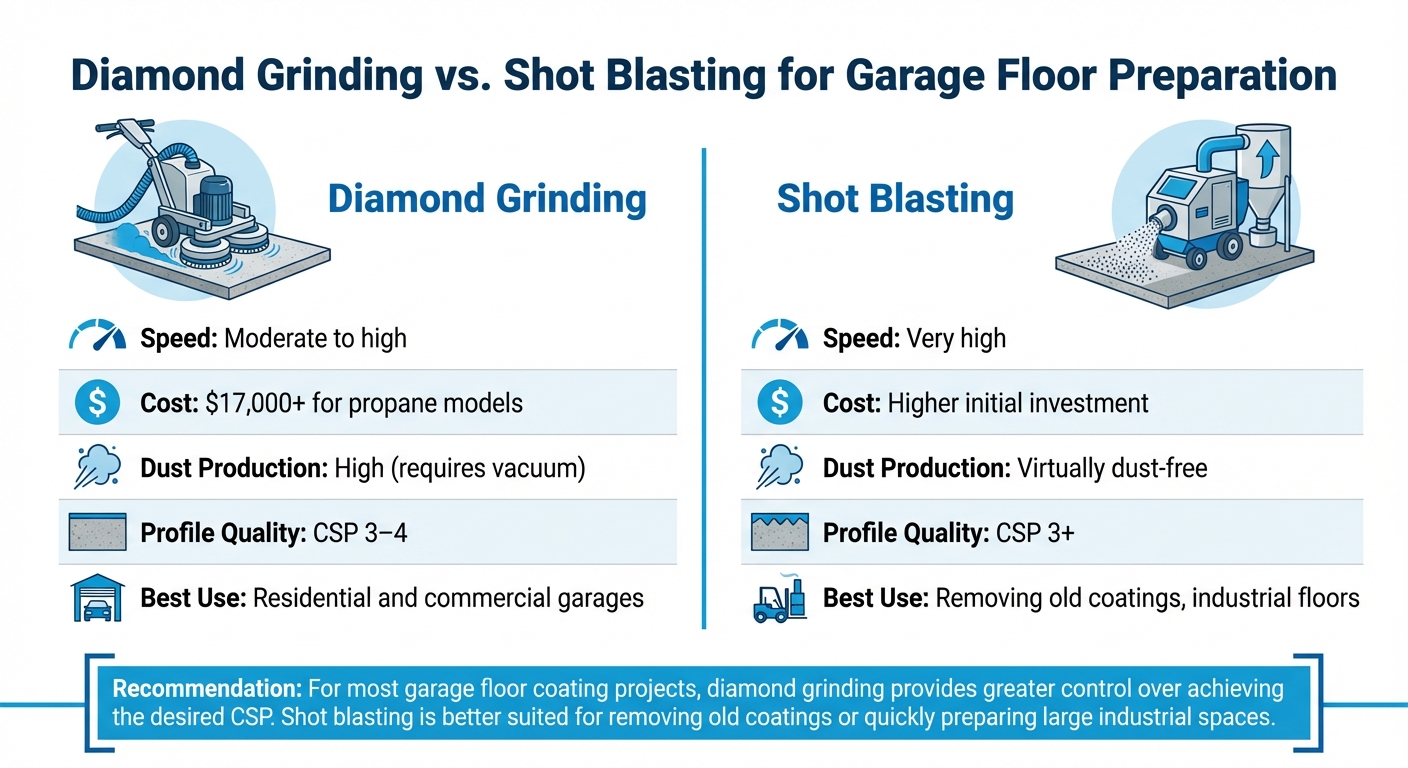
Diamond Grinding vs Shot Blasting for Garage Floor Preparation
To ensure proper coating adhesion, achieving a CSP (Concrete Surface Profile) of 3–4 is key.
Grinding and Blasting Equipment
Diamond grinders are a go-to choice for preparing both residential and commercial floors. These machines use diamond-faced stones on rotating plates to remove surface contaminants and create the perfect texture for coatings to adhere.
"A diamond grinder can produce CSPs of 3 or more, up to 4 in some cases, which, when prepping concrete for epoxy, polyurea or polyaspartic applications is in the Goldilocks range." – Robert Hanson, President and Founder, GarageFloorCoating.com
For larger projects, propane-powered grinders offer a cord-free alternative with faster performance compared to electric models. These professional-grade machines, priced at $17,000 or more, provide consistent results over expansive areas.
Shot blasters, on the other hand, use high-velocity steel balls to strip coatings and profile surfaces. With built-in vacuum systems, they operate virtually dust-free, making them ideal for industrial spaces or soft concrete removal. However, they can produce a CSP greater than 4, which might be too aggressive for standard residential projects.
If heavy-duty concrete removal is required, mechanical scarifiers (also called rotomillers) are the tool of choice. These machines generate CSPs exceeding 4, but they’re not typically used for routine polyurea preparation.
Once mechanical preparation is complete, a simple water test can confirm surface porosity. If water beads instead of soaking in, additional grinding is needed. For tight spots or edges, specialized tools are necessary.
Edge Cleanup Tools
Handheld grinders equipped with concrete-sanding plates are perfect for corners, edges, and other hard-to-reach areas, ensuring a consistent surface profile.
For stubborn adhesives, paint, or debris along baseboards and corners, a 13-inch angled razor scraper is highly effective.
It’s crucial to inspect edges and corners after preparation. If water beads near walls but absorbs into the main floor, adhesion inconsistencies could lead to coating failure.
Grinding vs. Shot Blasting Comparison
Both diamond grinding and shot blasting can achieve the required surface profile, but each method has its strengths depending on the project:
| Feature | Diamond Grinding | Shot Blasting |
|---|---|---|
| Speed | Moderate to high | Very high |
| Cost | $17,000+ for propane models | Higher initial investment |
| Dust Production | High (requires vacuum) | Virtually dust-free |
| Profile Quality | CSP 3–4 | CSP 3+ |
| Best Use | Residential and commercial garages | Removing old coatings, industrial floors |
For most garage floor coating projects, diamond grinding provides greater control over achieving the desired CSP. Shot blasting is better suited for removing old coatings or quickly preparing large industrial spaces.
Selecting the right tools for surface preparation is essential to ensure a strong bond and long-lasting results.
Mixing and Application Tools
After prepping the surface, selecting the right tools for mixing and application is key to achieving a smooth and long-lasting polyurea finish.
Drill Mixer and Mixing Paddles
For mixing polyurea components, a high-speed corded drill is essential. Cordless drills just don’t have the torque required for a thorough and uniform blend.
"The proper mixing of epoxy requires good equipment. Use a powerful, high-speed corded drill with appropriate mixing blade." – Robert Hanson, President and Founder, GarageFloorCoating.com
Avoid stirring by hand or shaking the bucket – it won’t produce the consistency you need. Instead, use mixing paddle attachments suited to your batch size. Smaller paddles work well for compact kits, while heavy-duty paddles are better for larger quantities. Keep the drill at a slow mixing speed to prevent air bubbles from forming. Be sure to scrape the sides and bottom of the bucket during mixing to ensure all pigment is evenly incorporated and nothing settles.
If your project involves multiple kits, mix all tinted materials together in a 5-gallon bucket before application to ensure consistent color across the floor. Timing is crucial – over-mixing can generate heat, speeding up the chemical reaction and shortening your working time.
Once the polyurea is fully mixed, transfer it immediately to begin application. Use the correct rollers and squeegees for the job to ensure an even coat.
Rollers and Squeegees
For polyurea coatings, a 3/8-inch nap roller works best, while a solvent-resistant chip brush is ideal for edges. Replace roller covers every 400–500 ft² to maintain a consistent finish. If you’re using a 100% solids system, opt for a 1/8-inch notched squeegee to achieve the correct dry film thickness.
For larger spaces, an 18-24 inch speed squeegee can help you cover more area quickly. Hold the squeegee at a 30° angle and pull it evenly across the floor for a uniform application.
When back-rolling a clear coat, first saturate the roller with a small amount of material to prevent it from pulling up coating already on the floor. For color coats, skip the paint tray – pour the mixed polyurea directly onto the floor in ribbons. Use a squeegee to spread it out evenly before back-rolling. This method ensures a smooth and professional finish.
sbb-itb-4b4bb37
Finishing and Detailing Tools
After the initial application, finishing and detailing tools are key to achieving a polished, professional result.
Squeegees for Large Areas
These tools help create a smooth and even surface, especially on expansive floors. For optimal results, a 14-inch or 16-inch squeegee is preferred over wider models. The smaller size adapts better to the natural unevenness of concrete, preventing excess coating from pooling in low spots.
"We typically use a 14-inch or 16-inch squeegee instead of the 2-foot- or 3-foot-wide ones, because they don’t leave as much epoxy in the lower spots on the floor." – Tim Seay, Concrete Finisher, Decorative Concrete of Virginia
To ensure the coating remains wet enough for proper application, work in manageable sections of about 3′×6′. After using the squeegee, follow up with a lint-free roller to back-roll the surface. This step removes any lines left by the squeegee and ensures a smooth, uniform finish.
For added precision and detail, spiked shoes can be an invaluable tool.
Spiked Shoes
Gunite spiked shoes allow you to step directly onto wet coatings without leaving marks. They are particularly useful for back-rolling and evenly distributing decorative flakes. Make sure the straps are adjusted snugly over your work boots for stability – having a helper can make this process easier. When walking on the surface, apply steady, even pressure to maintain a consistent coating depth.
These tools, when used correctly, ensure a flawless finish that meets professional standards.
Safety and Accessory Tools
Once you’ve prepped the surface and ensured application standards, it’s time to focus on safety and the right tools. Floor coating projects involve exposure to hazardous chemicals and fine dust, so using proper safety gear is non-negotiable.
Personal Protective Equipment (PPE)
Protect yourself with a NIOSH-approved respirator – either a half-mask or full-face model with organic vapor cartridges – to filter out harmful fumes from polyurea and epoxy coatings. When grinding or sanding concrete, add P100 or N100 particulate filters to shield yourself from respirable crystalline silica, a dangerous fine dust. If you notice chemical odors, it’s time to replace the cartridges.
For hand protection, wear chemical-resistant nitrile gloves to avoid contact with resin. Skip the acetone for cleaning and opt for specialized resin-removal creams instead. For tasks like grinding, choose tear-proof gloves for extra durability. Safety goggles with side shields will guard against chemical splashes and flying debris. To reduce skin exposure, wear long-sleeved coveralls and change out of contaminated clothing immediately. Steel-toed boots offer foot protection, and knee pads can help reduce strain during floor-level work. Lastly, if you’re working with loud machinery, don’t forget earplugs or earmuffs to protect your hearing.
Measuring and Marking Tools
Accurate measuring and marking are key to a flawless finish. Use 5-gallon pails to ensure the correct resin-to-hardener ratios and consistent color mixing. To create clean boundaries and protect surfaces like walls and trim, apply painter’s tape. For sharp edges near garage door openings, snap a chalk line, lay down duct tape along the edge, and peel it off while the coating is still wet for a crisp, clean line. These tools help ensure precision and safety during application.
Anti-Skid Additive Applicators
To minimize slip hazards, apply anti-skid additives like aluminum oxide or vinyl flakes. Spiked shoes are a game-changer here, letting you walk across wet coatings to evenly broadcast anti-skid media and flakes without leaving footprints. For smaller, hard-to-reach areas like edges and corners, use a high-quality brush for precise application. Always apply anti-skid additives while the coating is wet and keep the temperature between 70°F and 80°F throughout application and curing to ensure proper bonding.
"Anti-Skid additive is essential for the topcoat of any coating system." – GarageFlooringLLC.com
Conclusion
Using the right tools is key to creating a strong bond that resists peeling, delamination, and hot tire pickup. Achieving a Concrete Surface Profile (CSP) of 3–4 with diamond grinders can result in a bond that’s up to four times stronger than standard epoxy coatings.
Every tool has a purpose. From grinders that shape the surface profile to notched squeegees that ensure precise mil thickness, these tools are essential for building a durable, three-dimensional coating system. Safety gear, like NIOSH-approved respirators and chemical-resistant gloves, protects installers during the 72-hour curing process, while drill mixers maintain color consistency and prevent premature hardening. Combining proper tools with the right techniques ensures a coating system that stands the test of time.
FAQs
Why is achieving a CSP 3-4 important for garage floor coatings?
Achieving a CSP 3-4 (Concrete Surface Profile) is essential for ensuring garage floor coatings bond properly. This specific level of surface roughness creates the ideal texture for strong adhesion, which helps avoid problems like peeling or delamination down the line.
When you prepare concrete to meet this standard, you’re laying the groundwork for a coating that’s built to last. This preparation step is critical for ensuring durability and helping the coating stand up to everyday wear and tear.
Why are diamond grinders better than shot blasters for garage floor coatings?
Diamond grinders are a top choice for garage floor coating projects because they create a concrete surface profile (CSP) in the ideal range of 3 to 4. This range is perfect for ensuring coatings like polyurea, epoxy, or polyaspartic adhere securely. The result? A surface that’s smooth enough for a polished look but textured just right for long-lasting durability.
Shot blasters, on the other hand, often leave behind a much rougher finish with higher CSP levels. While this might work for industrial settings, it’s usually overkill for residential garages. The precision and control offered by diamond grinders make them the go-to option for achieving a professional, durable finish.
Why are spiked shoes important for applying a garage floor coating?
Spiked shoes play a key role when installing garage floor coatings. They let you move across the wet surface without causing any damage, like smudges or uneven spots. The spikes help maintain a clean, smooth finish while also offering better stability and control throughout the process.